The Flask Mega-Tutorial, Part XXII: Background Jobs
Posted by
on underThis is the twenty second installment of the Flask Mega-Tutorial series, in which I'm going to tell you how to create background jobs that run independently of the web server.
You are reading the 2024 edition of the Flask Mega-Tutorial. The complete course is also available to order in e-book and paperback formats from Amazon. Thank you for your support!
If you are looking for the 2018 edition of this course, you can find it here.
For your reference, here is the complete list of articles in this series:
- Chapter 1: Hello, World!
- Chapter 2: Templates
- Chapter 3: Web Forms
- Chapter 4: Database
- Chapter 5: User Logins
- Chapter 6: Profile Page and Avatars
- Chapter 7: Error Handling
- Chapter 8: Followers
- Chapter 9: Pagination
- Chapter 10: Email Support
- Chapter 11: Facelift
- Chapter 12: Dates and Times
- Chapter 13: I18n and L10n
- Chapter 14: Ajax
- Chapter 15: A Better Application Structure
- Chapter 16: Full-Text Search
- Chapter 17: Deployment on Linux
- Chapter 18: Deployment on Heroku
- Chapter 19: Deployment on Docker Containers
- Chapter 20: Some JavaScript Magic
- Chapter 21: User Notifications
- Chapter 22: Background Jobs (this article)
- Chapter 23: Application Programming Interfaces (APIs)
This chapter is dedicated to the implementation of long or complex processes that need to run as part of the application. These processes cannot be executed synchronously in the context of a request because that would block the response to the client for the duration of the task. I briefly touched on this topic in Chapter 10, when I moved the sending of emails to background threads to prevent the client from having to wait during those 3-4 seconds that it takes to send an email. While using threads for emails is acceptable, this solution does not scale well when the processes in question are much longer. The accepted practice is to offload long tasks to a worker process, or more likely to a pool of them.
To justify the need for having long running tasks, I'm going to introduce an export feature to Microblog through which users will be able to request a data file with all their blog posts. When a user makes use of this option, the application is going to start an export task that will generate a JSON file with all the user's posts, and then send it to the user by email. All this activity is going to happen in a worker process, and while it happens the user will see a notification showing the percentage of completion.
The GitHub links for this chapter are: Browse, Zip, Diff.
Introduction to Task Queues
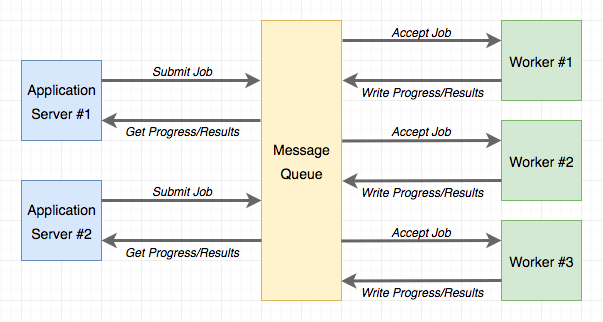
Task queues provide a convenient solution for the application to request the execution of a task by a worker process. Worker processes run independently of the application and can even be located on a different system. The communication between the application and the workers is done through a message queue. The application submits a job, and then monitors its progress by interacting with the queue. The following diagram shows a typical implementation:
The most popular task queue for Python is Celery. This is a fairly sophisticated package that has many options and supports several message queues. Another popular Python task queue is Redis Queue or just RQ, which sacrifices some flexibility, such as only supporting a Redis message queue, but in exchange it is much simpler to set up than Celery.
Both Celery and RQ are perfectly adequate to support background tasks in a Flask application, so my choice for this application is going to favor the simplicity of RQ. However, implementing the same functionality with Celery should be relatively easy. If you are interested in Celery more than RQ, you can read the Using Celery with Flask article that I have on my blog.
Using RQ
RQ is a standard Python package, that is installed with pip:
(venv) $ pip install rq
(venv) $ pip freeze > requirements.txt
As I mentioned earlier, the communication between the application and the RQ workers is going to be carried out in a Redis message queue, so you need to have a Redis server running. There are many options to get a Redis server installed and running, from one-click installers to downloading the source code and compiling it directly on your system. If you are using Windows, Microsoft maintains installers here. On Linux, you can likely get it as a package through your operating system's package manager, and macOS users can run brew install redis and then start the service manually with the redis-server command.
You will not need to interact with Redis at all outside of just ensuring that the service is running and accessible to RQ.
Note that RQ does not run on the Windows native Python interpreter. If you are using the Windows platform, you can only run RQ under Unix emulation. The two Unix emulation layers that I recommend to Windows users are Cygwin and the Windows Subsystem for Linux (WSL), and both are compatible with RQ.
Creating a Task
I'm going to show you how to run a simple task through RQ so that you familiarize with it. A task, is nothing more than a Python function. Here is an example task, that I'm going to put in a new app/tasks.py module:
app/tasks.py: Example background task.
import time

def example(seconds):
    print('Starting task')
    for i in range(seconds):
        print(i)
        time.sleep(1)
    print('Task completed')
This task takes a number of seconds as an argument, and then waits that amount of time, printing a counter once a second.
Running the RQ Worker
Now that the task is ready, a worker can be starter. This is done with the rq worker command:
(venv) $ rq worker microblog-tasks
18:55:06 RQ worker 'rq:worker:miguelsmac.90369' started, version 0.9.1
18:55:06 Cleaning registries for queue: microblog-tasks
18:55:06
18:55:06 *** Listening on microblog-tasks...
The worker process is now connected to Redis, and watching for any jobs that may be assigned to it on a queue named microblog-tasks. In cases where you want to have multiple workers to have more throughput, all you need to do is run more instances of rq worker, all connected to the same queue. Then when a job shows up in the queue, any of the available worker processes will pick it up. In a production environment you will probably want to have at least as many workers as available CPUs.
Executing Tasks
Now open a second terminal window and activate the virtual environment on it. I'm going to use a shell session to kick off the example() task in the worker:
>>> from redis import Redis
>>> import rq
>>> queue = rq.Queue('microblog-tasks', connection=Redis.from_url('redis://'))
>>> job = queue.enqueue('app.tasks.example', 23)
>>> job.get_id()
'c651de7f-21a8-4068-afd5-8b982a6f6d32'
The Queue class from RQ represents the task queue as seen from the application side. The arguments it takes are the queue name, and a Redis connection object, which in this case I initialize with a default URL. If you have your Redis server running on a different host or port number, you will need to use a different URL.
The enqueue() method on the queue is used to add a job to the queue. The first argument is the name of the task you want to execute, given directly as a function object, or as an import string. I find the string option much more convenient, as that makes it unnecessary to import the function on the application's side. Any remaining arguments given to enqueue() are going to be passed to the function running in the worker.
As soon as you make the enqueue() call you are going to notice some activity on your first terminal window, the one running the RQ worker. You will see that the example() function is now running, and printing the counter once per second. At the same time, your other terminal is not blocked and you can continue evaluating expressions in the shell. In the example above, I called the job.get_id() method to obtain the unique identifier assigned to the task. Another interesting expression you can try with the job object is to check if the function on the worker has finished:
>>> job.is_finished
False
If you passed a 23 like I did in my example above, then the function is going to run for about 23 seconds. After that time, the job.is_finished expression will become True. Isn't this pretty cool? I really like the simplicity of RQ.
Once the function completes, the worker goes back to waiting for new jobs, so you can repeat the enqueue() call with different arguments if you want to experiment more. The data that is stored in the queue regarding a task will stay there for some time (500 seconds by default), but eventually will be removed. This is important, the task queue does not preserve a history of executed jobs.
Reporting Task Progress
The example task I have used above is unrealistically simple. Normally, for a long running task you will want some sort of progress information to be made available to the application, which in turn can show it to the user. RQ supports this by using the meta attribute of the job object. Let me rewrite the example() task to write progress reports:
app/tasks.py: Example background task with progress.
import time
from rq import get_current_job

def example(seconds):
    job = get_current_job()
    print('Starting task')
    for i in range(seconds):
        job.meta['progress'] = 100.0 * i / seconds
        job.save_meta()
        print(i)
        time.sleep(1)
    job.meta['progress'] = 100
    job.save_meta()
    print('Task completed')
This new version of example() uses RQ's get_current_job() function to get a job instance, which is similar to the one returned to the application when it submits the task. The meta attribute of the job object is a dictionary where the task can write any custom data that it wants to communicate to the application. In this example, I'm writing a progress item that represents the percentage of completion of the task. Each time the progress is updated I call job.save_meta() to instruct RQ to write the data to Redis, where the application can find it.
On the application side (currently just a Python shell), I can run this task and then monitor progress as follows:
>>> job = queue.enqueue('app.tasks.example', 23)
>>> job.meta
{}
>>> job.refresh()
>>> job.meta
{'progress': 13.043478260869565}
>>> job.refresh()
>>> job.meta
{'progress': 69.56521739130434}
>>> job.refresh()
>>> job.meta
{'progress': 100}
>>> job.is_finished
True
As you can see above, on this side the meta attribute is available to read. The refresh() method needs to be invoked for the contents to be updated from Redis.
Database Representation of Tasks
For the example above it was enough to start a task and watch it run. For a web application things get a bit more complicated, because once one of these task is started as part of a request, that request is going to end, and all the context for that task is going to be lost. Because I want the application to keep track of what tasks each user is running, I need to use a database table to maintain some state. Below you can see the new Task model implementation:
app/models.py: Task model.
# ...
import redis
import rq

class User(UserMixin, db.Model):
    # ...
    tasks: so.WriteOnlyMapped['Task'] = so.relationship(back_populates='user')

# ...

class Task(db.Model):
    id: so.Mapped[str] = so.mapped_column(sa.String(36), primary_key=True)
    name: so.Mapped[str] = so.mapped_column(sa.String(128), index=True)
    description: so.Mapped[Optional[str]] = so.mapped_column(sa.String(128))
    user_id: so.Mapped[int] = so.mapped_column(sa.ForeignKey(User.id))
    complete: so.Mapped[bool] = so.mapped_column(default=False)

    user: so.Mapped[User] = so.relationship(back_populates='tasks')

    def get_rq_job(self):
        try:
            rq_job = rq.job.Job.fetch(self.id, connection=current_app.redis)
        except (redis.exceptions.RedisError, rq.exceptions.NoSuchJobError):
            return None
        return rq_job

    def get_progress(self):
        job = self.get_rq_job()
        return job.meta.get('progress', 0) if job is not None else 100
An interesting difference between this model and the previous ones is that the id primary key field is a string, not an integer. This is because for this model, I'm not going to rely on the database's own primary key generation and instead I'm going to use the job identifiers generated by RQ.
The model is going to store the task's fully qualified name (as passed to RQ), a description for the task that is appropriate for showing to users, a relationship to the user that requested the task, and a boolean that indicates if the task completed or not. The purpose of the complete field is to separate tasks that ended from those that are actively running, as running tasks require special handling to show progress updates.
The get_rq_job() method is a helper method that loads the RQ Job instance, from a given task id, which I can get from the model. This is done with Job.fetch(), which loads the Job instance from the data that exists in Redis about it. The get_progress() method builds on top of get_rq_job() and returns the progress percentage for the task. This method has a couple of interesting assumptions. If the job id from the model does not exist in the RQ queue, that means that the job already finished and the data expired and was removed from the queue, so in that case the percentage returned is 100. On the other extreme, if the job exists, but there is no information associated with the meta attribute, then it is safe to assume that the job is scheduled to run, but did not get a chance to start yet, so in that situation a 0 is returned as progress.
To apply the changes to the database schema, a new migration needs to be generated, and then the database upgraded:
(venv) $ flask db migrate -m "tasks"
(venv) $ flask db upgrade
The new model can also be added to the shell context, to make it accessible in shell sessions without having to import it:
microblog.py: Add Task model to shell context.
import sqlalchemy as sa
import sqlalchemy.orm as so
from app import create_app, db
from app.models import User, Post, Message, Notification, Task

app = create_app()

@app.shell_context_processor
def make_shell_context():
    return {'sa': sa, 'so': so, 'db': db, 'User': User, 'Post': Post,
            'Message': Message, 'Notification': Notification, 'Task': Task}
Integrating RQ with the Flask Application
The connection URL for the Redis service needs to be added to the configuration:
class Config:
    # ...
    REDIS_URL = os.environ.get('REDIS_URL') or 'redis://'
As always, the Redis connection URL will be sourced from an environment variable, and if the variable isn't defined, a default URL that assumes the service is running on the same host and in the default port will be used.
The application factory function will be in charge of initializing Redis and RQ:
app/__init__.py: RQ integration.
# ...
from redis import Redis
import rq

# ...

def create_app(config_class=Config):
    # ...
    app.redis = Redis.from_url(app.config['REDIS_URL'])
    app.task_queue = rq.Queue('microblog-tasks', connection=app.redis)

    # ...
The app.task_queue is going to be the queue where tasks are submitted. Having the queue attached to the application is convenient because anywhere in the application I can use current_app.task_queue to access it. To make it easy for any part of the application to submit or check on a task, I can create a few helper methods in the User model:
app/models.py: Task helper methods in the user model.
# ...

class User(UserMixin, db.Model):
    # ...

    def launch_task(self, name, description, *args, **kwargs):
        rq_job = current_app.task_queue.enqueue(f'app.tasks.{name}', self.id,
                                                *args, **kwargs)
        task = Task(id=rq_job.get_id(), name=name, description=description,
                    user=self)
        db.session.add(task)
        return task

    def get_tasks_in_progress(self):
        query = self.tasks.select().where(Task.complete == False)
        return db.session.scalars(query)

    def get_task_in_progress(self, name):
        query = self.tasks.select().where(Task.name == name,
                                          Task.complete == False)
        return db.session.scalar(query)
The launch_task() method takes care of submitting a task to the RQ queue, along with adding it to the database. The name argument is the function name, as defined in app/tasks.py. When submitting to RQ, the function prepends app.tasks. to this name to build the fully qualified function name. The description argument is a friendly description of the task that can be presented to users. For the function that export the blog posts, I will set the name to export_posts and the description to Exporting posts.... The remaining arguments are positional and keyword arguments that will be passed to the task. The function begins by calling the queue's enqueue() method to submit the job. The job object that is returned contains the task id assigned by RQ, so I can use that to create a corresponding Task object in my database.
Note that launch_task() adds the new task object to the session, but it does not issue a commit. In general, it is best to operate on the database session in the higher level functions, as that allows you to combine several updates made by lower level functions in a single transaction. This is not a strict rule, and in fact, you are going to see an exception where a commit is issued in a child function later in this chapter.
The get_tasks_in_progress() method returns the complete list of functions that are outstanding for the user. You will see later that I use this method to include information about running tasks in the pages that are rendered to the user.
Finally, the get_task_in_progress() is a simpler version of the previous one that returns a specific task. I prevent users from starting two or more tasks of the same type concurrently, so before I launch a task, I can use this method to find out if a previous task is currently running.
Sending Emails from the RQ Task
This may seem like a distraction from the main topic, but I said above that when the background export task completes, an email is going to be sent to the user with a JSON file that contains all the posts. The email functionality that I built in Chapter 11 needs to be extended in two ways. First, I need to add support for file attachments, so that I can attach a JSON file. Second, the send_email() function always sends emails asynchronously, using a background thread. When I'm going to send an email from a background task, which is already asynchronous, having a second level background task based on a thread makes little sense, so I need to support both synchronous and asynchronous email sending.
Luckily, Flask-Mail supports attachments, so all I need to do is extend the send_email() function to take them in an additional argument, and then configure them in the Message object. And to optionally send the email in the foreground, I just need to add a boolean sync argument:
app/email.py: Send emails with attachments.
# ...

def send_email(subject, sender, recipients, text_body, html_body,
               attachments=None, sync=False):
    msg = Message(subject, sender=sender, recipients=recipients)
    msg.body = text_body
    msg.html = html_body
    if attachments:
        for attachment in attachments:
            msg.attach(*attachment)
    if sync:
        mail.send(msg)
    else:
        Thread(target=send_async_email,
               args=(current_app._get_current_object(), msg)).start()
The attach() method of the Message class accepts three arguments that define an attachment: the filename, the media type, and the actual file data. The filename is just the name that the recipient will see associated with the attachment, it does not need to be a real file. The media type defines what type of attachment is this, which helps email readers render it appropriately. For example, if you send image/png as the media type, an email reader will know that the attachment is an image, in which case it can show it as such. For the blog post data file I'm going to use the JSON format, which uses a application/json media type. The third and last argument is a string or byte sequence with the contents of the attachment.
To make it simple, the attachments argument to send_email() is going to be a list of tuples, and each tuple is going to have three elements which correspond to the three arguments of attach(). So for each element in this list, I need to send the tuple as arguments to attach(). In Python, if you have a list or tuple with arguments that you want to send to a function, you can use func(*args) to have that list expanded into the actual argument list, instead of having to use a more tedious syntax such as func(args[0], args[1], args[2]). So for example, if you have args = [1, 'foo'], the call will send two arguments, same as if you called func(1, 'foo'). Without the *, the call would have a single argument which would be the list.
As far as the synchronous sending of the email, what I needed to do is just revert back to calling mail.send(msg) directly when sync is True.
Task Helpers
While the example() task I used above was a simple standalone function, the function that exports blog posts is going to need some of the functionality I have in the application, like access to the database and the email sending function. Because this is going to run in a separate process, I need to initialize Flask-SQLAlchemy and Flask-Mail, which in turn need a Flask application instance from which to get their configuration. So I'm going to add a Flask application instance and application context at the top of the app/tasks.py module:
app/tasks.py: Create application and context.
from app import create_app

app = create_app()
app.app_context().push()
The application is created in this module because this is the only module that the RQ worker is going to import. When you use the flask command, the microblog.py module in the root directory creates the application, but the RQ worker knows nothing about that, so it needs to create its own application instance if the task functions need it. You have seen the app.app_context() method in a couple of places already, pushing a context makes the application be the "current" application instance, and this enables extensions such as Flask-SQLAlchemy to use current_app.config to obtain their configuration. Without the context, the current_app expression would return an error.
I then started thinking about how I was going to report progress while this function is running. In addition to passing progress information through the job.meta dictionary, I'd like to push notifications to the client, so that the completion percentage can be updated dynamically without the user having to refresh the page. For this I'm going to use the notification mechanisms I built in Chapter 21. The updates are going to work in a very similar way to the unread messages badge. When the server renders a template, it will include "static" progress information obtained from job.meta, but then once the page is on the client's browser, the notifications are going to dynamically update the percentage using notifications. Because of the notifications, updating the progress of a running task is going to be slightly more involved than how I did it in the previous example, so I'm going to create a wrapper function dedicated to updating progress:
app/tasks.py: Set task progress.
from rq import get_current_job
from app import db
from app.models import Task

# ...

def _set_task_progress(progress):
    job = get_current_job()
    if job:
        job.meta['progress'] = progress
        job.save_meta()
        task = db.session.get(Task, job.get_id())
        task.user.add_notification('task_progress', {'task_id': job.get_id(),
                                                     'progress': progress})
        if progress >= 100:
            task.complete = True
        db.session.commit()
The export task can call _set_task_progress() to record the progress percentage. The function first writes the percentage to the job.meta dictionary and saves it to Redis, then it loads the corresponding task object from the database and uses task.user to push a notification to the user that requested the task, using the existing add_notification() method. The notification is going to be named task_progress, and the data associated with it is going to be a dictionary with two items, the task identifier and the progress number. Later I will add JavaScript code to act on this new notification type.
The function checks if the progress indicates that the function has completed, and in that case also updates the complete attribute of the task object in the database. The database commit call ensures that the task and the notification object added by add_notification() are both saved immediately to the database. I needed to be very careful in how I designed the parent task to not make any database changes, since this commit call would write those as well.
Implementing the Export Task
Now all the pieces are in place for me to write the export function. The high level structure of this function is going to be as follows:
app/tasks.py: Export posts general structure.
def export_posts(user_id):
    try:
        # read user posts from database
        # send email with data to user
    except Exception:
        # handle unexpected errors
    finally:
        # handle clean up
Why wrap the whole task in a try/except block? The application code that exists in request handlers is protected against unexpected errors because Flask itself catches exceptions and then handles them observing any error handlers and logging configuration I have set up for the application. This function, however, is going to run in a separate process that is controlled by RQ, not Flask, so if any unexpected errors occur the task will abort, RQ will display the error to the console and then will go back to wait for new jobs. So basically, unless you are watching the output of the RQ worker or logging it to a file, you will never find out there was an error.
Let's start looking at the sections indicated with comments above with the simplest ones, which are the error handling and clean up at the end:
app/tasks.py: Export posts error handling.
import sys
# ...

def export_posts(user_id):
    try:
        # ...
    except Exception:
        _set_task_progress(100)
        app.logger.error('Unhandled exception', exc_info=sys.exc_info())
    finally:
        _set_task_progress(100)
Whenever an unexpected error occurs, I'm going to use the logger object from the Flask application to log the error, along with the stack trace, information which is provided by the sys.exc_info() call. The nice thing about using the Flask application logger to log errors here as well is that any logging mechanisms you have implemented for the Flask application will be observed. For example, in Chapter 7 I configured errors to be sent out to the administrator email address. Just by using app.logger I also get that behavior for these errors. In the finally clause, which will run both for errored and successful runs, I mark the task as finished by setting the progress to 100%.
Next, I'm going to code the actual export, which simply issues a database query and walks through the results in a loop, accumulating them in a dictionary:
app/tasks.py: Read user posts from the database.
import time
from app.models import User, Post

# ...

def export_posts(user_id):
    try:
        user = db.session.get(User, user_id)
        _set_task_progress(0)
        data = []
        i = 0
        total_posts = db.session.scalar(sa.select(sa.func.count()).select_from(
            user.posts.select().subquery()))
        for post in db.session.scalars(user.posts.select().order_by(
                Post.timestamp.asc())):
            data.append({'body': post.body,
                         'timestamp': post.timestamp.isoformat() + 'Z'})
            time.sleep(5)
            i += 1
            _set_task_progress(100 * i // total_posts)

        # send email with data to user
    except Exception:
        # ...
    finally:
        # ...
For each post, the function is going to include a dictionary with two elements, the post body and the time the post was written. The time is going to be written in the ISO 8601 standard. The Python's datetime objects that I'm using do not store a timezone, so after I export the time in the ISO format I add the 'Z', which indicates UTC.
The code gets slightly complicated due to the need to keep track of progress. I maintain the counter i, and I need to issue an extra database query before I enter the loop for total_posts to have the number of posts. Using i and total_posts, each loop iteration can update the task progress with a number from 0 to 100.
You may have noticed that I also added a time.sleep(5) call in each loop iteration. The main reason I added the sleep is to make the export task last longer, and be able to see the progress go up even when the export covers just a handful of blog posts.
Below you can see the last part of the function, which sends an email to the user with all the information collected in data as an attachment:
app/tasks.py: Email posts to user.
import json
from flask import render_template
from app.email import send_email

# ...

def export_posts(user_id):
    try:
        # ...

        send_email(
            '[Microblog] Your blog posts',
            sender=app.config['ADMINS'][0], recipients=[user.email],
            text_body=render_template('email/export_posts.txt', user=user),
            html_body=render_template('email/export_posts.html', user=user),
            attachments=[('posts.json', 'application/json',
                          json.dumps({'posts': data}, indent=4))],
            sync=True)
    except Exception:
        # ...
    finally:
        # ...
This is simply a call to the send_email() function. The attachment is defined as a tuple with the three elements that are then passed to the attach() method of Flask-Mail's Message object. The third element in the tuple is the attachment contents, which are generated with Python's json.dumps() function.
There are a pair of new templates referenced here, which provide the contents of the email body in plain text and HTML form. Here is the text template:
app/templates/email/export_posts.txt: Export posts text email template.
Dear {{ user.username }},

Please find attached the archive of your posts that you requested.

Sincerely,

The Microblog Team
Here is the HTML version of the email:
app/templates/email/export_posts.html: Export posts HTML email template.
<p>Dear {{ user.username }},</p>
<p>Please find attached the archive of your posts that you requested.</p>
<p>Sincerely,</p>
<p>The Microblog Team</p>
Export Functionality in the Application
All the core pieces to support the background export tasks are now in place. What remains is to hook up this functionality to the application, so that users can place requests for their posts to be emailed to them.
Below you can see a new export_posts view function:
app/main/routes.py: Export posts route and view function.
@bp.route('/export_posts')
@login_required
def export_posts():
    if current_user.get_task_in_progress('export_posts'):
        flash(_('An export task is currently in progress'))
    else:
        current_user.launch_task('export_posts', _('Exporting posts...'))
        db.session.commit()
    return redirect(url_for('main.user', username=current_user.username))
The function first checks if the user has an outstanding export task, and in that case just flashes a message. It really makes no sense to have two export tasks for the same user at the same time, so this is prevented. I can check for this condition using the get_task_in_progress() method I implemented earlier.
If the user isn't already running an export, then launch_task() is invoked to start a one. The first argument is the name of the function that will be passed to the RQ worker, prefixed with app.tasks.. The second argument is just a friendly text description that will be shown to the user. Both values are written to the Task object in the database. The function ends with a redirect to the user profile page.
Now I need to expose a link to this route that the user can access to request the export. I think the most appropriate place to do this is in the user profile page, where the link can only be shown when users view their own page, right below the "Edit your profile" link:
app/templates/user.html: Export link in user profile page.
                ...
                <p>
                    <a href="{{ url_for('main.edit_profile') }}">
                        {{ _('Edit your profile') }}
                    </a>
                </p>
                {% if not current_user.get_task_in_progress('export_posts') %}
                <p>
                    <a href="{{ url_for('main.export_posts') }}">
                        {{ _('Export your posts') }}
                    </a>
                </p>
                ...
                {% endif %}
This link is tied to a conditional, because I don't want it to appear when the user already has an export in progress.
At this point the background jobs should be functional, but without giving any feedback to the user. If you want to try this out, you can start the application and the RQ worker as follows:
- Make sure you have Redis running
- In a first terminal window, start one or more instances of the RQ worker. For this you have to use the command
rq worker microblog-tasks - In a second terminal window, start the Flask application with
flask run(remember to setFLASK_APPfirst)
Progress Notifications
To wrap up this feature I want to inform the user when a background task is running, including a percentage of completion. In looking through the Bootstrap component options, I decided to use an alert below the navigation bar for this. Alerts are these color horizontal bars that display information to the user. The blue alert boxes are what I'm using to render flashed messages. Now I'm going to add a green one to show progress status. Below you can see how that is going to look:

app/templates/base.html: Export progress alert in base template.
...
{% block content %}
    <div class="container">
        {% if current_user.is_authenticated %}
        {% with tasks = current_user.get_tasks_in_progress() %}
        {% if tasks %}
            {% for task in tasks %}
            <div class="alert alert-success" role="alert">
                {{ task.description }}
                <span id="{{ task.id }}-progress">{{ task.get_progress() }}</span>%
            </div>
            {% endfor %}
        {% endif %}
        {% endwith %}
        {% endif %}
        ...
{% endblock %}
...
The method to render the task alerts is almost identical to the flashed messages. The outer conditional skips all the alert related markup when the user is not logged in. For logged in users, I get the currently in-progress task list by calling the get_tasks_in_progress() method I created earlier. In the current version of the application I will only get one result at the most, since I don't allow more than one active export at a time, but in the future I may want to support other types of tasks that can coexist, so writing this in a generic way could save me time later.
For each task I write an alert element to the page. The color of the alert is controlled with the second CSS style, which in this case is alert-success, while in the case of the flashed messages was alert-info. The Bootstrap documentation includes the details on the HTML structure for the alerts. The text of the alert includes the description field stored in the Task model, followed by the completion percentage.
The percentage is wrapped in a <span> element that has a id attribute. The reason for this is that I'm going to refresh the percentage from JavaScript when notifications are received. The id that I'm using for a given task is constructed as the task id with -progress appended at the end. When a notification arrives, it will contain the task id, so I can easily locate the correct <span> element to update with a selector for #<task.id>-progress.
If you try the application at this point, you are going to see "static" progress updates, each time you navigate to a new page. You will notice that after you start an export task, you can freely navigate to different pages of the application, and the state of the running task is always recalled.
To prepare for applying dynamic updates to the percentage <span> elements, I'm going to write a little helper function in the JavaScript side:
app/templates/base.html: Helper function to dynamically update task progress.
...
{% block scripts %}
    ...
    <script>
        ...
        function set_task_progress(task_id, progress) {
            const progressElement = document.getElementById(task_id + '-progress');
            if (progressElement) {
                progressElement.innerText = progress;
            }
        }
    </script>
    ...
{% endblock %}
This function takes a task id and a progress value, uses the DOM API in the browser to locate the <span> element for the task, and if the element exists, it writes the new progress as its new contents.
The notifications are already arriving to the browser because the _set_task_progress() function in app/tasks.py calls add_notification() each time the progress is updated. If you are confused about how these notifications could be reaching the browser without me having to do anything, it's really because in Chapter 21 I was wise to implement the notifications feature in a completely generic way. Any notifications that are added through the add_notification() method will be seen by the browser when it periodically asks the server for notification updates.
But the JavaScript code that processes these notifications only recognizes those that have a unread_message_count name, and ignores the rest. What I need to do now is expand that function to also handle task_progress notifications by calling the set_task_progress() function I defined above. Here is an updated version of the loop that processes notifications from JavaScript:
app/templates/base.html: Notification handler.
          for (let i = 0; i < notifications.length; i++) {
            switch (notifications[i].name) {
              case 'unread_message_count':
                set_message_count(notifications[i].data);
                break;
              case 'task_progress':
                set_task_progress(notifications[i].data.task_id,
                    notifications[i].data.progress);
                break;
            }
            since = notifications[i].timestamp;
          }
Now that I need to handle two different notifications, I decided to replace the if statement that checked for the unread_message_count notification name with a switch statement that contains one section for each of the notifications I now need to support. If you are not very familiar with the "C" family of languages you may not have seen switch statements before. These provide a convenient syntax that replaces a long chain of if/elseif statements. This is nice because as I need to support more notifications, I can simply keep adding them as additional case blocks.
If you recall, the data that the RQ task attaches to the task_progress notification is a dictionary with two elements, task_id and progress, which are the two arguments that I need to use to invoke set_task_progress().
If you run the application now, the progress indicator in the green alert box is going to refresh every 10 seconds, as notifications are delivered to the client.
Because I have introduced new translatable strings in this chapter, the translation files need to be updated. If you are maintaining a non-English language file, you need to use Flask-Babel to refresh your translation files and then add new translations:
(venv) $ flask translate update
If you are using the Spanish translation, then I have done the translation work for you, so you can just extract the app/translations/es/LC_MESSAGES/messages.po files from the download package for this chapter and add it to your project.
After the translations are done, you have to compile the translation files:
(venv) $ flask translate compile
Deployment Considerations
To complete this chapter, I want to discuss how the deployment of the application changes. To support background tasks I have added two new components to the stack, a Redis server, and one or more RQ workers. Obviously these need to be included in your deployment strategy, so I'm going to briefly go over the different deployment options I covered in previous chapters and how they are affected by these changes.
Deployment on a Linux Server
If you are running your application on a Linux server, adding Redis should be as simple as installing this package from your operating system. For Ubuntu Linux, you have to run sudo apt-get install redis-server.
To run the RQ worker process, you can follow the "Setting Up Gunicorn and Supervisor" section in Chapter 17 to create a second Supervisor configuration in which you run rq worker microblog-tasks instead of gunicorn. If you want to run more than one worker (and you probably should for production), you can use Supervisor's numprocs directive to indicate how many instances you want to have running concurrently.
Deployment on Heroku
To deploy the application on Heroku you are going to need to add a Redis service to your account. This is similar to the process that I used to add the Postgres database. Redis also has a free tier, which can be added with the following command:
$ heroku addons:create heroku-redis:hobby-dev
The access URL for your new redis service is going to be added to your Heroku environment as a REDIS_URL variable, which is exactly what the application expects.
The free plan in Heroku allows one web dyno and one worker dyno, so you can host a single rq worker along with your application without incurring into any expenses. For this you will need to declare the worker in a separate line in your procfile:
web: flask db upgrade; flask translate compile; gunicorn microblog:app
worker: rq worker -u $REDIS_URL microblog-tasks
After you deploy with these changes, you can start the worker with the following command:
$ heroku ps:scale worker=1
Deployment on Docker
If you are deploying the application to Docker containers, then you first need to create a Redis container on the same network the application is using. For this you can use one of the official Redis images from the Docker registry:
$ docker run --name redis -d -p 6379:6379 --network microblog-network redis:latest
When you run your application you will need to set the REDIS_URL environment variable, similar to how the MySQL container was handled. Here is a complete command to start the application including a redis link:
$ docker run --name microblog -d -p 8000:5000 --rm -e SECRET_KEY=my-secret-key \
    -e MAIL_SERVER=smtp.googlemail.com -e MAIL_PORT=587 -e MAIL_USE_TLS=true \
    -e MAIL_USERNAME=<your-gmail-username> -e MAIL_PASSWORD=<your-gmail-password> \
    --network microblog-network \
    -e DATABASE_URL=mysql+pymysql://microblog:<database-password>@mysql/microblog \
    -e REDIS_URL=redis://redis:6379/0 \
    microblog:latest
Finally, you will need to run one or more containers for the RQ workers. Because the workers are based on the same code as the main application, you can use the same container image you use for your application, overriding the start up command so that the worker is started instead of the web application. Here is an example docker run command that starts a worker:
$ docker run --name rq-worker -d --rm -e SECRET_KEY=my-secret-key \
    -e MAIL_SERVER=smtp.googlemail.com -e MAIL_PORT=587 -e MAIL_USE_TLS=true \
    -e MAIL_USERNAME=<your-gmail-username> -e MAIL_PASSWORD=<your-gmail-password> \
    --network microblog-network \
    -e DATABASE_URL=mysql+pymysql://microblog:<database-password>@mysql/microblog \
    -e REDIS_URL=redis://redis:6379/0 \
    --entrypoint venv/bin/rq \
    microblog:latest worker -u redis://redis:6379/0 microblog-tasks
Overriding the default start up command of a Docker image is a bit tricky because the command needs to be given in two parts. The --entrypoint argument takes just the executable name, but the arguments (if any) need to be given after the image and tag, at the end of the command line. Note that rq needs to be given as venv/bin/rq so that it works without having the virtual environment activated.
Continue on to the next chapter.
Become a Patron!
Hello, and thank you for visiting my blog! If you enjoyed this article, please consider supporting my work on this blog on Patreon!

-
#1 Jo said
Hi Miguel,
On linux deployment, do I put two programs in the same conf.d file or do i make one file for gunicorn and one file for rq?
-
#2 Miguel Grinberg said
@Jo: separate files. The files for this tutorial are all available on GitHub, so you can check this for yourself without having to ask me. See the links in the introduction section.
-
#3 Jo said
Aha, I didn't realize you also put the deployment files there. Many thanks! In the mean time I put both in the same file and it seemed to work, but I have no idea if any caveats, so will restructure to two files.
-
#4 Dave said
In my docker container I found the path at usr/local/bin
I haven't hooked up the email system so trying to think of another way to test if this is working. Does it save the json anywhere in the container? How could I return the file directly to the users browser?
-
#5 Miguel Grinberg said
@Dave: You can add code to save the json file to disk to the task, it does not do that in the way I designed it.
-
#6 ManoRJ said
Miguel, thanks!
As a beginner I am struggling to implement cron scheduled periodic tasks.
I want to perform db queries (flask_sqlalchemy) on a daily basis, but due to some checks and complexity of those, I could not attach them to my application factory. I know rq-scheduler, flask_rq2 and apscheduler exist.Could you give me a hint? Thank you
-
#7 Grant said
Hi!
After implementing and running export posts a number of times, I see the finished jobs are never removed from Task table. Would this not create a problem in the future in that there would be a lot of unused data piling up? Should a mechanism be created to periodically remove old tasks? I was thinking after logging in removing all completed tasks.
The same issue is for notifications in the last chapter. They pile up without being removed, and I wonder the same thing with them. Thanks!
-
#8 Miguel Grinberg said
@Grant: In real-world projects data is rarely deleted from databases. You can remove tasks and notifications once they are used, but in general it makes more sense to keep them as a form of audit log.
-
#9 Miguel Grinberg said
@ManoRJ: I don't understand what you mean by "some checks and complexity of those". I would make sure you can run your queries from a flask shell, for example, and once you have them working you can add them to a cron job as shown in this article.
-
#10 Grant said
Interesting. The notifications (especially) and tasks seems like temp data instead of something to store long term. But I'm still learning so that's why I'm asking. Thanks!
-
#11 Miguel Grinberg said
@Grant: You may want to know how many tasks you executed over a period of time. If you delete the task records you would not be able to get this information. I'm not saying that you shouldn't delete them, just that in general disk space is cheap and it makes sense to preserve information in case you need it in the future.
-
#12 Farouk said
Thanks a million times Miguel, remarkable tutorial.
I followed every single bit from the beginning and everything works perfectly, until the very last command to deploy the RQ worker. when i run the cmd for the worker container i get the bellow error, can you please advise!
docker run --name rq-worker -d --rm -e SECRET_KEY=a-really-long-and-unique-key-that-nobody-knows -e MAIL_SERVER= "some server here" -e MAIL_PORT=587 -e MAIL_USE_TLS=true -e MAIL_USERNAME="some username" -e MAIL_PASSWORD='some password' --network myapp-network -e DATABASE_URL=mysql+pymysql://myapp:myapp@mysql/myapp -e REDIS_URL=redis://redis:6379/0 --entrypoint venv/bin/rq myapp:latest worker -u redis://redis:6379/0 myapp-tasks
d0dc9a5959f0c525bc78a0f35d841f3akjhkd1b31d612b4f023792c483b5bed87
docker: Error response from daemon: failed to create task for container: failed to create shim task: OCI runtime create failed: runc create failed: unable to start container process: exec: "venv/bin/rq": stat venv/bin/rq: no such file or directory: unknown.i have my venv directory in my project main folder.
-
#13 Miguel Grinberg said
@Farouk: I think this is because you did not install the
rqpackage. -
#14 Farouk said
Thank you @Miguel for your quick reply.
The RQ packeage is installed and works just fine before deployment to Docker container, it only complains when i run the command to create a worker container.
-
#15 Miguel Grinberg said
@Farouk: Sorry, this is my own mistake. Try using
rqinstead ofvenv/bin/rqin thedocker runcommand. There is no virtualenv in this Docker image. -
#16 Ido said
Inside the tasks.py file you are creating a new flask app with the default config.
Assuming you want to run your tests on functionality that depends on the tasks and there is a change in the config effecting the task this would not work.
How would you suggest to change it so that the test config is also passed to the tasks context? -
#17 Miguel Grinberg said
@Ido: the tasks.py file creates the Flask application exactly as the main server does in microblog.py. If you need to pass options that affect the configuration, you can add them in both places.
-
#18 Ido said
Thanks for the fast answer @Miguel.
I will try to rephrase, could you please explain how will you add a test for the export_posts endpoint or something similar that is calling a task which is dependent on something in the config that is not the same between production and tests?Will adding in the setup phase something that runs the tasks will do the trick?
-
#19 Miguel Grinberg said
@Ido: You are overcomplicating this, I think. The tests use their own database, which is different from the database used during development, and the one used in production. This is controlled through environment variables, and should work for the main application and for the instance created in tasks.py. If you have other settings that need to be different, you can define them through environment variables as well. Or as I suggested above, you can add arguments to
create_app()if you prefer. -
#20 Kris said
Hi Miguel, thanks for your articles on Flask!
I'm thankful for how how in-depth you go with explaining why a package is used and what alternatives there are. I am having an issue getting Redis or Celery to work on Windows for testing. I originally tried installing a redis-server .msi file and running the server this way. Truthfully I couldn't get the server to run, so I decided to try running purely from a docker-compose container where I instantiate redis server and redis-worker containers. Somewhat alternated based from https://github.com/fcakyon/flask-redis-docker.
I'm wondering if you can update your article with further guidance on how to setup Redis on Windows? My target application greatly requires the use of task queues and I cannot get past my AttributeErrors where my task worker cannot find the targeted job path to run. If not, do you have any suggestions on what I can look for or alternative articles to check out? -
#21 Miguel Grinberg said
@Kris: I don't use Windows every day, but as far as I know the installer I reference in this article works fine. Alternatively you can set up Redis under WSL, following Ubuntu setup instructions.
-
#22 Kris said
@Miguel: I setup a virtual machine and was able to play with redis a bit. I found my issue: I was simply starting my worker in the app directory. If you do this, the path 'app./path/to/function' can't be found because it's already in the folder app. Glad I found it, a bit difficult to debug on Windows ¯_(ツ)_/¯
-
#23 et said
Hi Miguel,
I have a question about Redis connections as I am running into hitting the connection maximum on Heroku much faster than anticipated. I'm sure I'm not understanding something.
I've done some testing on microblog locally just to make sure it wasn't something wrong with my app (which implements background jobs just as you direct) or a Heroku thing.in init.py, just below
app.task_queue = rq.Queue('microblog-tasks', connection=app.redis)
I added:
connections = app.redis.info()['connected_clients']
print("Total connections", connections)When I run the app, with the microblog-tasks not running,
I get
Total connections 5
* Serving Flask app 'microblog.py'
* Debug mode: on
WARNING: This is a development server. Do not use it in a production deployment. Use a production WSGI server instead.
* Running on http://127.0.0.1:5001
Press CTRL+C to quit
* Restarting with stat
Total connections 6
* Debugger is active!I'm not surprised at the 5 since Redis starts a pool of 5 connections?. But then Werkzeug restarting adds a 6th?
Then I start rq worker microblog-tasks, and export my posts:
microblog-tasks: app.tasks.export_posts(1) (06cd0609-bd4f-442b-af00-0c4028043ba1)
Total connections 10
Why did it start a new pool?Total connections stay at 10 with each download. If I quit the app and restart it with the worker still up:
microblog-0.22 % flask run --port 5001
Total connections 7
* Serving Flask app 'microblog.py'
* Debug mode: on
WARNING: This is a development server. Do not use it in a production deployment. Use a production WSGI server instead.
* Running on http://127.0.0.1:5001
Press CTRL+C to quit
* Restarting with stat
Total connections 8
* Debugger is active!My app has 2 queues which I automatically scale up and down using heroku3. I also send some tasks for which I don't need progress to heroku run.
All these tasks go through init.py as they need all need the database and the number of connections goes up very quickly with minimal activity.
Any suggestions to force the new workers to use the unused connections in the pool? -
#24 Miguel Grinberg said
@et:
But then Werkzeug restarting adds a 6th?
first of all, do not use the code reloader when testing connections or other production related settings. The reloader creates additional processes that do not exist in production. Since you are testing how connections are used on your production site, you should use a set up that matches production as much as possible. Use the same web server, same type of concurrency, same number of workers, etc.
Then I start rq worker microblog-tasks, and export my posts:
Why did it start a new pool?It's a separate Python process. How would the RQ worker access a pool that is maintained in the web server process? Each process has its own connection pool, two or more Python processes cannot see each other's structures. This is true for everything. Your relational database works in the same way.
Any suggestions to force the new workers to use the unused connections in the pool?
I really see no indication from what you are saying that there are unused connections in any pool. As explained above, each Python process has its own connection pool.
I also don't know what is the significance of the 5 number of connections that you see when you start. I would imagine each server process makes one connection to redis and not 5, at least initially, before there is any concurrency in place? I'm not really sure how to interpret your observations.
-
#25 et said
Thanks for the quick reply Miguel.
I showed you the tests I did in development with the microblog to keep it as simple and as close as possible to your blog for my question. The Werkzeug thing was just an aside that surprised me, of course for my site, I test the production environment as best I can and the results are the same. That's why I tested it with microblog in the first place, to make sure it was real, not a special issue with my site or heroku.I think the issue is when running create_app() from tasks.py, it runs init.py, which creates a new redis for that app instance, which creates a new connection pool (default of 5 connections).
That new pool would only be used if the background task itself was required to enqueue another background task.As you suggested when answering another question about testing I've tried adding an argument to create_app(bgworker=False) in init.py, and put the redis and queue creation in an if statement:
if not bgworker:
app.redis = Redis.from_url(app.config['REDIS_URL'])
app.task_queue = rq.Queue('microblog-tasks', connection=app.redis)When calling it from tasks.py I now set bgworker=True. The microblog app works just fine like that. I trust the extra connections I used to see are not made anymore but there is no app.redis to be able to run app.redis.info()['connected_clients'] on the background app.
In real life I should be able to monitor the connections with the heroku Redis monitoring tool (which is how I found this issue in the first place).This made me realise that I really need to consider what is actually needed by a background task. Depending on what it's doing, it may not need all the components of the full app.


