The Flask Mega-Tutorial, Part II: Templates
Posted by
on underIn this second installment of the Flask Mega-Tutorial series, I'm going to discuss how to work with templates.
You are reading the 2024 edition of the Flask Mega-Tutorial. The complete course is also available to order in e-book and paperback formats from Amazon. Thank you for your support!
If you are looking for the 2018 edition of this course, you can find it here.
For your reference, here is the complete list of articles in this series:
- Chapter 1: Hello, World!
- Chapter 2: Templates (this article)
- Chapter 3: Web Forms
- Chapter 4: Database
- Chapter 5: User Logins
- Chapter 6: Profile Page and Avatars
- Chapter 7: Error Handling
- Chapter 8: Followers
- Chapter 9: Pagination
- Chapter 10: Email Support
- Chapter 11: Facelift
- Chapter 12: Dates and Times
- Chapter 13: I18n and L10n
- Chapter 14: Ajax
- Chapter 15: A Better Application Structure
- Chapter 16: Full-Text Search
- Chapter 17: Deployment on Linux
- Chapter 18: Deployment on Heroku
- Chapter 19: Deployment on Docker Containers
- Chapter 20: Some JavaScript Magic
- Chapter 21: User Notifications
- Chapter 22: Background Jobs
- Chapter 23: Application Programming Interfaces (APIs)
After completing Chapter 1, you should have a simple, yet functional web application that has the following file structure:
microblog\
  venv\
  app\
    __init__.py
    routes.py
  microblog.py
To run the application you set the FLASK_APP=microblog.py in your terminal session (or better yet, add a .flaskenv file with this variable), and then execute flask run. This starts a web server with the application, which you can open by typing the http://localhost:5000/ URL in your web browser's address bar.
In this chapter you will continue working on the same application, and in particular, you are going to learn how to generate more elaborate web pages that have a complex structure and many dynamic components. If anything about the application or the development workflow so far isn't clear, please review Chapter 1 again before continuing.
The GitHub links for this chapter are: Browse, Zip, Diff.
What Are Templates?
I want the home page of my microblogging application to have a heading that welcomes the user. For the moment, I'm going to ignore the fact that the application does not yet have the concept of users, as this is going to come later. Instead, I'm going to use a mock user, which I'm going to implement as a Python dictionary, as follows:
user = {'username': 'Miguel'}
Creating mock objects is a useful technique that allows you to concentrate on one part of the application without having to worry about other parts of the system that don't exist yet. I want to design the home page of my application, and I don't want the fact that I don't have a user system in place to distract me, so I just make up a user object so that I can keep going.
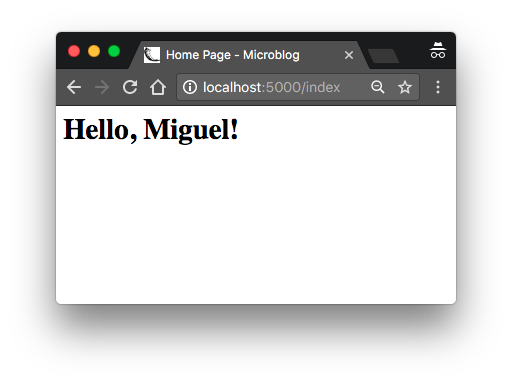
The view function in the application returns a simple string. What I want to do now is expand that returned string into a complete HTML page, maybe something like this:
app/routes.py: Return complete HTML page from view function
from app import app

@app.route('/')
@app.route('/index')
def index():
    user = {'username': 'Miguel'}
    return '''
<html>
    <head>
        <title>Home Page - Microblog</title>
    </head>
    <body>
        <h1>Hello, ''' + user['username'] + '''!</h1>
    </body>
</html>'''
If you are not familiar with HTML, I recommend that you read HTML Markup on Wikipedia for a brief introduction.
Update the view function as shown above and run the application again to see how it looks in your browser.
I hope you agree with me that the solution used above to deliver HTML to the browser is not good. Consider how complex the code in this view function will become when you add blog posts from users, which are going to constantly change. The application is also going to have more view functions that are going to be associated with other URLs, so imagine if one day I decide to change the layout of this application, and have to update the HTML in every view function. This is clearly not an option that will scale as the application grows.
If you could keep the logic of your application separate from the layout or presentation of your web pages, then things would be much better organized, don't you think? You could even hire a web designer to create a killer website while you code the application logic in Python.
Templates help achieve this separation between presentation and business logic. In Flask, templates are written as separate files, stored in a templates folder that is inside the application package. After making sure that you are in the microblog directory, create the directory where templates will be stored:
(venv) $ mkdir app/templates
Below you can see your first template, which is similar in functionality to the HTML page returned by the index() view function above. Write this file in app/templates/index.html:
app/templates/index.html: Main page template
<!doctype html>
<html>
    <head>
        <title>{{ title }} - Microblog</title>
    </head>
    <body>
        <h1>Hello, {{ user.username }}!</h1>
    </body>
</html>
This is a standard, short HTML page. The only interesting thing in this page is that there are a couple of placeholders for the dynamic content, enclosed in {{ ... }} sections. These placeholders represent the parts of the page that are variable and will only be known at runtime.
Now that the presentation of the page was offloaded to the HTML template, the view function can be simplified:
app/routes.py: Use render_template() function
from flask import render_template
from app import app

@app.route('/')
@app.route('/index')
def index():
    user = {'username': 'Miguel'}
    return render_template('index.html', title='Home', user=user)
This looks much better, right? Try this new version of the application to see how the template works. Once you have the page loaded in your browser, you may want to view the source HTML and compare it against the original template.
The operation that converts a template into a complete HTML page is called rendering. To render the template I had to import a function that comes with the Flask framework called render_template(). This function takes a template filename and a variable list of template arguments, and returns the same template, but with all the placeholders in it replaced with actual values.
The render_template() function invokes the Jinja template engine that comes bundled with the Flask framework. Jinja substitutes {{ ... }} blocks with the corresponding values, given by the arguments provided in the render_template() call.
Conditional Statements
You have seen how Jinja replaces placeholders with actual values during rendering, but this is just one of many powerful operations Jinja supports in template files. For example, templates also support control statements, given inside {% ... %} blocks. The next version of the index.html template adds a conditional statement:
app/templates/index.html: Conditional statement in template
<!doctype html>
<html>
    <head>
        {% if title %}
        <title>{{ title }} - Microblog</title>
        {% else %}
        <title>Welcome to Microblog!</title>
        {% endif %}
    </head>
    <body>
        <h1>Hello, {{ user.username }}!</h1>
    </body>
</html>
Now the template is a bit smarter. If the view function forgets to pass a value for the title placeholder variable, then instead of showing an empty title the template will provide a default one. You can try how this conditional works by removing the title argument in the render_template() call of the view function.
Loops
The logged-in user will probably want to see recent posts from connected users in the home page, so what I'm going to do now is extend the application to support that.
Once again, I'm going to rely on the handy mock object trick to create some users and some posts to show:
app/routes.py: Fake posts in view function
from flask import render_template
from app import app

@app.route('/')
@app.route('/index')
def index():
    user = {'username': 'Miguel'}
    posts = [
        {
            'author': {'username': 'John'},
            'body': 'Beautiful day in Portland!'
        },
        {
            'author': {'username': 'Susan'},
            'body': 'The Avengers movie was so cool!'
        }
    ]
    return render_template('index.html', title='Home', user=user, posts=posts)
To represent user posts I'm using a list, where each element is a dictionary that has author and body fields. When I get to implement users and blog posts for real I'm going to try to preserve these field names as much as possible, so that all the work I'm doing to design and test the home page template using these fake objects will continue to be valid when I introduce real users and posts.
On the template side I have to solve a new problem. The list of posts can have any number of elements, it is up to the view function to decide how many posts are going to be presented in the page. The template cannot make any assumptions about how many posts there are, so it needs to be prepared to render as many posts as the view sends in a generic way.
For this type of problem, Jinja offers a for control structure:
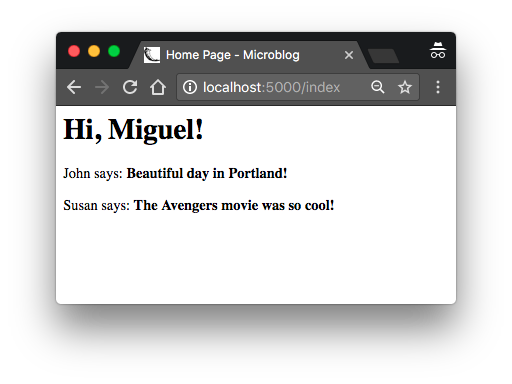
app/templates/index.html: for-loop in template
<!doctype html>
<html>
    <head>
        {% if title %}
        <title>{{ title }} - Microblog</title>
        {% else %}
        <title>Welcome to Microblog</title>
        {% endif %}
    </head>
    <body>
        <h1>Hi, {{ user.username }}!</h1>
        {% for post in posts %}
        <div><p>{{ post.author.username }} says: <b>{{ post.body }}</b></p></div>
        {% endfor %}
    </body>
</html>
Simple, right? Give this new version of the application a try, and be sure to play with adding more content to the posts list to see how the template adapts and always renders all the posts the view function sends.
Template Inheritance
Most web applications these days have a navigation bar at the top of the page with a few frequently used links, such as a link to edit your profile, to login, logout, etc. I can easily add a navigation bar to the index.html template with some more HTML, but as the application grows I will be needing this same navigation bar in other pages. I don't really want to have to maintain several copies of the navigation bar in many HTML templates, it is a good practice to not repeat yourself if that is possible.
Jinja has a template inheritance feature that specifically addresses this problem. In essence, what you can do is move the parts of the page layout that are common to all templates to a base template, from which all other templates are derived.
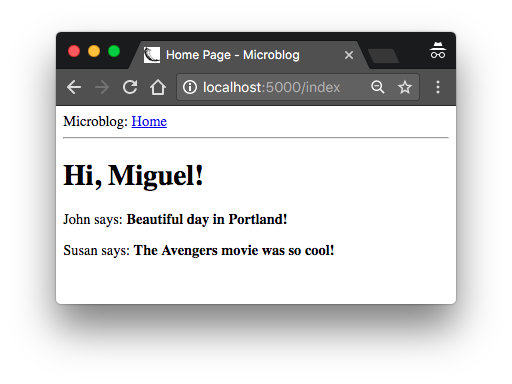
So what I'm going to do now is define a base template called base.html that includes a simple navigation bar and also the title logic I implemented earlier. You need to write the following template in file app/templates/base.html:
app/templates/base.html: Base template with navigation bar
<!doctype html>
<html>
    <head>
      {% if title %}
      <title>{{ title }} - Microblog</title>
      {% else %}
      <title>Welcome to Microblog</title>
      {% endif %}
    </head>
    <body>
        <div>Microblog: <a href="/index">Home</a></div>
        <hr>
        {% block content %}{% endblock %}
    </body>
</html>
In this template I used the block control statement to define the place where the derived templates can insert themselves. Blocks are given a unique name, which derived templates can reference when they provide their content.
With the base template in place, I can now simplify index.html by making it inherit from base.html:
app/templates/index.html: Inherit from base template
{% extends "base.html" %}

{% block content %}
    <h1>Hi, {{ user.username }}!</h1>
    {% for post in posts %}
    <div><p>{{ post.author.username }} says: <b>{{ post.body }}</b></p></div>
    {% endfor %}
{% endblock %}
Since the base.html template will now take care of the general page structure, I have removed all those elements from index.html and left only the content part. The extends statement establishes the inheritance link between the two templates, so that Jinja knows that when it is asked to render index.html it needs to embed it inside base.html. The two templates have matching block statements with name content, and this is how Jinja knows how to combine the two templates into one. Now if I need to create additional pages for the application, I can create them as derived templates from the same base.html template, and that is how I can have all the pages of the application sharing the same look and feel without duplication.
Continue on to the next chapter.
Become a Patron!
Hello, and thank you for visiting my blog! If you enjoyed this article, please consider supporting my work on this blog on Patreon!

-
#1 Vladimir Kuzmenkov said
I appreciate that you go through html/jinja structure and language.
-
#2 Alfredo Muñoz said
I am really engage on this tutorial as it is more user friendly, updated and streamlined than the book version. Just what I needed to learn develop full stack applications with flask. Really appreciated this, thank you!
-
#3 Miguel Grinberg said
@Alfredo: the book version is identical to this tutorial, I manage both from the same source content.
-
#4 Ssali Jonathan said
Thank you so much for this tutorial Miguel
-
#5 JinShao said
Thanks so much for your work!
-
#6 Hariprasad Reddy said
Thank you so much for this so many tutorials
-
#7 John said
Enjoying this, Thanks. I prefer the written format to the video course.
-
#8 Adu Eshete said
Excellent material!
-
#9 Giuseppe said
Hey, Miguel. Thank you for version 2023 of MegaTutorial.
I tried it first with the 2018 version and got to the end of the avatar paragraph successfully. I used a Pizero W with Python 3. 7. Then nothing worked anymore.
I decided to use pi400 with Python 3. 9. I am now at the end of Chapter 2. Using Flask run the code waits for the connection. However, I can't connect from my Mac or even from a tablet. The answer: "Connection failed. Firefox cannot establish a connection to the server 192. 168. 0. 114:5000".
I really don't understand why. Can you give me a suggestion? -
#10 Miguel Grinberg said
@Giuseppe: you don't seem to be following the instructions in this tutorial exactly, right? So it is difficult for me to know what's wrong. In the tutorial you are supposed to use localhost:5000 to access your application, but you are using an IP address. If this address correct? Have you reconfigured the Flask app to listen for external connections as well as internal ones?
-
#11 Giuseppe said
Hi Miguel, thanks very much for your reply.
However, believe me, please, I have faithfully followed the instructions of your Mega tutorial. I thought localhost would indicate the IP address of the pi400. I made a different choice from the tutorial only for the app name referring to the directory, I named appDir, for the one referring to the application, that I named New app and for the name of the main code (your microblog.py) that I named main2023.py. This is because, being a beginner, I wanted to understand the meaning of the app name in the instructions.
Anyway, when using the instruction "flask run" in the venv the output is the following:(venv) raspberrypi-2@raspberrypi-2:~/Flask-related/FLASK-SITO_WEB/Prove_2_Mega_Tutorial_2023/microblog $ flask run
* Ignoring a call to 'app.run()' that would block the current 'flask' CLI command.
Only call 'app.run()' in an 'if name == "main"' guard.
* Serving Flask app 'main2023.py'
* Debug mode: off
WARNING: This is a development server. Do not use it in a production deployment. Use a production WSGI server instead.
* Running on http://127.0.0.1:5000
Press CTRL+C to quitI'm not able to connect to the 192.168.0.114:5000, the IP of the Pi400 (as resulting from RVNC). After your replay, the connection is not successful also using localhost.
After several attempts I found that using the command "python main2023.py" (main2023.py is the file you name microblog.py) I get the following output. Now I can connect to the application and see Home and login command.
(venv) raspberrypi-2@raspberrypi-2:~/Flask-related/FLASK-SITO_WEB/Prove_2_Mega_Tutorial_2023/microblog python main2023.py
* Serving Flask app 'appDir'
* Debug mode: on
WARNING: This is a development server. Do not use it in a production deployment. Use a production WSGI server instead.
* Running on all addresses (0.0.0.0)
* Running on http://127.0.0.1:5000
* Running on http://192.168.0.114:5000
Press CTRL+C to quit
* Restarting with stat
* Debugger is active!
* Debugger PIN: 629-747-225Obviously I'm happy that I can go on with Tutorial, however I still do not understand what happens.
-
#12 Miguel Grinberg said
@Giuseppe: when the tutorial asks you to type
http://localhost:5000in your web browser's address bar, that is exactly what you need to type. I'm not sure why you thought you had to replace localhost with an IP address, that is incorrect. The namelocalhostis special, in all computers it refers to the internal network interface.I suggest you remove the
app.run()that you apparently added somewhere in the application. Note you are getting a warning about it:* Ignoring a call to 'app.run()' that would block the current 'flask' CLI command.Also you should preferably use the
flask runcommand to run the application, as shown in this tutorial. I think all these problems you are having came from your replacing oflocalhostby an IP address. I think if you don't do that everything in this tutorial will work for you, without changes. -
#13 Giuseppe said
Hi Miguel,
I'm working on the problem of connecting to the localhost. I updated the MegaTutorial up to the end of Chapter 5 and I deleted the "app.run(host='0.0.0.0',debug=True)" in the microblog.py as you suggested. The app starts with the command "flask run" and wait for a connection.
However the browser address "localhost:5000/" is not able to connect to the application either using Firefox, Safari or a phone. Neither works the browser address 192.168.0.114:/5000/. Really I do not understand why. Obviously the command "python microblog.py" now cannot work (and does not work) because the "app.run" command inside microblog.py has been deleted. May you suggest how to solve this troubleshooting? Thank you -
#14 Miguel Grinberg said
@Giuseppe: you shouldn't be on chapter 5 if you do not have a basic application running. I would suggest you go back to chapter 1 and follow the instructions to get a simpler application working before getting into more complex things. Note that you will never be able to connect to the application from a phone at this stage in the tutorial, you are supposed to use the same machine in which you run the server.
-
#15 Kamuran said
I am curious to know if it is still considered best practice to use Flask and Jinja for web development, or if it is better to utilize Flask purely as an API backend. I find great joy and satisfaction in using ReactJS for my frontend and Python for my backend.
Best Regards.
-
#16 Miguel Grinberg said
@Kamuran: It is certainly not a bad practice to render templates in the server. Lots of applications use server-side rendering, even front-end frameworks also offer the option to render templates in the server.
-
#17 Yuming said
Hi Miguel,
It is interesting to see your reply to message #15 by Mr. Kamuran. I have learned Flask, Vanilla Javascript, React and React-Native, and I have tried the following three approaches,
(A) Flask/Jinja in backend, Javascript in frontend.
(B) Third party services such as Firestore in backend, React single page apps in frontend.
(C) Flask in backend, React in frontend (As your tutorial https://blog.miguelgrinberg.com/post/how-to-create-a-react--flask-project demonstrates).I can see the beauty of each approach as well as the differences among them:
Approach (A) Gives programmers more control over the backend because they need to not only write server code in Python, but also know all the details related to deployment, such as Nginx, commercial database, SSL, firewall, etc. Detail-oriented programmers may enjoy this approach more because everything is crystal clear and under their control.
Writing Python with Flask is more straight forward than React, but generating every page from the backend is not as efficient and fancy as React SPA?(B) Programmers who are not familiar with Unix configurations may prefer this approach? Less control on the backend side is an advantage rather than a drawback for them?
(C) Programmers who not only enjoy React but also want to know what is going on in the backend may like this approach?
My web development experience is too limited to see the big picture and summary all the pros and cons of these approaches. For example, I have no idea how these approaches may impact performance when they are used for commercial applications with many users and very heavy network traffic. I am interested in seeing more discussion on this topics.
-
#18 Miguel Grinberg said
@Yuming: I think it is very difficult to rationalize why people prefer different approaches. I feel it is just a matter of preference and what areas each developer is more comfortable in. As far as performance there is really no clear winner, all the options can lead to a performant solution if implemented properly.


