The Flask Mega-Tutorial, Part IV: Database
Posted by
on underThis is the fourth installment of the Flask Mega-Tutorial series, in which I'm going to tell you how to work with databases.
You are reading the 2024 edition of the Flask Mega-Tutorial. The complete course is also available to order in e-book and paperback formats from Amazon. Thank you for your support!
If you are looking for the 2018 edition of this course, you can find it here.
For your reference, here is the complete list of articles in this series:
- Chapter 1: Hello, World!
- Chapter 2: Templates
- Chapter 3: Web Forms
- Chapter 4: Database (this article)
- Chapter 5: User Logins
- Chapter 6: Profile Page and Avatars
- Chapter 7: Error Handling
- Chapter 8: Followers
- Chapter 9: Pagination
- Chapter 10: Email Support
- Chapter 11: Facelift
- Chapter 12: Dates and Times
- Chapter 13: I18n and L10n
- Chapter 14: Ajax
- Chapter 15: A Better Application Structure
- Chapter 16: Full-Text Search
- Chapter 17: Deployment on Linux
- Chapter 18: Deployment on Heroku
- Chapter 19: Deployment on Docker Containers
- Chapter 20: Some JavaScript Magic
- Chapter 21: User Notifications
- Chapter 22: Background Jobs
- Chapter 23: Application Programming Interfaces (APIs)
The topic of this chapter is extremely important. For most applications, there is going to be a need to maintain persistent data that can be retrieved efficiently, and this is exactly what databases are made for.
The GitHub links for this chapter are: Browse, Zip, Diff.
Databases in Flask
As I'm sure you have heard already, Flask does not support databases natively. This is one of the many areas in which Flask is intentionally not opinionated, which is great, because you have the freedom to choose the database that best fits your application instead of being forced to adapt to one.
There are great choices for databases in Python, many of them with Flask extensions that make a better integration with the application. The databases can be separated into two big groups, those that follow the relational model, and those that do not. The latter group is often called NoSQL, indicating that they do not implement the popular relational query language SQL. While there are great database products in both groups, my opinion is that relational databases are a better match for applications that have structured data such as lists of users, blog posts, etc., while NoSQL databases tend to be better for data that has a less defined structure. This application, like most others, can be implemented using either type of database, but for the reasons stated above, I'm going to go with a relational database.
In Chapter 3 I showed you a first Flask extension. In this chapter I'm going to use two more. The first is Flask-SQLAlchemy, an extension that provides a Flask-friendly wrapper to the popular SQLAlchemy package, which is an Object Relational Mapper or ORM. ORMs allow applications to manage a database using high-level entities such as classes, objects and methods instead of tables and SQL. The job of the ORM is to translate the high-level operations into database commands.
The nice thing about SQLAlchemy is that it is an ORM not for one, but for many relational databases. SQLAlchemy supports a long list of database engines, including the popular MySQL, PostgreSQL and SQLite. This is extremely powerful, because you can do your development using a simple SQLite database that does not require a server, and then when the time comes to deploy the application on a production server you can choose a more robust MySQL or PostgreSQL server, without having to change your application.
To install Flask-SQLAlchemy in your virtual environment, make sure you have activated it first, and then run:
(venv) $ pip install flask-sqlalchemy
Database Migrations
Most database tutorials I've seen cover creation and use of a database, but do not adequately address the problem of making updates to an existing database as the application needs change or grow. This is hard because relational databases are centered around structured data, so when the structure changes the data that is already in the database needs to be migrated to the modified structure.
The second extension that I'm going to present in this chapter is Flask-Migrate, which is actually one created by myself. This extension is a Flask wrapper for Alembic, a database migration framework for SQLAlchemy. Working with database migrations adds a bit of work to get a database started, but that is a small price to pay for a robust way to make changes to your database in the future.
The installation process for Flask-Migrate is similar to other extensions you have seen:
(venv) $ pip install flask-migrate
Flask-SQLAlchemy Configuration
During development, I'm going to use a SQLite database. SQLite databases are the most convenient choice for developing small applications, sometimes even not so small ones, as each database is stored in a single file on disk and there is no need to run a database server like MySQL and PostgreSQL.
Flask-SQLAlchemy needs a new configuration item added to the config file:
config.py: Flask-SQLAlchemy configuration
import os
basedir = os.path.abspath(os.path.dirname(__file__))

class Config:
    # ...
    SQLALCHEMY_DATABASE_URI = os.environ.get('DATABASE_URL') or \
        'sqlite:///' + os.path.join(basedir, 'app.db')
The Flask-SQLAlchemy extension takes the location of the application's database from the SQLALCHEMY_DATABASE_URI configuration variable. As you recall from Chapter 3, it is in general a good practice to set configuration from environment variables, and provide a fallback value when the environment does not define the variable. In this case I'm taking the database URL from the DATABASE_URL environment variable, and if that isn't defined, I'm configuring a database named app.db located in the main directory of the application, which is stored in the basedir variable.
The database is going to be represented in the application by the database instance. The database migration engine will also have an instance. These are objects that need to be created after the application, in the app/__init__.py file:
app/__init__.py: Flask-SQLAlchemy and Flask-Migrate initialization
from flask import Flask
from config import Config
from flask_sqlalchemy import SQLAlchemy
from flask_migrate import Migrate

app = Flask(__name__)
app.config.from_object(Config)
db = SQLAlchemy(app)
migrate = Migrate(app, db)

from app import routes, models
I have made three changes to the __init__.py file. First, I have added a db object that represents the database. Then I added migrate, to represent the database migration engine. Hopefully you see a pattern in how to work with Flask extensions. Most extensions are initialized as these two. In the last change, I'm importing a new module called models at the bottom. This module will define the structure of the database.
Database Models
The data that will be stored in the database will be represented by a collection of classes, usually called database models. The ORM layer within SQLAlchemy will do the translations required to map objects created from these classes into rows in the proper database tables.
Let's start by creating a model that represents users. Using the WWW SQL Designer tool, I have made the following diagram to represent the data that we want to use in the users table:
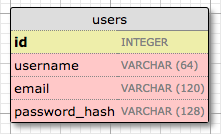
The id field is usually in all models, and is used as the primary key. Each user in the database will be assigned a unique id value, stored in this field. Primary keys are, in most cases, automatically assigned by the database, so I just need to provide the id field marked as a primary key.
The username, email and password_hash fields are defined as strings (or VARCHAR in database jargon), and their maximum lengths are specified so that the database can optimize space usage. While the username and email fields are self-explanatory, the password_hash fields deserves some attention. I want to make sure that the application that I'm building adopts security best practices, and for that reason I will not be storing user passwords in plain text. The problem with storing passwords is that if the database ever becomes compromised, the attackers will have access to the passwords, and that could be devastating for users. Instead of writing the passwords directly, I'm going to write password hashes, which greatly improve security. This is going to be the topic of another chapter, so don't worry about it too much for now.
So now that I know what I want for my users table, I can translate that into code in the new app/models.py module:
app/models.py: User database model
from typing import Optional
import sqlalchemy as sa
import sqlalchemy.orm as so
from app import db

class User(db.Model):
    id: so.Mapped[int] = so.mapped_column(primary_key=True)
    username: so.Mapped[str] = so.mapped_column(sa.String(64), index=True,
                                                unique=True)
    email: so.Mapped[str] = so.mapped_column(sa.String(120), index=True,
                                             unique=True)
    password_hash: so.Mapped[Optional[str]] = so.mapped_column(sa.String(256))

    def __repr__(self):
        return '<User {}>'.format(self.username)
I start by importing the sqlalchemy and sqlalchemy.orm modules from the SQLAlchemy package, which provide most of the elements that are needed to work with a database. The sqlalchemy module includes general purpose database functions and classes such as types and query building helpers, while sqlalchemy.orm provides the support for using models. Given that these two module names are long and will need to be referenced often, the sa and so aliases are defined directly in the import statements. The db instance from Flask-SQLAlchemy and the Optional typing hint from Python are imported as well.
The User class created above will represent users stored in the database. The class inherits from db.Model, a base class for all models from Flask-SQLAlchemy. The User model defines several fields as class variables. These are the columns that will be created in the corresponding database table.
Fields are assigned a type using Python type hints, wrapped with SQLAlchemy's so.Mapped generic type. A type declaration such as so.Mapped[int] or so.Mapped[str] define the type of the column, and also make values required, or non-nullable in database terms. To define a column that is allowed to be empty or nullable, the Optional helper from Python is also added, as password_hash demonstrates.
In most cases defining a table column requires more than the column type. SQLAlchemy uses a so.mapped_column() function call assigned to each column to provide this additional configuration. In the case of id above, the column is configured as the primary key. For string columns many databases require a length to be given, so this is also included. I have included other optional arguments that allow me to indicate which fields are unique and indexed, which is important so that database is consistent and searches are efficient.
The __repr__ method tells Python how to print objects of this class, which is going to be useful for debugging. You can see the __repr__() method in action in the Python interpreter session below:
>>> from app.models import User
>>> u = User(username='susan', email='susan@example.com')
>>> u
<User susan>
Creating The Migration Repository
The model class created in the previous section defines the initial database structure (or schema) for this application. But as the application continues to grow, it is likely that I will need to make changes to that structure such as adding new things, and sometimes to modify or remove items. Alembic (the migration framework used by Flask-Migrate) will make these schema changes in a way that does not require the database to be recreated from scratch every time a change is made.
To accomplish this seemingly difficult task, Alembic maintains a migration repository, which is a directory in which it stores its migration scripts. Each time a change is made to the database schema, a migration script is added to the repository with the details of the change. To apply the migrations to a database, these migration scripts are executed in the sequence they were created.
Flask-Migrate exposes its commands through the flask command. You have already seen flask run, which is a sub-command that is native to Flask. The flask db sub-command is added by Flask-Migrate to manage everything related to database migrations. So let's create the migration repository for microblog by running flask db init:
(venv) $ flask db init
  Creating directory /home/miguel/microblog/migrations ... done
  Creating directory /home/miguel/microblog/migrations/versions ... done
  Generating /home/miguel/microblog/migrations/alembic.ini ... done
  Generating /home/miguel/microblog/migrations/env.py ... done
  Generating /home/miguel/microblog/migrations/README ... done
  Generating /home/miguel/microblog/migrations/script.py.mako ... done
  Please edit configuration/connection/logging settings in
  '/home/miguel/microblog/migrations/alembic.ini' before proceeding.
Remember that the flask command relies on the FLASK_APP environment variable to know where the Flask application lives. For this application, you want to set FLASK_APP to the value microblog.py, as discussed in Chapter 1. If you included a .flaskenv file in your project, then the all sub-commands of the flask command will automatically have access to the application.
After you run the flask db init command, you will find a new migrations directory, with a few files and a versions subdirectory inside. All these files should be treated as part of your project from now on, and in particular, should be added to source control along with your application code.
The First Database Migration
With the migration repository in place, it is time to create the first database migration, which will include the users table that maps to the User database model. There are two ways to create a database migration: manually or automatically. To generate a migration automatically, Alembic compares the database schema as defined by the database models, against the actual database schema currently used in the database. It then populates the migration script with the changes necessary to make the database schema match the application models. In this case, since there is no previous database, the automatic migration will add the entire User model to the migration script. The flask db migrate sub-command generates these automatic migrations:
(venv) $ flask db migrate -m "users table"
INFO  [alembic.runtime.migration] Context impl SQLiteImpl.
INFO  [alembic.runtime.migration] Will assume non-transactional DDL.
INFO  [alembic.autogenerate.compare] Detected added table 'user'
INFO  [alembic.autogenerate.compare] Detected added index 'ix_user_email' on '['email']'
INFO  [alembic.autogenerate.compare] Detected added index 'ix_user_username' on '['username']'
  Generating /home/miguel/microblog/migrations/versions/e517276bb1c2_users_table.py ... done
The output of the command gives you an idea of what Alembic included in the migration. The first two lines are informational and can usually be ignored. It then says that it found a user table and two indexes. Then it tells you where it wrote the migration script. The e517276bb1c2 value is an automatically generated and unique code for the migration (it will be different for you). The comment given with the -m option is optional, it just adds a short descriptive text to the migration.
The generated migration script is now part of your project, and if you are using git or other source control tool, it needs to be incorporated as an additional source file, along with all other files stored in the migrations directory. You are welcome to inspect the script if you are curious to see how it looks. You will find that it has two functions called upgrade() and downgrade(). The upgrade() function applies the migration, and the downgrade() function removes it. This allows Alembic to migrate the database to any point in the history, even to older versions, by using the downgrade path.
The flask db migrate command does not make any changes to the database, it just generates the migration script. To apply the changes to the database, the flask db upgrade command must be used.
(venv) $ flask db upgrade
INFO  [alembic.runtime.migration] Context impl SQLiteImpl.
INFO  [alembic.runtime.migration] Will assume non-transactional DDL.
INFO  [alembic.runtime.migration] Running upgrade  -> e517276bb1c2, users table
Because this application uses SQLite, the upgrade command will detect that a database does not exist and will create it (you will notice a file named app.db is added after this command finishes, that is the SQLite database). When working with database servers such as MySQL and PostgreSQL, you have to create the database in the database server before running upgrade.
Note that Flask-SQLAlchemy uses a "snake case" naming convention for database tables by default. For the User model above, the corresponding table in the database will be named user. For a AddressAndPhone model class, the table would be named address_and_phone. If you prefer to choose your own table names, you can add an attribute named __tablename__ to the model class, set to the desired name as a string.
Database Upgrade and Downgrade Workflow
The application is in its infancy at this point, but it does not hurt to discuss what is going to be the database migration strategy going forward. Imagine that you have your application on your development machine, and also have a copy deployed to a production server that is online and in use.
Let's say that for the next release of your application you have to introduce a change to your models, for example a new table needs to be added. Without migrations, you would need to figure out how to change the schema of your database, both in your development machine and then again in your server, and this could be a lot of work.
But with database migration support, after you modify the models in your application you generate a new migration script (flask db migrate), you review it to make sure the automatic generation did the right thing, and then apply the changes to your development database (flask db upgrade). You will add the migration script to source control and commit it.
When you are ready to release the new version of the application to your production server, all you need to do is grab the updated version of your application, which will include the new migration script, and run flask db upgrade. Alembic will detect that the production database is not updated to the latest revision of the schema, and run all the new migration scripts that were created after the previous release.
As I mentioned earlier, you also have a flask db downgrade command, which undoes the last migration. While you will be unlikely to need this option on a production system, you may find it very useful during development. You may have generated a migration script and applied it, only to find that the changes that you made are not exactly what you need. In this case, you can downgrade the database, delete the migration script, and then generate a new one to replace it.
Database Relationships
Relational databases are good at storing relations between data items. Consider the case of a user writing a blog post. The user will have a record in the users table, and the post will have a record in the posts table. The most efficient way to record who wrote a given post is to link the two related records.
Once a link between a user and a post is established, the database can answer queries about this link. The most trivial one is when you have a blog post and need to know what user wrote it. A more complex query is the reverse of this one. If you have a user, you may want to know all the posts that this user wrote. SQLAlchemy helps with both types of queries.
Let's expand the database to store blog posts to see relationships in action. Here is the schema for a new posts table:
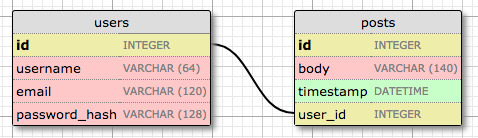
The posts table will have the required id, the body of the post and a timestamp. But in addition to these expected fields, I'm adding a user_id field, which links the post to its author. You've seen that all users have a id primary key, which is unique. The way to link a blog post to the user that authored it is to add a reference to the user's id, and that is exactly what the user_id field is for. This user_id field is called a foreign key, because it references a primary key of another table. The database diagram above shows foreign keys as a link between the field and the id field of the table it refers to. This kind of relationship is called a one-to-many, because "one" user writes "many" posts.
The modified app/models.py is shown below:
app/models.py: Posts database table and relationship
from datetime import datetime, timezone
from typing import Optional
import sqlalchemy as sa
import sqlalchemy.orm as so
from app import db

class User(db.Model):
    id: so.Mapped[int] = so.mapped_column(primary_key=True)
    username: so.Mapped[str] = so.mapped_column(sa.String(64), index=True,
                                                unique=True)
    email: so.Mapped[str] = so.mapped_column(sa.String(120), index=True,
                                             unique=True)
    password_hash: so.Mapped[Optional[str]] = so.mapped_column(sa.String(256))

    posts: so.WriteOnlyMapped['Post'] = so.relationship(
        back_populates='author')

    def __repr__(self):
        return '<User {}>'.format(self.username)

class Post(db.Model):
    id: so.Mapped[int] = so.mapped_column(primary_key=True)
    body: so.Mapped[str] = so.mapped_column(sa.String(140))
    timestamp: so.Mapped[datetime] = so.mapped_column(
        index=True, default=lambda: datetime.now(timezone.utc))
    user_id: so.Mapped[int] = so.mapped_column(sa.ForeignKey(User.id),
                                               index=True)

    author: so.Mapped[User] = so.relationship(back_populates='posts')

    def __repr__(self):
        return '<Post {}>'.format(self.body)
The new Post class will represent blog posts written by users. The timestamp field is defined with a datetime type hint and is configured to be indexed, which is useful if you want to efficiently retrieve posts in chronological order. I have also added a default argument, and passed a lambda function that returns the current time in the UTC timezone. When you pass a function as a default, SQLAlchemy will set the field to the value returned by the function. In general, you will want to work with UTC dates and times in a server application instead of the local time where you are located. This ensures that you are using uniform timestamps regardless of where the users and the server are located. These timestamps will be converted to the user's local time when they are displayed.
The user_id field was initialized as a foreign key to User.id, which means that it references values from the id column in the users table. Since not all databases automatically create an index for foreign keys, the index=True option is added explicitly, so that searches based on this column are optimized.
The User class has a new posts field, that is initialized with so.relationship(). This is not an actual database field, but a high-level view of the relationship between users and posts, and for that reason it isn't in the database diagram. Likewise, the Post class has an author field that is also initialized as a relationship. These two attributes allow the application to access the connected user and post entries.
The first argument to so.relationship() is the model class that represents the other side of the relationship. This argument can be provided as a string, which is necessary when the class is defined later in the module. The back_populates arguments reference the name of the relationship attribute on the other side, so that SQLAlchemy knows that these attributes refer to the two sides of the same relationship.
The posts relationship attribute uses a different typing definition. Instead of so.Mapped, it uses so.WriteOnlyMapped, which defines posts as a collection type with Post objects inside. Don't worry if these details don't make much sense just yet, I'll show you examples of this at the end of this article.
Since I have updates to the application models, a new database migration needs to be generated:
(venv) $ flask db migrate -m "posts table"
INFO  [alembic.runtime.migration] Context impl SQLiteImpl.
INFO  [alembic.runtime.migration] Will assume non-transactional DDL.
INFO  [alembic.autogenerate.compare] Detected added table 'post'
INFO  [alembic.autogenerate.compare] Detected added index 'ix_post_timestamp' on
'['timestamp']'
  Generating /home/miguel/microblog/migrations/versions/780739b227a7_posts_table.py ... done
And the migration needs to be applied to the database:
(venv) $ flask db upgrade
INFO  [alembic.runtime.migration] Context impl SQLiteImpl.
INFO  [alembic.runtime.migration] Will assume non-transactional DDL.
INFO  [alembic.runtime.migration] Running upgrade e517276bb1c2 -> 780739b227a7, posts table
If you are storing your project in source control, also remember to add the new migration script to it.
Playing with the Database
I have made you suffer through a long process to define the database, but I haven't shown you how everything works yet. Since the application does not have any database logic yet, let's play with the database in the Python interpreter to familiarize with it. Fire up Python by running python on your terminal. Make sure your virtual environment is activated before you start the interpreter.
Once in the Python prompt, let's import the application, database instance, models and SQLAlchemy entry point:
>>> from app import app, db
>>> from app.models import User, Post
>>> import sqlalchemy as sa
The next step is a bit strange. For Flask and its extensions to have access to the Flask application without having to pass app as an argument into every function, an application context must be created and pushed. Application contexts are going to be covered in more detail later in the tutorial, so for now, type the following code in your Python shell session:
>>> app.app_context().push()
Next, create a new user:
>>> u = User(username='john', email='john@example.com')
>>> db.session.add(u)
>>> db.session.commit()
Changes to a database are done in the context of a database session, which can be accessed as db.session. Multiple changes can be accumulated in a session and once all the changes have been registered you can issue a single db.session.commit(), which writes all the changes atomically. If at any time while working on a session there is an error, a call to db.session.rollback() will abort the session and remove any changes stored in it. The important thing to remember is that changes are only written to the database when a commit is issued with db.session.commit(). Sessions guarantee that the database will never be left in an inconsistent state.
Are you wondering how do all these database operations know what database to use? The application context that was pushed above allows Flask-SQLAlchemy to access the Flask application instance app without having to receive it as an argument. The extension looks in the app.config dictionary for the SQLALCHEMY_DATABASE_URI entry, which contains the database URL.
Let's add another user:
>>> u = User(username='susan', email='susan@example.com')
>>> db.session.add(u)
>>> db.session.commit()
The database can answer a query that returns all the users:
>>> query = sa.select(User)
>>> users = db.session.scalars(query).all()
>>> users
[<User john>, <User susan>]
The query variable in this example is assigned a basic query that selects all the users. This is achieved by passing the model class to the SQLAlchemy sa.select() query helper function. You will find that most database queries start from a sa.select() call.
The database session, which above was used to define and commit changes, is also used to execute queries. The db.session.scalars() method executes the database query and returns a results iterator. Calling the all() method of the results object converts the results to a plain list.
In many situations it is most efficient to use the results iterator in a for-loop instead of converting it to a list:
>>> users = db.session.scalars(query)
>>> for u in users:
...     print(u.id, u.username)
...
1 john
2 susan
Note that the id fields were automatically set to 1 and 2 when those users were added. This happens because SQLAlchemy configures integer primary key columns to be auto-incrementing.
Here is another way to do queries. If you know the id of a user, you can retrieve that user as follows:
>>> u = db.session.get(User, 1)
>>> u
<User john>
Now let's add a blog post:
>>> u = db.session.get(User, 1)
>>> p = Post(body='my first post!', author=u)
>>> db.session.add(p)
>>> db.session.commit()
I did not need to set a value for the timestamp field, because this field has a default, which you can see in the model definition. And what about the user_id field? Recall that the so.relationship that I created in the Post class adds an author attribute to posts. I assign an author to a post using this author field instead of having to deal with user IDs. SQLAlchemy is great in that respect, as it provides a high-level abstraction over relationships and foreign keys.
To complete this session, let's look at a few more database queries:
>>> # get all posts written by a user
>>> u = db.session.get(User, 1)
>>> u
<User john>
>>> query = u.posts.select()
>>> posts = db.session.scalars(query).all()
>>> posts
[<Post my first post!>]

>>> # same, but with a user that has no posts
>>> u = db.session.get(User, 2)
>>> u
<User susan>
>>> query = u.posts.select()
>>> posts = db.session.scalars(query).all()
>>> posts
[]

>>> # print post author and body for all posts
>>> query = sa.select(Post)
>>> posts = db.session.scalars(query)
>>> for p in posts:
...     print(p.id, p.author.username, p.body)
...
1 john my first post!

# get all users in reverse alphabetical order
>>> query = sa.select(User).order_by(User.username.desc())
>>> db.session.scalars(query).all()
[<User susan>, <User john>]

# get all users that have usernames starting with "s"
>>> query = sa.select(User).where(User.username.like('s%'))
>>> db.session.scalars(query).all()
[<User susan>]
Note how in the first two examples above the relationship between users and posts is used. Recall that the User model has a posts relationship attribute that was configured with the WriteOnlyMapped generic type. This is a special type of relationship that adds a select() method that returns a database query for the related items. The u.posts.select() expression takes care of generating the query that links the user to its blog posts.
The last query demonstrates how to filter the contents of a table using a condition. The where() clause is used to create filters that select only a subset of the rows from the entity selected. In this example I'm using the like() operator to select users based on a pattern.
The SQLAlchemy documentation is the best place to learn about the many options that are available to query the database.
To end, exit the Python shell and use the following commands to erase the test users and posts created above, so that the database is clean and ready for the next chapter:
(venv) $ flask db downgrade base
(venv) $ flask db upgrade
The first command tells Flask-Migrate to apply the database migrations in reverse order. When the downgrade command is not given a target, it downgrades one revision. The base target causes all migrations to be downgraded, until the database is left at its initial state, with no tables.
The upgrade command re-applies all the migrations in forward order. The default target for upgrades is head, which is a shortcut for the most recent migration. This command effectively restores the tables that were downgraded above. Since database migrations do not preserve the data stored in the database, downgrading and then upgrading has the effect of quickly emptying all the tables.
Shell Context
Remember what you did at the start of the previous section, right after starting a Python interpreter? At the start you typed some imports and then pushed an application context:
>>> from app import app, db
>>> from app.models import User, Post
>>> import sqlalchemy as sa
>>> app.app_context().push()
While you work on your application, you will need to test things out in a Python shell very often, so having to repeat the above statements every time is going to get tedious. This is a good time to address this problem.
The flask shell sub-command is another very useful tool in the flask umbrella of commands. The shell command is the second "core" command implemented by Flask, after run. The purpose of this command is to start a Python interpreter in the context of the application. What does that mean? See the following example:
(venv) $ python
>>> app
Traceback (most recent call last):
  File "<stdin>", line 1, in <module>
NameError: name 'app' is not defined
>>>

(venv) $ flask shell
>>> app
<Flask 'app'>
With a regular interpreter session, the app symbol is not known unless it is explicitly imported, but when using flask shell, the command pre-imports the application instance, and pushes its application context for you. The nice thing about flask shell is not only that it pre-imports app, but that you can also configure a "shell context", which is a list of other symbols to pre-import.
The following function in microblog.py creates a shell context that adds the database instance and models to the shell session:
import sqlalchemy as sa
import sqlalchemy.orm as so
from app import app, db
from app.models import User, Post

@app.shell_context_processor
def make_shell_context():
    return {'sa': sa, 'so': so, 'db': db, 'User': User, 'Post': Post}
The app.shell_context_processor decorator registers the function as a shell context function. When the flask shell command runs, it will invoke this function and register the items returned by it in the shell session. The reason the function returns a dictionary and not a list is that for each item you have to also provide a name under which it will be referenced in the shell, which is given by the dictionary keys.
After you add the shell context processor function you can work with database entities without having to import them:
(venv) $ flask shell
>>> db
<SQLAlchemy sqlite:////home/miguel/microblog/app.db>
>>> User
<class 'app.models.User'>
>>> Post
<class 'app.models.Post'>
If you try the above and get NameError exceptions when you try to access sa, so, db, User and Post, then the make_shell_context() function is not being registered with Flask. The most likely cause of this is that you have not set FLASK_APP=microblog.py in the environment. In that case, go back to Chapter 1 and review how to set the FLASK_APP environment variable. If you often forget to set this variable when you open new terminal windows, you may consider adding a .flaskenv file to your project, as described at the end of that chapter.
Continue on to the next chapter.
Become a Patron!
Hello, and thank you for visiting my blog! If you enjoyed this article, please consider supporting my work on this blog on Patreon!

-
#1 🌙 said
Is it possible to use Flask-Migrate without using SQLAlchemy? I like to write raw SQL code but I don't want to rebuild the database from scratch each time a change is made to the schema.
-
#2 Miguel Grinberg said
@🌙: No, Flask-Migrate depends on Flask-SQLAlchemy or Alchemical, both of which depend on SQLAlchemy.
-
#3 Justin said
I just noticed that flask-sqlalchemy 3.0 adds
add_models_to_shell=Trueso for many users and in this exampleThe dict items
''User': User, 'Post': Postis not needed in theshell_context_processor.Also it seems like db is also not needed, I think that is also flask-sqlalchemy 3.0 but I'm not certain
-
#4 Miguel Grinberg said
@Justin: Thanks. Yes, you can do it that way if you like, but I believe you will still miss the SQLAlchemy imports so it is useful to show how to manually add symbols to the shell.
-
#5 h said
https://flask-sqlalchemy.palletsprojects.com/en/2.x/models/
https://flask-sqlalchemy.palletsprojects.com/en/3.1.x/customizing/hello, thank you for the guide. i would like to ask what is the difference between these 2 methods when creating the tables.
thank you -
#6 Miguel Grinberg said
@h: The first link is the legacy way of creating models. The second link is the current way. Both can be used, but the second is the most modern, taking advantage of Python typing hints.
-
#7 Al said
Thank you so much for the great tutorial! Since I'm new to all this, I could be mistaken but I think there are two minor typos.
- In the database table model for Users, password_hash is defined as VARCHAR(128) but in the python code model, it's 256. Not sure which is correct (or if it matters).
- In the Post class, should user_id: so.Mapped[str] be defined as an [int]?
Thanks
-
#8 Marc Lebrun said
Hi Miguel,
In the definition of the Post class, you defined the user_id as so.Mapped[str], but shouldn't it be [int] instead ? -
#9 Miguel Grinberg said
@Marc: Yes, sorry about that. This has been corrected now.
-
#10 Miguel Grinberg said
@Al: Both were correct in the code, I posted a slightly out of date version here. I have now updated this article to match the code. Thanks!
-
#11 Pierre said
Thanks a lot for this tutoriel! I was wondering how to get updates into production with Google Cloud Run, for example?
-
#12 Miguel Grinberg said
@Pierre: there are a few deployment chapters later on. Nothing specific to Google Cloud, but more generic about how to configure an instance on any cloud for a production site.
-
#13 QuirkyT said
Hi Miguel, why does password_hash use the Optional helper? Won't there always be a password hash?
-
#14 Miguel Grinberg said
@QuirkyT: Is a general rule, many authentication systems use passwords as one of several options. Also note that if you have users already in your database, you will not be able to add a non-nullable field, since those pre-existing entries do not have a value for this field.
-
#15 jon said
whats causing this error at the flask db init:
Traceback (most recent call last):
File "/usr/bin/flask", line 33, in <module>
sys.exit(load_entry_point('Flask==2.2.5', 'console_scripts', 'flask')())
^^^^^^^^^^^^^^^^^^^^^^^^^^^^^^^^^^^^^^^^^^^^^^^^^^^^^^^^^^^^^^
File "/usr/lib/python3/dist-packages/flask/cli.py", line 1050, in main
cli.main()
File "/usr/lib/python3/dist-packages/click/core.py", line 1077, in main
with self.make_context(prog_name, args, **extra) as ctx:
^^^^^^^^^^^^^^^^^^^^^^^^^^^^^^^^^^^^^^^^^^^
File "/usr/lib/python3/dist-packages/flask/cli.py", line 627, in make_context
load_dotenv()
File "/usr/lib/python3/dist-packages/flask/cli.py", line 704, in load_dotenv
path = dotenv.find_dotenv(name, usecwd=True)
^^^^^^^^^^^^^^^^^^^^^^^^^^^^^^^^^^^^^
File "/usr/lib/python3/dist-packages/dotenv/main.py", line 288, in find_dotenv
path = os.getcwd()
^^^^^^^^^^^
FileNotFoundError: [Errno 2] No such file or directory -
#16 Miguel Grinberg said
@jon: I'm not sure, but my suggestion would be that you follow the instructions provided by this tutorial more carefully. You are not using a virtual environment, and you should be.
-
#17 sblaisot said
Hi Miguel,
Thanks you very much for your wonderful tutorial.
In this part, It should probably be a good idea to handle cascading deletes.
It is currently impossible to delete a user due to the relationship$ flask shell Python 3.10.12 (main, Nov 20 2023, 15:14:05) [GCC 11.4.0] on linux App: app Instance: microblog/instance >>> u = User(username='susan', email='susan@example.com') >>> db.session.add(u) >>> p = Post(body='my first post!', author=u) >>> db.session.add(p) >>> db.session.commit() >>> db.session.delete(u) >>> db.session.commit() Traceback (most recent call last): File "<console>", line 1, in <module> File ".venv/lib/python3.10/site-packages/sqlalchemy/orm/scoping.py", line 598, in commit return self._proxied.commit() File ".venv/lib/python3.10/site-packages/sqlalchemy/orm/session.py", line 1969, in commit trans.commit(_to_root=True) File "<string>", line 2, in commit File ".venv/lib/python3.10/site-packages/sqlalchemy/orm/state_changes.py", line 139, in _go ret_value = fn(self, *arg, **kw) File ".venv/lib/python3.10/site-packages/sqlalchemy/orm/session.py", line 1256, in commit self._prepare_impl() File "<string>", line 2, in _prepare_impl File ".venv/lib/python3.10/site-packages/sqlalchemy/orm/state_changes.py", line 139, in _go ret_value = fn(self, *arg, **kw) File ".venv/lib/python3.10/site-packages/sqlalchemy/orm/session.py", line 1231, in _prepare_impl self.session.flush() File ".venv/lib/python3.10/site-packages/sqlalchemy/orm/session.py", line 4312, in flush self._flush(objects) File ".venv/lib/python3.10/site-packages/sqlalchemy/orm/session.py", line 4447, in _flush with util.safe_reraise(): File ".venv/lib/python3.10/site-packages/sqlalchemy/util/langhelpers.py", line 146, in __exit__ raise exc_value.with_traceback(exc_tb) File ".venv/lib/python3.10/site-packages/sqlalchemy/orm/session.py", line 4408, in _flush flush_context.execute() File ".venv/lib/python3.10/site-packages/sqlalchemy/orm/unitofwork.py", line 442, in execute postsort_actions = self._generate_actions() File ".venv/lib/python3.10/site-packages/sqlalchemy/orm/unitofwork.py", line 400, in _generate_actions if action.execute(self): File ".venv/lib/python3.10/site-packages/sqlalchemy/orm/unitofwork.py", line 532, in execute self.dependency_processor.presort_deletes(uow, delete_states) File ".venv/lib/python3.10/site-packages/sqlalchemy/orm/dependency.py", line 448, in presort_deletes history = uowcommit.get_attribute_history( File ".venv/lib/python3.10/site-packages/sqlalchemy/orm/unitofwork.py", line 283, in get_attribute_history history = impl.get_history( File ".venv/lib/python3.10/site-packages/sqlalchemy/orm/writeonly.py", line 383, in get_history c = self._get_collection_history(state, passive) File ".venv/lib/python3.10/site-packages/sqlalchemy/orm/writeonly.py", line 407, in _get_collection_history return self.collection_history_cls( File ".venv/lib/python3.10/site-packages/sqlalchemy/orm/writeonly.py", line 94, in __init__ raise exc.InvalidRequestError( sqlalchemy.exc.InvalidRequestError: Attribute User.posts can't load the existing state from the database for this operation; full iteration is not permitted. If this is a delete operation, configure passive_deletes=True on the User.posts relationship in order to resolve this error.Adding
cascade="all, delete-orphan", passive_deletes=Trueon User.post let you delete user but breaks the posts related to this user, which are not deleted.How would you solve this? Do you recommand to manually handle the case in the code (i.e. deleting all posts related to the user before deleting the user, or at least setting their author value to something else like a garbage user)?
-
#18 Miguel Grinberg said
@sblaisot: first of all, deleting is not a common operation in web services, as that can create lots of inconsistencies. A pattern more frequently used is the "soft delete" pattern, in which the entries are not deleted, but just marked as deleted with a boolean attribute. But if you still want to proceed with a deletion, the cascade configuration that you used should work just fine, I think, but you have to add it on all relationships that have the user on one of the sides. This includes tasks, notifications and messages as well as posts. Do you see how impractical it would be to delete a user?
-
#19 Antonio said
(venv) PS C:\Users\path> flask db migrate
<hr />
INFO [alembic.runtime.migration] Context impl SQLiteImpl.
INFO [alembic.runtime.migration] Will assume non-transactional DDL.
INFO [alembic.env] No changes in schema detected.I truly don't know why, when im trying to make some change to the database in models.py, the migration does not recognize any change. I'm trying to use it in my application, different from yours, but i followed the same process as you showed.
Also if i completly change the User in models.py it does not recognize any change to the database
-
#20 Miguel Grinberg said
@Antonio: There are several issues on the GitHub repo with users complaining of this. I really cannot tell you what is the problem with the little information you provided. All I can tell you is that your model definitions (as seen by Flask-Migrate) match exactly the table definitions in your database, so Flask-Migrate does not think there is any migrations needed. Why your models are identical to your database I do not know, but to make a migration there has to be some differences.
-
#21 Karl van de Waal said
(venv) PS E:\Documents\Code\microblog> flask db migrate -m "users table"
INFO [alembic.runtime.migration] Context impl SQLiteImpl.
INFO [alembic.runtime.migration] Will assume non-transactional DDL.
INFO [alembic.env] No changes in schema detected.This is the result when I enter this command. I've cut-and-paste your code into all the files so I doubt there's a typo or anything. Any suggestions because I cannot proceed without this working.
-
#22 Miguel Grinberg said
@Karl: the most likely cause of this is that you already created the database outside of this tutorial's instructions. If the database already exists, then Flask-Migrate will find there is no need to make any more changes to it. Try deleting your database, then the command should work.
-
#23 Tom said
I see you put Post in quotes in this line in the User definition.
posts: so.WriteOnlyMapped['Post'] = so.relationship(
    back_populates='author')
I understand this is because it is not quite parallel to the Post definition which uses User without quotes for the author field. I imagine this would only cause issues if one were to change the name of the Post class down the line but is there another way to structure this such that you don't need the hard-coded "Post" string? Thanks for the terrific resource.
-
#24 Miguel Grinberg said
@Tom: I explain this in the article. When a class needs to reference another class that is define below it, you cannot write the name directly, because Python will give you an error. This is called a "forward reference". SQLAlchemy allows you to enter forward references as strings. When the
Postclass referencesUserit is not a forward reference becauseUseris defined abovePost, so in that case a string is not necessary (but if you want to be consistent you can use a string on that one as well). -
#25 Odum said
Hi! Could you possible add a screenshot of what the file structure would look like after adding the database configurations? Thanks!