The Flask Mega-Tutorial, Part VII: Error Handling
Posted by
on underThis is the seventh installment of the Flask Mega-Tutorial series, in which I'm going to tell you how to do error handling in a Flask application.
You are reading the 2024 edition of the Flask Mega-Tutorial. The complete course is also available to order in e-book and paperback formats from Amazon. Thank you for your support!
If you are looking for the 2018 edition of this course, you can find it here.
For your reference, here is the complete list of articles in this series:
- Chapter 1: Hello, World!
- Chapter 2: Templates
- Chapter 3: Web Forms
- Chapter 4: Database
- Chapter 5: User Logins
- Chapter 6: Profile Page and Avatars
- Chapter 7: Error Handling (this article)
- Chapter 8: Followers
- Chapter 9: Pagination
- Chapter 10: Email Support
- Chapter 11: Facelift
- Chapter 12: Dates and Times
- Chapter 13: I18n and L10n
- Chapter 14: Ajax
- Chapter 15: A Better Application Structure
- Chapter 16: Full-Text Search
- Chapter 17: Deployment on Linux
- Chapter 18: Deployment on Heroku
- Chapter 19: Deployment on Docker Containers
- Chapter 20: Some JavaScript Magic
- Chapter 21: User Notifications
- Chapter 22: Background Jobs
- Chapter 23: Application Programming Interfaces (APIs)
In this chapter I'm taking a break from coding new features into my microblog application, and instead will discuss a few strategies to deal with bugs, which invariably make an appearance in every software project. To help illustrate this topic, I intentionally let a bug slip in the code that I've added in Chapter 6. Before you continue reading, see if you can find it!
The GitHub links for this chapter are: Browse, Zip, Diff.
Error Handling in Flask
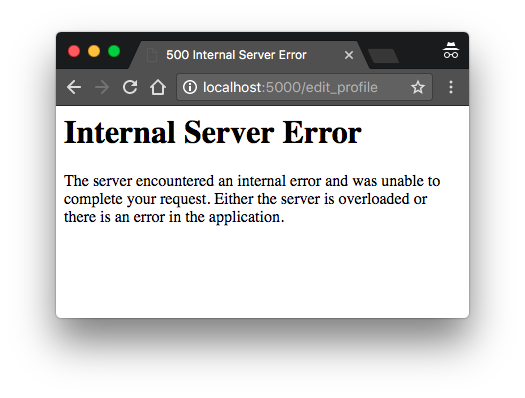
What happens when an error occurs in a Flask application? The best way to find out is to experience it first hand. Go ahead and start the application, and make sure you have at least two users registered. Log in as one of the users, open the profile page and click the "Edit" link. In the profile editor, try to change the username to the username of another user that is already registered, and boom! This is going to bring a scary looking "Internal Server Error" page:
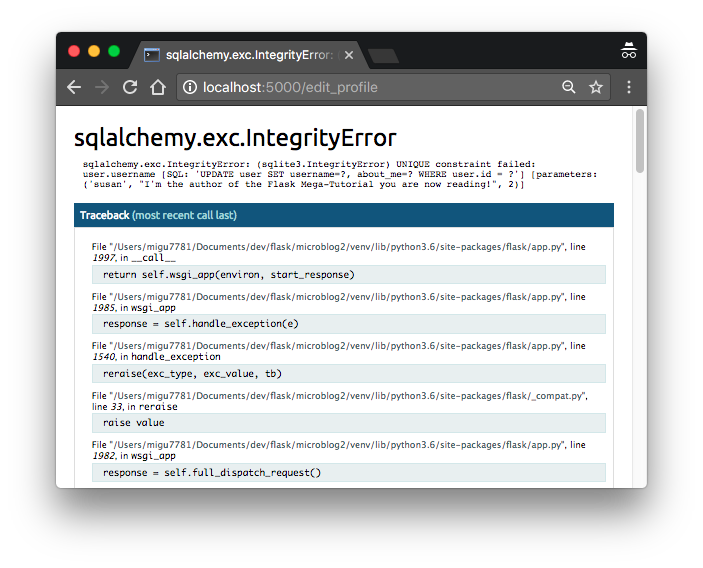
If you look in the terminal session where the application is running, you will see a stack trace of the error. Stack traces are extremely useful in debugging errors, because they show the sequence of calls in that stack, all the way to the line that produced the error:
([2023-04-28 23:59:42,300] ERROR in app: Exception on /edit_profile [POST]
Traceback (most recent call last):
  File "venv/lib/python3.11/site-packages/sqlalchemy/engine/base.py", line 1963, in _exec_single_context
    self.dialect.do_execute(
  File "venv/lib/python3.11/site-packages/sqlalchemy/engine/default.py", line 918, in do_execute
    cursor.execute(statement, parameters)
sqlite3.IntegrityError: UNIQUE constraint failed: user.username
The stack trace helps you determine what is the bug. The application allows a user to change the username, but it does not validate that the new username chosen does not collide with another user already in the system. The error comes from SQLAlchemy, which tries to write the new username to the database, but the database rejects it because the username column is defined with the unique=True option.
It is important to note that the error page that is presented to the user does not provide much information about the error, and that is good. I definitely do not want users to learn that the crash was caused by a database error, or what database I'm using, or what are some of the table and field names in my database. All that information should be kept internal.
But there are a few things that are far from ideal. I have an error page that is very ugly and does not match the application layout. I also have important application stack traces being dumped on a terminal that I need to constantly watch to make sure I don't miss any errors. And of course, I have a bug to fix. I'm going to address all these issues, but first, let's talk about Flask's debug mode.
Debug Mode
The way you saw that errors are handled above is great for a system that is running on a production server. If there is an error, the user gets a vague error page (though I'm going to make this error page nicer), and the important details of the error are in the server process output or in a log file.
But when you are developing your application, you can enable debug mode, a mode in which Flask outputs a really nice debugger directly on your browser. To activate debug mode, stop the application, and then set the following environment variable:
(venv) $ export FLASK_DEBUG=1
If you are on Microsoft Windows, remember to use set instead of export.
After you set FLASK_DEBUG, restart the server. The output on your terminal is going to be slightly different than what you are used to see:
(venv) $ flask run
 * Serving Flask app 'microblog.py' (lazy loading)
 * Environment: development
 * Debug mode: on
 * Running on http://127.0.0.1:5000/ (Press CTRL+C to quit)
 * Restarting with stat
 * Debugger is active!
 * Debugger PIN: 118-204-854
Now make the application crash one more time to see the interactive debugger in your browser:
The debugger allows you expand each stack frame and see the corresponding source code. You can also open a Python prompt on any of the frames and execute any valid Python expressions, for example to check the values of variables.
It is extremely important that you never run a Flask application in debug mode on a production server. The debugger allows the user to remotely execute code in the server, so it can be an unexpected gift to a malicious user who wants to infiltrate your application or your server. As an additional security measure, the debugger running in the browser starts locked, and on first use it will ask for a PIN, which you can see in the output of the flask run command.
Since I am on the topic of debug mode, I should mention the second important feature that is enabled with debug mode, which is the reloader. This is a very useful development feature that automatically restarts the application when a source file is modified. If you run flask run while in debug mode, you can then work on your application and any time you save a file, the application will restart to pick up the new code.
Custom Error Pages
Flask provides a mechanism for an application to install its own error pages, so that your users don't have to see the plain and boring default ones. As an example, let's define custom error pages for the HTTP errors 404 and 500, the two most common ones. Defining pages for other errors works in the same way.
To declare a custom error handler, the @errorhandler decorator is used. I'm going to put my error handlers in a new app/errors.py module.
app/errors.py: Custom error handlers
from flask import render_template
from app import app, db

@app.errorhandler(404)
def not_found_error(error):
    return render_template('404.html'), 404

@app.errorhandler(500)
def internal_error(error):
    db.session.rollback()
    return render_template('500.html'), 500
The error functions work very similarly to view functions. For these two errors, I'm returning the contents of their respective templates. Note that both functions return a second value after the template, which is the error code number. For all the view functions that I created so far, I did not need to add a second return value because the default of 200 (the status code for a successful response) is what I wanted. In this case these are error pages, so I want the status code of the response to reflect that.
The error handler for the 500 errors could be invoked after a database error, which was actually the case with the username duplicate above. To make sure any failed database sessions do not interfere with any database accesses triggered by the template, I issue a session rollback. This resets the session to a clean state.
Here is the template for the 404 error:
app/templates/404.html: Not found error template
{% extends "base.html" %}

{% block content %}
    <h1>File Not Found</h1>
    <p><a href="{{ url_for('index') }}">Back</a></p>
{% endblock %}
And here is the one for the 500 error:
app/templates/500.html: Internal server error template
{% extends "base.html" %}

{% block content %}
    <h1>An unexpected error has occurred</h1>
    <p>The administrator has been notified. Sorry for the inconvenience!</p>
    <p><a href="{{ url_for('index') }}">Back</a></p>
{% endblock %}
Both templates inherit from the base.html template, so that the error page has the same look and feel as the normal pages of the application.
To get these error handlers registered with Flask, I need to import the new app/errors.py module after the application instance is created:
app/__init__.py: Import error handlers
# ...

from app import routes, models, errors
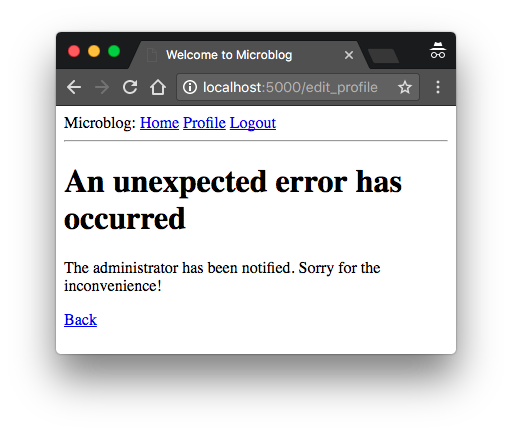
If you set FLASK_DEBUG=0 in your terminal session (or delete the FLASK_DEBUG variable), and then trigger the duplicate username bug one more time, you are going to see a slightly more friendly error page.
Sending Errors by Email
The other problem with the default error handling provided by Flask is that there are no notifications. The stack traces for any errors are printed to the terminal, which means that the output of the server process needs to be monitored to discover errors. When you are running the application during development, this is perfectly fine, but once the application is deployed on a production server, nobody is going to be looking at the output of the server, so a more robust solution needs to be put in place.
I think it is very important to take a proactive approach regarding errors. If an error occurs on the production version of the application, I want to know right away. So my first solution is going to be to configure Flask to email me immediately after an error, with the stack trace of the error in the email body.
The first step is to add the email server details to the configuration file:
config.py: Email configuration
class Config:
    # ...
    MAIL_SERVER = os.environ.get('MAIL_SERVER')
    MAIL_PORT = int(os.environ.get('MAIL_PORT') or 25)
    MAIL_USE_TLS = os.environ.get('MAIL_USE_TLS') is not None
    MAIL_USERNAME = os.environ.get('MAIL_USERNAME')
    MAIL_PASSWORD = os.environ.get('MAIL_PASSWORD')
    ADMINS = ['your-email@example.com']
The configuration variables for email include the server and port, a boolean flag to enable encrypted connections, and optional username and password. The five configuration variables are sourced from their environment variable counterparts. If the email server is not set in the environment, then I will use that as a sign that emailing errors needs to be disabled. The email server port can also be given in an environment variable, but if not set, the standard port 25 is used. Email server credentials are by default not used, but can be provided if needed. The ADMINS configuration variable is a list of the email addresses that will receive error reports, so your own email address should be in that list.
Flask uses Python's logging package to write its logs, and this package already has the ability to send logs by email. All I need to do to get emails sent out on errors is to add a SMTPHandler instance to the Flask logger object, which is app.logger:
app/__init__.py: Log errors by email
import logging
from logging.handlers import SMTPHandler

# ...

if not app.debug:
    if app.config['MAIL_SERVER']:
        auth = None
        if app.config['MAIL_USERNAME'] or app.config['MAIL_PASSWORD']:
            auth = (app.config['MAIL_USERNAME'], app.config['MAIL_PASSWORD'])
        secure = None
        if app.config['MAIL_USE_TLS']:
            secure = ()
        mail_handler = SMTPHandler(
            mailhost=(app.config['MAIL_SERVER'], app.config['MAIL_PORT']),
            fromaddr='no-reply@' + app.config['MAIL_SERVER'],
            toaddrs=app.config['ADMINS'], subject='Microblog Failure',
            credentials=auth, secure=secure)
        mail_handler.setLevel(logging.ERROR)
        app.logger.addHandler(mail_handler)

from app import routes, models, errors
As you can see, I'm only going to enable the email logger when the application is running without debug mode, which is indicated by app.debug being True, and also when the email server exists in the configuration.
Setting up the email logger is somewhat tedious due to having to handle optional security options that are present in many email servers. But in essence, the code above creates a SMTPHandler instance, sets its level so that it only reports errors and not warnings, informational or debugging messages, and finally attaches it to the app.logger object from Flask.
There are two approaches to test this feature. The easiest one is to use an SMTP debugging server. This is a fake email server that accepts emails, but instead of sending them, it prints them to the console. To run this server, open a second terminal session, activate the virtual environment, and install the aiosmtpd package:
(venv) $ pip install aiosmtpd
Then run the following command to start a debugging email server:
(venv) $ aiosmtpd -n -c aiosmtpd.handlers.Debugging -l localhost:8025
This command will not print anything yet, but will wait for clients to connect. Leave the debugging SMTP server running and go back to your first terminal and configure your email server as follows:
export MAIL_SERVER=localhost
export MAIL_PORT=8025
As always, use set instead of export if you are on Microsoft Windows. Make sure the FLASK_DEBUG variable is set to 0 or not set at all, since the application will not send emails in debug mode. Run the application and trigger the SQLAlchemy error one more time to see how the terminal session running the fake email server shows an email with the full stack trace of the error.
A second testing approach for this feature is to configure a real email server. Below is the configuration to use your Gmail account's email server:
export MAIL_SERVER=smtp.googlemail.com
export MAIL_PORT=587
export MAIL_USE_TLS=1
export MAIL_USERNAME=<your-gmail-username>
export MAIL_PASSWORD=<your-gmail-password>
If you are using Microsoft Windows, remember to use set instead of export in each of the statements above.
The security features in your Gmail account may prevent the application from sending emails through it unless you explicitly allow "less secure apps" access to your Gmail account. You can read about this here, and if you are concerned about the security of your account, you can create a secondary account that you configure just for testing emails, or you can enable less secure apps only temporarily to run this test and then revert to the default.
Yet another alternative is to use a dedicated email service such as SendGrid, which allows you to send up to 100 emails per day on a free account.
Logging to a File
Receiving errors via email is nice, but sometimes this isn't enough. There are some failure conditions that do not end in a Python exception and are not a major problem, but they may still be interesting enough to save for debugging purposes. For this reason, I'm also going to maintain a log file for the application.
To enable a file based log another handler, this time of type RotatingFileHandler, needs to be attached to the application logger, similarly to the email handler.
app/__init__.py: Logging to a file
# ...
from logging.handlers import RotatingFileHandler
import os

# ...

if not app.debug:
    # ...

    if not os.path.exists('logs'):
        os.mkdir('logs')
    file_handler = RotatingFileHandler('logs/microblog.log', maxBytes=10240,
                                       backupCount=10)
    file_handler.setFormatter(logging.Formatter(
        '%(asctime)s %(levelname)s: %(message)s [in %(pathname)s:%(lineno)d]'))
    file_handler.setLevel(logging.INFO)
    app.logger.addHandler(file_handler)

    app.logger.setLevel(logging.INFO)
    app.logger.info('Microblog startup')
I'm writing the log file with name microblog.log in a logs directory, which I create if it doesn't already exist.
The RotatingFileHandler class is nice because it rotates the logs, ensuring that the log files do not grow too large when the application runs for a long time. In this case I'm limiting the size of the log file to 10KB, and I'm keeping the last ten log files as backup.
The logging.Formatter class provides custom formatting for the log messages. Since these messages are going to a file, I want them to have as much information as possible. So I'm using a format that includes the timestamp, the logging level, the message and the source file and line number from where the log entry originated.
To make the logging more useful, I'm also lowering the logging level to the INFO category, both in the application logger and the file logger handler. In case you are not familiar with the logging categories, they are DEBUG, INFO, WARNING, ERROR and CRITICAL in increasing order of severity.
As a first interesting use of the log file, the server writes a line to the logs each time it starts. When this application runs on a production server, these log entries will tell you when the server was restarted.
Fixing the Duplicate Username Bug
I have used the username duplication bug for too long. Now that I have showed you how to prepare the application to handle these types of errors, I can go ahead and fix it.
If you recall, the RegistrationForm already implements validation for usernames, but the requirements of the edit form are slightly different. During registration, I need to make sure the username entered in the form does not exist in the database. On the edit profile form I have to do the same check, but with one exception. If the user leaves the original username untouched, then the validation should allow it, since that username is already assigned to that user. Below you can see how I implemented the username validation for this form:
app/forms.py: Validate username in edit profile form.
class EditProfileForm(FlaskForm):
    username = StringField('Username', validators=[DataRequired()])
    about_me = TextAreaField('About me', validators=[Length(min=0, max=140)])
    submit = SubmitField('Submit')

    def __init__(self, original_username, *args, **kwargs):
        super().__init__(*args, **kwargs)
        self.original_username = original_username

    def validate_username(self, username):
        if username.data != self.original_username:
            user = db.session.scalar(sa.select(User).where(
                User.username == self.username.data))
            if user is not None:
                raise ValidationError('Please use a different username.')
The implementation is in a custom validation method, but there is an overloaded constructor that accepts the original username as an argument. This username is saved as an instance variable, and checked in the validate_username() method. If the username entered in the form is the same as the original username, then there is no reason to check the database for duplicates.
To use this new validation method, I need to add the original username argument in the view function, where the form object is created:
app/routes.py: Validate username in edit profile form.
@app.route('/edit_profile', methods=['GET', 'POST'])
@login_required
def edit_profile():
    form = EditProfileForm(current_user.username)
    # ...
Now the bug is fixed and duplicates in the edit profile form will be prevented in most cases. This is not a perfect solution, because it may not work when two or more processes are accessing the database at the same time. In that situation, a race condition could cause the validation to pass, but a moment later when the rename is attempted the database was already changed by another process and cannot rename the user. This is somewhat unlikely except for very busy applications that have a lot of server processes, so I'm not going to worry about it for now.
At this point you can try to reproduce the error one more time to see how the new form validation method prevents it.
Enabling Debug Mode Permanently
Flask's debug mode is so useful that you may want to have it turned on by default. This can be done by adding the FLASK_DEBUG environment variable to the .flaskenv file.
.flaskenv: Environment variables for flask command
FLASK_APP=microblog.py
FLASK_DEBUG=1
With this change, debug mode will be enabled when you start the server with the flask run command.
Continue on to the next chapter.
Become a Patron!
Hello, and thank you for visiting my blog! If you enjoyed this article, please consider supporting my work on this blog on Patreon!

-
#1 Vladimir Kuzmenkov said
Hi Miguel, thanks a lot for another chapter.
Gmail no longer supports less secure apps since 30 May 2022
SendGrid SMTP is an option that worked for me. They guide the user through configuration in a very clean manner.
Here are two things that are not very obvious during configuration:
1) On the step, when api key created, make sure to go to "Edit API key" and set permission for you key to "Full Access"
2) In our init.py file set the "fromaddr" to the email you linked for SendGrid to use.
A good way would be to create MAIL_DEFAULT_SENDER variable in .flaskenv, pass it to config and then to "fromaddr". -
#2 esor said
For anyone else who may run into this issue.
The command: "aiosmtpd -n -c aiosmtpd.handlers.Debugging -l localhost:8025" kept giving me a traceback indicating that aiosmtpd could not bind to the port:
"OSError: [Errno 99] error while attempting to bind on address ('::1', 8025, 0, 0): cannot assign requested address"
If you run into this, it could be how your /etc/hosts file is configured.
For me the /etc/hosts starts as follows:
"127.0.0.1 localhost
::1 localhost ip6-localhost ip6-loopback"It was attempting to use the "::1" IPv6 interface.
My quick fix was to use "127.0.0.1" rather than "localhost."
aiosmtpd -n -c aiosmtpd.handlers.Debugging -l 127.0.0.1:8025
(Great tutorial by the way!)
-
#3 Simon said
Hi,
thanks for another great chapter. I followed through with the instructions, but I can't get the mailing to work. It logs errors to disk though, that's a start. I tried testing it with aiosmtpd, but when I run the app and cause the error the terminal running the debug mail server stays blank.Any suggestions on how to troubleshoot?
-
#4 Miguel Grinberg said
@Simon: Instead of
localhost, try using the127.0.0.1IP address. Someone else indicated that in their systemlocalhostwas mapped to an IPv6 address and that created some complications. Other than that, you need to make sure that you have defined all the mail server variables, and that the code is correct. You can download the working code from the download link I share in the introduction of this article. -
#5 TheBlack said
Hello, I'm a bit confused with a log e-mail sending code in app/init.py
1) Should it be "and" operator instead of "or" in chunk of code below? It seems for me that we would want to fill "auth" var. in case we have both username and password
auth = None
if app.config['MAIL_USERNAME'] OR app.config['MAIL_PASSWORD']:
2) If MAIL_SERVER is provided, but MAIL_USERNAME or MAIL_PASSWORD or both of them are not provided, will any error happen because of "auth" variable passed to SMTPHandler while its being None or containing None for any of MAIL_USERNAME or MAIL_PASSWORD?
Thanks in advance. -
#6 Miguel Grinberg said
@TheBlack: regarding 1, the idea is that as long as one or both variables are set an attempt to authenticate will be made. This isn't very common, but some systems encoding a token in one of the two variables and leave the other empty, so this would support those.
For 2, when username and password aren't given the server will be assumed to not require authentication. This is how the SMTP logic in Python is implemented.
-
#7 Kaaskop said
Hello Miguel,
I'm trying to follow through your tutorial but keep getting the same error with this part but also with the password reset part which says in console:
smtplib.SMTPServerDisconnected: please run connect() first
I used SendGrid since there is no more Google support but also had this error with localhost I think. What mistake did I make / part did I miss? I have been going over all parts and my code seems to be the same as yours so I'm not sure what I am missing. Thanks in advance! -
#8 Miguel Grinberg said
@Kaaskop: the most likely error on your part is missing or incorrect credentials for SendGrid. This is the environment variables that are described in this article. Make sure they are set correctly for your SendGrid account.
-
#9 Dervish Grady said
Thanks a lot for this great tutorial. I learn a lot in only one week. I want to become a full-stack Python developer. I know I'm a newbie in web technologies and this is my first try. I began to learn Python three months ago and I'm searching for a good tutorial to begin more advanced topics. I found this jewel and I only want to say: Thank you very much, I really appreciate your effort. I buy your SQLALchemy 2.0 book to support your work. I'm working on this tutorial with slight changes: I'm using SQL SERVER 2008 R2 (and 2022) as the database engine and configuring an email server to work with the topic of sending emails. This became challenging for me, but finally with some investigation and the guide of the tips of this tutorial, today I finished this topic. :)
-
#10 WildElixir said
Hello Miguel,
I have been following along the tutorial to teach myself the basics of Flask, before reaching this section I was playing around with validation to help my understanding. I implemented email validation by following the examples used in the login form like this ...
def validate_email(self, email):
user = db.session.scalar(sa.select(User).where(User.email == email.data))
if user is not None and user.email != current_user.email:
raise ValidationError('That email is associated with another account')As someone not very familiar with python and flask in general, your username validation seems more complex . Is there a particular benefit to setting this up with the overloaded constructor, other than not making an unnecessary DB call?
Many thanks for a fantastic learning resource,
-
#11 Miguel Grinberg said
@WildElixir: yes, the benefit is that my form class validator does not have a dependency on Flask-Login, while your does. In general it is a good idea to avoid unnecessary dependencies, too many interdependencies always end up causing issues when you upgrade packages, for example.
-
#12 sunday-potion said
Hello Miguel,
would u recommend setting these email details in the .flaskenv file from the get-go? From what I understood I would otherwise need to set these email details for each session? Would this be more convenient and streamlined?
FLASK_APP=microblog.py
FLASK_DEBUG=1
MAIL_SERVER=smtp.example.com
MAIL_PORT=587
MAIL_USE_TLS=true
MAIL_USERNAME=myemail@example.com
MAIL_PASSWORD=mysecretpassword -
#13 Miguel Grinberg said
@sunday: No, the .flaskenv file is not a good place to store sensitive configuration variables such as your email server's password. Use a
.envfile instead, which you can configure in your.gitignoreto never be added to git. This is covered later in the tutorial, by the way.


