Building an Arduino Robot, Part I: Hardware Components
Posted by
on under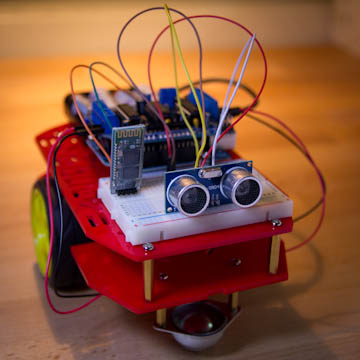
I have been doing software for almost as long as I have memory. I have also been following the open source hardware movement since its inception a few years ago, but I have never found the time or the disposition to attempt a hardware project myself.
Until now, that is.
I have decided to do a small hardware project to get my feet wet, a project that I will fully document and discuss here with the hope to encourage and motivate others to do the same.
Here is the list of articles I have published:
- Part I: Hardware Components (this article)
- Part II: Programming the Arduino
- Part III: Assembling the Robot
- Part IV: A (Not So) Basic Robot Firmware
- Part V: Avoiding Obstacles
- Part VI: Remote Control
Deciding what to build
For the hardware platform I have decided on the Arduino. This was an easy choice, as this is a platform that is widely used by hardware tinkerers all over the world, which means there is plenty of information and resources available.
The choice of a project that is in line with my (limited) knowledge was also pretty easy to make. I knew I wanted to build a cool toy, something I can impress my kids with. That pretty much reduced the list of options to just one: a robot.
But what kind of robot? A humanoid robot would be awesome to build, but it does not seem like a good choice for a first project. I needed something easy enough that I can complete in a relatively short amount of time, yet hard enough to be interesting and challenging.
After some Googling to see what other people do with Arduinos I have settled on a remote controlled robot vehicle.
As I said before I wanted to make this challenging, so I decided against buying a kit that includes all the parts, the software and the instructions. Instead, I decided to come up with a relatively custom robot design, get the parts I needed and figure out how to build it and program it without any specific instructions.
Here are the features I decided my robot will have:
- It should be a vehicle that can move forward, backwards and turn.
- It should be easy to assemble and disassemble.
- It should have a mode in which it is able to move on its own, detecting obstacles ahead and avoiding them.
- It should have a mode in which it can be fully controlled from my Android smartphone.
- It should be easy to hack, change and improve.
Does this sound interesting enough to you? I hope it does, it certainly does to me!
Shopping list
With the above feature list in hand I went on to research what parts I needed for my project. Here is the list I came up with:
- Arduino board
- Motor controller
- Distance sensor
- Bluetooth slave
- Prototyping board and cables
- USB cable
- Vehicle kit
The Arduino board

The Arduino board will be the brain of the robot, as it will be running the software that will control all the other parts.
My son had an old Arduino Uno that he ended up not using, so I did not need to buy one. There are plenty of Arduino models or even Arduino compatible boards that can be used.
My recommendation: Arduino Uno R3, currently $21.95 at Amazon.
The motor driver

The Arduino board cannot directly control a motor. The tricky part is to be able to make the motor selectively run forward or backwards, which requires swapping power and ground inputs into the motor.
There is a specialized circuit called an H-Bridge that can do this, and there are several implementations of this circuit readily available for the Arduino platform, or you can also build one from basic parts for next to nothing.
Without having much knowledge about this I bought the cheapest motor controller board I've found, a fully assembled version of the Adafruit motor shield at Amazon for $13.99. Later I realized with this board I will need to work around a design issue, so if I had to buy again I would get a more expensive one. More about this later.
My recommendation: Arduino Motor Shield R3, for $33.01 at Amazon.
The Distance Sensor

Distance sensors send an ultrasonic signal forward and then wait to receive a bounced signal. Depending on how long the signal takes to bounce back the approximated distance to an obstacle can be calculated. I will use this little device to prevent the robot from hitting walls or other obstacles in its way.
Browsing on Amazon I found a cheap and highly regarded component, the HC-SR04, currently selling for $6.59. This is a nice component that will not only give the robot the ability to see but also give it cool looking eyes!
My recommendation: HC-SR04, for $6.59 at Amazon.
The Bluetooth Slave

The easiest way to control the robot from a smartphone is via the bluetooth serial interface that all modern smartphones have. The phone will act as a master, so I needed a bluetooth slave for the robot.
Browsing on Amazon I found the BT2S Bluetooth to Serial Slave which seems to fit the bill nicely.
My recommendation: BT2S Bluetooth to Serial Slave, for $14.95 at Amazon.
The Prototyping Board and Cables


One of the restrictions I decided to impose myself with this project is that I would not do any soldering, so that I can assemble and disassemble the robot to my heart's content without ruining any parts.
Then I needed a platform where I can easily connect all the components together. For this kind of task people typically use a breadboard. Browsing on Amazon I found one from microtivity that comes with a set of jumper cables.
My recommendation: microtivity IB401, for $8.66 at Amazon.
The USB Cable

The Arduino board is connected to a computer via a USB port. The USB connection is used to upload software and also can be used as a power source when testing.
I took a cable from an old printer I have, so I did not need to buy this item. If you need to buy a cable, make sure you get the right connectors. The computer side is the standard A-Male, but on the Arduino side you need a B-Male connector.
My recommendation: Amazon Basics USB 2.0 A-Male to B-Male Cable, 6 feet for $5.49 at Amazon.
The Vehicle Kit

There are many choices for robot friendly vehicles. My only requirements were that it had a large platform where all the parts can be mounted and that it came with the wheels and motors.
In the end I decided to get the Magician Chassis. This is a kit that is extremely simple to build. It includes two motors and a battery box that plugs directly into the Arduino board.
My recommendation: Magician Chassis, for $25 at Amazon.
The total cost for the parts above gets to around $115 if you go with my recommendations, but if you want to save money you could certainly spend less and do more work.
Final words
Thank you for reading the first part of my tutorial series, I hope you found it useful.
In the second article I will fire up my Arduino board, introduce you to the Arduino development environment and finally write a few little Arduino programs to demonstrate how to control each of the parts of the robot.
If you have any questions or comments please write then below and I'll do my best to address them.
See you next time!
Miguel
Become a Patron!
Hello, and thank you for visiting my blog! If you enjoyed this article, please consider supporting my work on this blog on Patreon!

-
#1 alain frenois said
belle réalisation il me tarde de voir le développement du programmes Arduino
jais des probleme pour fair mon programmes pour mon robot avec un camera rs232
je suis débutant sur arduino
merci -
#2 Cefn Hoile said
That bluetooth module looks like a JY-MCU with a HC-06 on it. Should be possible to get these for less than $8 from the right supplier (if you're ordering a few).
I'm using one for my two-wheeled @ShrimpingIt robot - very similar logic and intent. I've established it's possible to build my robot, including ultrasonic sensing and bluetooth control, for less than $20 using stock retail parts (but buying in bulk).
-
#3 Bernie said
Do you have a Infrared version of remote control?
-
#4 Miguel Grinberg said
@Bernie: I haven't written the software driver yet, but I do have the parts here, so I intend to do that at some point.
-
#5 Duane said
Hey Miguel, thanks for the post and sharing it. Love the article and trying to build same robot on my own for the first time.
I have few questions before.
1. Can you control the robot with windows phone? does it have to be Android?
2. WHy do you need 2 Arduino microcontrollers for the project?thanks in advance
-
#6 Miguel Grinberg said
@Duane: to use a Windows phone you will need to find a bluetooth remote control for that platform and implement a driver for it. You need one Arduino board for the robot, plus a bluetooth receiver.
-
#7 Ivailo said
Hey Miguel, great work both with the robot and the explanation article.However, I have a question here.I have almost finished building your project(I am pretty new at robotics, but the great hints really helped) and I want to improve it.Is there a way to make him a line tracer robot too, and do you have any ideas how the robot should need, for example sensors, programm code etc.And how can I switch between inbuild algorithms, if he has two-for obstacle avoidance and line following.I will really appreciate if you give me some hints.Have a nice day :)
-
#8 Miguel Grinberg said
@Ivailo: the robot assembly is the same, you just need to add a line sensor to it. This type of sensor can detect surface reflectance. To switch between line following and obstacle avoidance modes you will use a remote control function key, as explained in a later article.
-
#9 Ivailo said
Miguel, thanks for the fast answer.I did the assembly, and it went pretty well, and now I am searching for a type of sensor you said I should use.I stopped my attention on this sensor( http://dx.com/p/meeeno-track-sensor-brick-module-for-arduino-orange-works-with-official-arduino-boards-213949 ), because it is pretty cheap, and I am student and don't have much of a financial capabilites.Do you think this one will work, and if not, can you recommend me one.I will really appreciate that, because as I said, I can't spend much money on my project and I can't afford making a mistakes with the parts.Sorry for bodering you, but I am still pretty newbie and I need as much hints as possible from more experienced developers like you.Thanks :)
-
#10 Miguel Grinberg said
@Ivailo: one sensor isn't enough to have the robot follow the line, you need a few of them, so that the robot can determine to which side it needs to turn to center itself on the line. Take a look at this one, which comes with 8 sensor in a single board: http://www.pololu.com/catalog/product/961.
-
#11 Arnaldo Armida said
Dear Miguel...I'm really beginner and so sorry for the stupid question...
I have downloaded all the libraries from your site and that's the all *.h
Where and hoe to store it?? I have created a dir named "michelino" and put all of them there... but i Thin I'm wrong since the michelino.ino file doesn't compile......Kindly help me and again ---sorry...
Regards
Arnaldo -
#12 Miguel Grinberg said
@Arnaldo: the files go in a directory, and then you need to open the .ino file from the Arduino software. The *.h files are referenced by the .ino file, they just need to be there and they will be found.
-
#13 esther loy amongin said
have read your first yutorial series and seems quiet interesting.but i was inquiring is their any substitute for the motor driver
-
#14 rohan said
hey....my final year project is library management using a line following robot......but i don't know how to implement localization....how is it done?? i want the robot to fetch a book and come back to its initial position....
-
#15 Nilesh said
Hi Miguel. Firstly I must say this is a fantastic compilation and by the best arduino building tutorial I have seen on the web. I am totally inspired and just wanting to start on it.
I live in the UAE and am not able to locate a couple of items here viz. HC-SR04 and BT2S. Can you suggest alternates to these which I can find easily. Also, someone already asked you this but I am not clear whether to go with Arduino Motor Shield or Adafruit ? Thanks in advance. Cheers. -
#16 Miguel Grinberg said
@Nilesh: You can use any distance sensor or bluetooth slave. It's just a matter of writing the software driver for the one you choose. Same goes for the motor driver. if you get the Adafruit then you can use my driver, if you get something else you will need to write a driver (and if you do, I'd appreciate it if you contribute it to my project, so that others can benefit from it).
-
#17 Superdog said
Bought as you have said in these fantastic tutorial
Bought a adafruit stepper motor shield but the shield came complete printed circuit board complete with holes to have items inserted and soldered. You told us about put a wire in a hole, no no I think that pin in hole tight so I bought screw shield the same board a complete horror nightmare do you have any tips as to identify ic are easy but the rest pass can not read info on components
Regards Superdog -
#18 Miguel Grinberg said
@Superdog: you can buy the motor shield assembled if you are not into soldering.
-
#19 Raghunath G Nair said
can you tell how to replace bluetooth slave with wifi
-
#20 rxq592176 said
Just wanted to thank you for this great tutorial! Really helpful!!!
-
#21 Miguel Grinberg said
@Raghunath: you will need to write a remote control driver similar to mine, but using wifi as communication. You will also need to build (or find) a remote control app that sends commands over wifi.
-
#22 Gabriel said
Does the Bluetooth slave work with iOS? If yes, how can I use it?
-Gabriel
-
#23 Miguel Grinberg said
@Gabriel: It should work with iOS, just install a bluetooth terminal app on your iOS device and try to connect.
-
#24 Janushanth said
Hi Mr. Miguel Grinberg
I don't have HC-SR04 this sensor
i buy Hy-SRF05 sensor this sensor working with robots ?
please reply me
thank you -
#25 Miguel Grinberg said
@Janushanth: Yes, you can use the NewPing library also with the SRF05.