Building an Arduino Robot, Part I: Hardware Components
Posted by
on under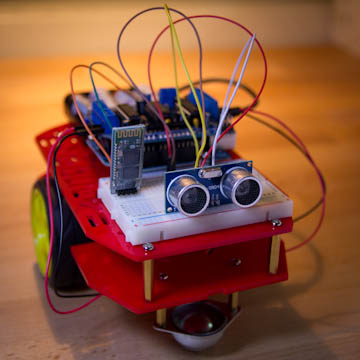
I have been doing software for almost as long as I have memory. I have also been following the open source hardware movement since its inception a few years ago, but I have never found the time or the disposition to attempt a hardware project myself.
Until now, that is.
I have decided to do a small hardware project to get my feet wet, a project that I will fully document and discuss here with the hope to encourage and motivate others to do the same.
Here is the list of articles I have published:
- Part I: Hardware Components (this article)
- Part II: Programming the Arduino
- Part III: Assembling the Robot
- Part IV: A (Not So) Basic Robot Firmware
- Part V: Avoiding Obstacles
- Part VI: Remote Control
Deciding what to build
For the hardware platform I have decided on the Arduino. This was an easy choice, as this is a platform that is widely used by hardware tinkerers all over the world, which means there is plenty of information and resources available.
The choice of a project that is in line with my (limited) knowledge was also pretty easy to make. I knew I wanted to build a cool toy, something I can impress my kids with. That pretty much reduced the list of options to just one: a robot.
But what kind of robot? A humanoid robot would be awesome to build, but it does not seem like a good choice for a first project. I needed something easy enough that I can complete in a relatively short amount of time, yet hard enough to be interesting and challenging.
After some Googling to see what other people do with Arduinos I have settled on a remote controlled robot vehicle.
As I said before I wanted to make this challenging, so I decided against buying a kit that includes all the parts, the software and the instructions. Instead, I decided to come up with a relatively custom robot design, get the parts I needed and figure out how to build it and program it without any specific instructions.
Here are the features I decided my robot will have:
- It should be a vehicle that can move forward, backwards and turn.
- It should be easy to assemble and disassemble.
- It should have a mode in which it is able to move on its own, detecting obstacles ahead and avoiding them.
- It should have a mode in which it can be fully controlled from my Android smartphone.
- It should be easy to hack, change and improve.
Does this sound interesting enough to you? I hope it does, it certainly does to me!
Shopping list
With the above feature list in hand I went on to research what parts I needed for my project. Here is the list I came up with:
- Arduino board
- Motor controller
- Distance sensor
- Bluetooth slave
- Prototyping board and cables
- USB cable
- Vehicle kit
The Arduino board

The Arduino board will be the brain of the robot, as it will be running the software that will control all the other parts.
My son had an old Arduino Uno that he ended up not using, so I did not need to buy one. There are plenty of Arduino models or even Arduino compatible boards that can be used.
My recommendation: Arduino Uno R3, currently $21.95 at Amazon.
The motor driver

The Arduino board cannot directly control a motor. The tricky part is to be able to make the motor selectively run forward or backwards, which requires swapping power and ground inputs into the motor.
There is a specialized circuit called an H-Bridge that can do this, and there are several implementations of this circuit readily available for the Arduino platform, or you can also build one from basic parts for next to nothing.
Without having much knowledge about this I bought the cheapest motor controller board I've found, a fully assembled version of the Adafruit motor shield at Amazon for $13.99. Later I realized with this board I will need to work around a design issue, so if I had to buy again I would get a more expensive one. More about this later.
My recommendation: Arduino Motor Shield R3, for $33.01 at Amazon.
The Distance Sensor

Distance sensors send an ultrasonic signal forward and then wait to receive a bounced signal. Depending on how long the signal takes to bounce back the approximated distance to an obstacle can be calculated. I will use this little device to prevent the robot from hitting walls or other obstacles in its way.
Browsing on Amazon I found a cheap and highly regarded component, the HC-SR04, currently selling for $6.59. This is a nice component that will not only give the robot the ability to see but also give it cool looking eyes!
My recommendation: HC-SR04, for $6.59 at Amazon.
The Bluetooth Slave

The easiest way to control the robot from a smartphone is via the bluetooth serial interface that all modern smartphones have. The phone will act as a master, so I needed a bluetooth slave for the robot.
Browsing on Amazon I found the BT2S Bluetooth to Serial Slave which seems to fit the bill nicely.
My recommendation: BT2S Bluetooth to Serial Slave, for $14.95 at Amazon.
The Prototyping Board and Cables


One of the restrictions I decided to impose myself with this project is that I would not do any soldering, so that I can assemble and disassemble the robot to my heart's content without ruining any parts.
Then I needed a platform where I can easily connect all the components together. For this kind of task people typically use a breadboard. Browsing on Amazon I found one from microtivity that comes with a set of jumper cables.
My recommendation: microtivity IB401, for $8.66 at Amazon.
The USB Cable

The Arduino board is connected to a computer via a USB port. The USB connection is used to upload software and also can be used as a power source when testing.
I took a cable from an old printer I have, so I did not need to buy this item. If you need to buy a cable, make sure you get the right connectors. The computer side is the standard A-Male, but on the Arduino side you need a B-Male connector.
My recommendation: Amazon Basics USB 2.0 A-Male to B-Male Cable, 6 feet for $5.49 at Amazon.
The Vehicle Kit

There are many choices for robot friendly vehicles. My only requirements were that it had a large platform where all the parts can be mounted and that it came with the wheels and motors.
In the end I decided to get the Magician Chassis. This is a kit that is extremely simple to build. It includes two motors and a battery box that plugs directly into the Arduino board.
My recommendation: Magician Chassis, for $25 at Amazon.
The total cost for the parts above gets to around $115 if you go with my recommendations, but if you want to save money you could certainly spend less and do more work.
Final words
Thank you for reading the first part of my tutorial series, I hope you found it useful.
In the second article I will fire up my Arduino board, introduce you to the Arduino development environment and finally write a few little Arduino programs to demonstrate how to control each of the parts of the robot.
If you have any questions or comments please write then below and I'll do my best to address them.
See you next time!
Miguel
Become a Patron!
Hello, and thank you for visiting my blog! If you enjoyed this article, please consider supporting my work on this blog on Patreon!

-
#26 MickClark said
Adafruit new motor sheld only uses a4 and a5 pins oly need limited soldering
-
#27 Janushanth said
Hi Mr. Miguel Grinberg
I have ov7670 CMOS camera this camera how to fixed Arduino Uno R3
becasue i have to plan to make spy robot but i have no idea pins are connect to the arduino and the video i want watch on my computer please help me -
#28 Pavle said
I setup the breadboard with my arduino with the distance sensor and I put in your code to program the distance senor and I get the errors:
'NewPing' does not name a type
'DistanceSensor' was not declared in this scope
In function 'void loop()':What should I do??? Thank you for your guide.
-
#29 Miguel Grinberg said
@Pavle: You are missing the NewPing library. Did you install it?
-
#30 Choy said
You are my savior! great article, great tutorial, happens to be my thesis right now. =) thank you sir.
-
#31 firaz said
can i use arduino RV3 motor driver shield
-
#32 Miguel Grinberg said
@firaz: Yes, I've added a driver for the Arduino motor shield contributed by a reader. You will find it in the github project.
-
#33 Nekobasu said
I found the "MICRO MAGICIAN V2 ROBOT CONTROLLER" on Amazon that has the Arduino and motor controller all in one for $35. Would this be a simple replacement for the Uno and Motor Shield? It's a quarter the size of those two boards together (half the size of the Uno), so could fit in a tighter space, if needed.
-
#34 Miguel Grinberg said
@Nekobasu: I guess it can be a replacement, but it is unclear what kind of motor driver it has, it may be different than the ones I have drivers for. Also don't know how many open pins it has for connecting the bluetooth module and the distance sensor.
-
#35 Avishkar Zanje said
Really great article for beginners. I am going to try this in a week. Thanks a lot.
-
#36 Nathan said
So there are a lot of L293D motor shields out there and i was wondering if they were different. The one you suggested looks the same as a bunch of other ones.
http://goo.gl/h1Ev2Q
http://goo.gl/vd0hmD
http://goo.gl/jXaBoH
http://goo.gl/KgBsza
I was wondering if there was a difference or could I just buy the cheapest one and call it a day. I am not looking to spend a lot of money and am aware of the design issue on all of these boards (no access to pin outs). Thanks! -
#37 Miguel Grinberg said
@Nathan: I have drivers for the Adafruit and Arduino motor shields. Any clones that are compatible to these should work with the drivers I have. Others can work too, but you will need to write a driver for them. It's not that hard.
-
#38 Arturo said
Hi Miguel, im having problems with my prgm. i corrected some errors , but now i get this error:
In file included from michelino.ino:62:
newping_distance_sensor.h:28: error: 'NewPing' does not name a type
/newping_distance_sensor.h: In constructor 'Michelino::DistanceSensor::DistanceSensor(int, int, int)':
newping_distance_sensor.h:16: error: class 'Michelino::DistanceSensor' does not have any field named 'sensor'
/newping_distance_sensor.h: In member function 'virtual unsigned int Michelino::DistanceSensor::getDistance()':
newping_distance_sensor.h:22: error: 'sensor' was not declared in this scope.Thanks A lot!
-
#39 Miguel Grinberg said
@Arturo: did you install the NewPing library?
-
#40 Arturo said
Yes, i still dont know why does it happens. Is there a way i can share with you my folder, so you can help me solve the issues with the program.
Thank you Miguel!
-
#41 Miguel Grinberg said
@Arturo: I still think you have not installed the NewPing library correctly. Do the simpler examples I presented in Part II work for you? Start with the simple ones, then move on the more complex one.
-
#42 cp said
can i use a rasberry pi with the same components you've listed instead of an arduino? I received a pi as a gift ... i really like your project and would like to try it.
-
#43 Miguel Grinberg said
@cp: No, the Pi is different than the Arduino.
-
#44 nilesh said
Hi Miguel, this is a really the best guide to making robots for beginners like me , this is
the first time I’m making the robot , I’m having problems with my prgm when I verified
I ‘m new to programming :
michelino_final.ino: In member function 'void Michelino::Robot::run()':
michelino_final.ino:118: warning: deprecated conversion from string constant to 'char*'
michelino_final.ino: In member function 'bool Michelino::Robot::turn(long unsigned int)':
michelino_final.ino:196: warning: no return statement in function returning non-void
michelino_final.ino:196: warning: control reaches end of non-void function
Thanks, in advance . -
#45 Miguel Grinberg said
@nilesh: these are warnings, not errors. I need to review my code, the one in line 196 is definitely something I need to address. But as I said, the application will run just fine regardless of these warnings.
-
#46 Arpit Jain said
Hi Miguel,
I am building the same robot refering your this article.but I am stuck in one part of it. I have connected motor shield with arduino uno and two motor with shield. But it seems that the motor shield is not getting power. I have connected four 1.5 V batteries to ardunio uno. I am confused what I am doing wrong. Please help.
-
#47 Baibhav said
what type of batteries have you used?
-
#48 Miguel Grinberg said
@Baibhav: I use standard alkaline batteries.
-
#49 JohnG said
Just want to saw this is an amazing Tutorial. Congratulations on it being so well thought out and informative.
Adafruit has come out with a new Version 2 Motor Shield which is capable of stacking, Headers are separate now, and can soldered into place. how would you then wire up the device to function using this new design? -
#50 Miguel Grinberg said
@JohnG: I believe there are no practical differences in terms of connections. If you buy the kit from Adafruit then you have to solder the headers, this was the same with the v1 kit. Note that there are third party vendors who sell the v1 motor shield assembled.


