Building an Arduino Robot, Part V: Avoiding Obstacles
Posted by
on under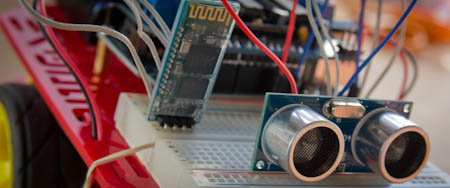
Welcome to the fifth article in the tutorial series in which I'm building a remote controlled Arduino based vehicle robot.
Here is the list of articles I have published so far:
- Part I: Hardware Components
- Part II: Programming the Arduino
- Part III: Assembling the Robot
- Part IV: A (Not So) Basic Robot Firmware
- Part V: Avoiding Obstacles (this article)
- Part VI: Remote Control
In the previous article I wrote a first version of my Michelino robot firmware that included a motor controller driver. Today I'm adding support for the distance sensor.
Distance Sensor driver
As I have shown in the last article, my firmware can handle any motor controller board as long as a device driver is written for it. A device driver in this context is nothing more than a class that implements the generic interface that I have defined for devices of this class.
Distance sensors are no different, the same idea can be applied to them. I'll start by defining the interface that will be common to all distance sensor devices. This will go in file distance_sensor.h:
/**
 * @file distance_sensor.h
 * @brief distance sensor driver definition for the Michelino robot.
 * @author Miguel Grinberg
 */

namespace Michelino
{
    class DistanceSensorDriver
    {
    public:
        /**
          * @brief Class constructor.
          * @param distance The maximum distance in centimeters that needs to be tracked.
          */
        DistanceSensorDriver(unsigned int distance) : maxDistance(distance) {}

        /**
         * @brief Return the distance to the nearest obstacle in centimeters.
         * @return the distance to the closest object in centimeters
         *   or maxDistance if no object was detected
         */
        virtual unsigned int getDistance() = 0;

    protected:
        unsigned int maxDistance;
    };
};
My distance sensor driver is going to be extremely simple, a driver just needs to provide one method that reports the distance to the nearest object in centimeters. This is all I need for now, I can always come back and add more functionality to the driver definition later.
The constructor to the driver takes a maximum distance. This is the value that getDistance() will return when there is no detected obstacle.
Note that maxDistance member variable is in a protected block, not a private block like I used in other classes. Variables that are protected are still private to the outside, but they are accessible to subclasses. I want this value to be accessible to implementations of this driver, that's why I made it protected.
As I mentioned in a past article, I have found that the HC-SR04 distance sensor that I'm using works really well with the arduino-new-ping open source library, so I'll now implement the above driver interface for it in file newping_distance_sensor.h:
/**
 * @file newping_distance_sensor.h
 * @brief distance sensor driver for distance sensors supported by the NewPing library.
 * @author Miguel Grinberg
 */

#include "distance_sensor.h"

namespace Michelino
{
    class DistanceSensor : public DistanceSensorDriver
    {
    public:
        DistanceSensor(int triggerPin, int echoPin, int maxDistance)
            : DistanceSensorDriver(maxDistance),
              sensor(triggerPin, echoPin, maxDistance)
        {
        }

        virtual unsigned int getDistance()
        {
            int distance = sensor.ping_cm();
            if (distance <= 0)
                return maxDistance;
            return distance;
        }
    private:
        NewPing sensor;
    };
};
Note in the getDistance() implementation how the maxDistance member variable defined in the parent class is accessible. If I had defined this variable in a private block this code would not compile.
Integration with the firmware
As a first integration test let's make the robot go forward and stop when it finds an obstacle.
I will start from the firmware I wrote in the previous article and will just replace the initialize() and run() methods, which are my object oriented counterparts to the Arduino's setup() and loop() functions. You may want to go back to that article to see the structure of the complete sketch if you are not familiar with it.
At the top of the sketch I include the driver using the same structure I used for the motor controller:
#define ENABLE_NEWPING_DISTANCE_SENSOR_DRIVER

#ifdef ENABLE_NEWPING_DISTANCE_SENSOR_DRIVER
#include <NewPing.h>
#include "newping_distance_sensor.h"
#define DISTANCE_SENSOR_INIT 14,15,MAX_DISTANCE
#endif
In the private section of the Robot class a DistanceSensor object is created:
private:
    DistanceSensor distanceSensor;
In the Robot class constructor the object is initialized:
Robot()
    : leftMotor(LEFT_MOTOR_INIT), rightMotor(RIGHT_MOTOR_INIT),
      distanceSensor(DISTANCE_SENSOR_INIT)
{
    initialize();
}
In the initialize() method I start the motors and set the state to running:
void initialize()
{
    leftMotor.setSpeed(255);
    rightMotor.setSpeed(255);
    state = stateRunning;
}
And in the run() method I stop the motors when the distance sensor finds a close obstacle:
void run()
{
    if (state == stateRunning) {
        if (distanceSensor.getDistance() <= TOO_CLOSE) {
            state = stateStopped;
            leftMotor.setSpeed(0);
            rightMotor.setSpeed(0);
        }
    }
}
I have used two constants in all the changes above, MAX_DISTANCE and TOO_CLOSE. These constants are defined at the top of the sketch, so that they are easy to find in case they need to be modified:
#define TOO_CLOSE 10
#define MAX_DISTANCE (TOO_CLOSE * 20)
I'm going to use 10cm as the distance to consider an obstacle too close. The maximum distance I need to track will be twenty times that, or 2 meters. These are numbers that I pulled out of thin air, I don't really know if they will work or not, but I can always come back and adjust them after I get a chance to test them.
The sketch is now in a usable state. Below is the complete michelino.ino sketch source code:
#define ENABLE_ADAFRUIT_MOTOR_DRIVER
#define ENABLE_NEWPING_DISTANCE_SENSOR_DRIVER

#define TOO_CLOSE 10
#define MAX_DISTANCE (TOO_CLOSE * 20)

#ifdef ENABLE_ADAFRUIT_MOTOR_DRIVER
#include <AFMotor.h>
#include "adafruit_motor_driver.h"
#define LEFT_MOTOR_INIT 1
#define RIGHT_MOTOR_INIT 3
#endif

#ifdef ENABLE_NEWPING_DISTANCE_SENSOR_DRIVER
#include <NewPing.h>
#include "newping_distance_sensor.h"
#define DISTANCE_SENSOR_INIT 14,15,MAX_DISTANCE
#endif

namespace Michelino
{
    class Robot
    {
    public:
        /*
         * @brief Class constructor.
         */
        Robot()
            : leftMotor(LEFT_MOTOR_INIT), rightMotor(RIGHT_MOTOR_INIT),
              distanceSensor(DISTANCE_SENSOR_INIT)
        {
            initialize();
        }

        /*
         * @brief Initialize the robot state.
         */
        void initialize()
        {
            leftMotor.setSpeed(255);
            rightMotor.setSpeed(255);
            state = stateRunning;
        }
        /*
         * @brief Update the state of the robot based on input from sensor and remote control.
         *  Must be called repeatedly while the robot is in operation.
         */
        void run()
        {
            if (state == stateRunning) {
                if (distanceSensor.getDistance() <= TOO_CLOSE) {
                    state = stateStopped;
                    leftMotor.setSpeed(0);
                    rightMotor.setSpeed(0);
                }
            }
        }

    private:
        Motor leftMotor;
        Motor rightMotor;
        DistanceSensor distanceSensor;
        enum state_t { stateStopped, stateRunning };
        state_t state;
    };
};

Michelino::Robot robot;

void setup()
{
    robot.initialize();
}

void loop()
{
    robot.run();
}
Under the control of this sketch the robot will run until it gets 10cm or less from a wall or other obstacle and then stop.
If you are building a robot like mine and give the sketch a try you may find that the robot functions as expected most of the times, but not always. Occasionally it may stop even though there is no close obstacle, or other times it may bump into a wall without stopping. Keep on reading to know how I figured out the problem and how I addressed it.
Logging
Running the above sketch a few times makes it clear that something unexpected is going on, but how can I find out what is it? I really need to see all the data the sketch is receiving and how it is reacting to it to understand why things aren't going the way I expected them to go. In other words, I need to debug my sketch.
A pretty useful technique to debug embedded systems like this one is to write information passing through the application to a log that can be reviewed.
To be able to log from my sketch I'm going to write a logging function that will have the same arguments as the good old printf() function from the C standard library, except that since my robot does not have a screen the output will go to the serial port, which I can capture from the Arduino software running on my PC, or alternatively to my cell phone via bluetooth. I'm going to call this function log(). Here is an example usage:
unsigned int distance = distanceSensor.getDistance();
log("distance: %u\n", distance);
One aspect to consider is that once I correct this problem I may not want to continue sending logging data to the serial port. This is really an operation that is not needed during normal operation, it is only useful for debugging. But if I remove the log statements from my sketch once I have found a solution to my problem I will have to write them all again next time I have to debug. What I want is to keep the logging calls in the sketch, but selectively be able to enable or disable them. I'm going to use a C preprocessor trick to do this. Below is the source code of my logging function, partially based on the implementation of the p function in this Arduino playground page. I'm going to put it in a file named logging.h:
#ifdef LOGGING

// logging is enabled
#include <stdarg.h>

void log(char* format, ...)
{
    char line[1024];
    va_list args;
    va_start(args, format);
    vsnprintf(line, sizeof(line), format, args);
    va_end(args);
    Serial.print(line);
}

#else

// logging is disabled
#define log(...)

#endif
This code defines two versions of the log() function. If the LOGGING constant is defined the log() function does all the work to print data to the serial port. But if the LOGGING constant is not defined then the log() function isn't really defined as a function but as a macro or constant using #define, with a completely empty definition. What this means is that if LOGGING is not defined in the main sketch, then the compiler will consider any calls to the log() function as an empty line, so no code will be generated. But when I need to debug I can just define LOGGING at the top of my sketch and all the logging statements will magically get included in the firmware.
To enable logging in my sketch I've added the following near the top of the main michelino.ino file:
#define LOGGING
#include "logging.h"
Then I changed my run() function as follows:
void run()
{
    if (state == stateRunning) {
        unsigned int distance = distanceSensor.getDistance();
        log("distance: %u\n", distance);
        if (distance <= TOO_CLOSE) {
            state = stateStopped;
            leftMotor.setSpeed(0);
            rightMotor.setSpeed(0);
        }
    }
}
Then I connected the robot to my computer with a long USB cable, uploaded the sketch and watched the output in the serial monitor. I had to do a few runs to get the problem to occur, but in two out of about twenty the robot stopped when there was no close obstacle.
One of the failures was immediately after the sketch started running. Here is the log for that session:
distance: 63
distance: 74
distance: 5
The 63 and 74cm numbers were about right for the distance to the wall, but the 5cm came out of the blue, without nothing being that close to the robot.
The other failure I captured was also odd, the robot was several meters away from a wall, so it was logging the maximum distance value, but check out what happened at some point:
distance: 200
distance: 200
distance: 200
distance: 200
distance: 200
distance: 7
Based on these two failures I was able to formulate a theory that explains my problem.
The sensor works by emitting an ultrasonic ping and waiting for the sound wave to bounce off of an obstacle and reach the sensor back. This measurement technique isn't precise by far and is bound to produce errors from time to time. Sometimes the wave may bounce on the floor and somehow make it back to the sensor, other times it may bounce off of a surface that absorbs sound, so the bounced signal is weak and the sensor misses it. The fact is, the readings from the distance sensor aren't always reliable.
Averaging
With the help of logging to the serial interface I found out that the sensor isn't 100% reliable. So what can I do? One way to greatly improve its accuracy is to not react to a single reading, it's better to take several readings and make sure they are consistent before causing a state change in the robot.
The technique I'm going to use to filter out errors or noise is pretty simple, I'm just going to take a few readings and average them.
But doing multiple readings each time I need to check for obstacles will make the robot response slower, so ideally I want to find a way to get the benefit of averaging multiple readings without having to sacrifice performance. The moving average algorithm solves this problem nicely.
A moving average works incrementally. Let's say I decide to use an average of three readings. Each time I need to obtain data from the sensor I take a single reading, but I don't use that result directly. Instead, I compute an average between that reading and the previous two. The next time I need to read the sensor I get another reading, just one like before. Now I drop the oldest of the three readings I averaged the previous time and add this new one. So I'm always adding the new reading and dropping the oldest from the average.
To make it more clear let's look at an example:
| Sensor readings | 200 | 200 | 200 | 200 | 7 | 200 | 200 | 7 | 7 | 5 |
|---|---|---|---|---|---|---|---|---|---|---|
| Moving Average with N=3 | 200 | 200 | 135 | 135 | 135 | 135 | 71 | 6 |
Without the moving average the robot would have stopped at the first 7, like it did for me in one of the failures I captured logs for. But with the moving average the numbers only get down to below TOO_CLOSE when three consecutive readings are low, so the robot ignored that first 7 as an abnormality, but after three readings came up low the average finally reflected that.
This technique can be pretty useful, so instead of hard coding it into the distance sensor driver I will create a generic moving average class that I can then apply to other types of samples. I will put this class in file moving_average.h:
/**
 * @file moving_average.h
 * @brief Helper class that maintains a moving average over a set of samples.
 * @author Miguel Grinberg
 */

template <typename V, int N> class MovingAverage
{
public:
    /*
     * @brief Class constructor.
     * @param def the default value to initialize the average.
     */
    MovingAverage(V def = 0) : sum(0), p(0)
    {
        for (int i = 0; i < N; i++) {
            samples[i] = def;
            sum += samples[i];
        }
    }

    /*
     * @brief Add a new sample.
     * @param new_sample the new sample to add to the moving average.
     * @return the updated average.
     */
    V add(V new_sample)
    {
        sum = sum - samples[p] + new_sample;
        samples[p++] = new_sample;
        if (p >= N)
            p = 0;
        return sum / N;
    }

private:
    V samples[N];
    V sum;
    V p;
};
The MovingAverage class is different than classes I wrote before. This class begins with a template declaration, which basically makes this class a sort of model from which many other classes can be constructed. The reason to make it a template class is that moving averages can be computed on samples of different types. For the distance sensor I'm going to be using unsigned int values, but in the future I may need to use the same algorithm for values of type float, double or even a user defined type. The template argument V declared right after the template keyboard takes care of that. Anywhere in the class where I use the V type the compiler will replace it with an actual type provided when an object of the class is created. The second template argument N is used to declare how many samples need to be kept in memory to do the average. In my example I will use three, but I may need more for other purposes. So instead of making the class use a fix size of three I can call the size N and once again the compiler will replace it with the proper value for each instance. If I wanted to create the instance for the distance sensor I would do it like this:
MovingAverage<unsigned int, 3> average;
Note that the class constructor takes an argument that by default is 0. This is the default sample value, the value that will be used to do the average before I have seen three samples.
The implementation uses a circular buffer with size N, which is initialized to the default sample value in the constructor. I also have a sum member variable that keeps the sum of the N samples that are in memory, and a p member varialble that indicates what is the entry in the circular buffer where the next sample will be stored.
When a new sample is obtained it is added to the moving average via the add() method. The implementation stores the new sample in the circular buffer and moves the pointer p to the next entry. The sum is reduced by the value of the oldest sample (the one that is getting replaced) and increased by the value of the new sample. Finally, the new average is calculated and returned.
How is this class used in the robot firmware? First I need to include the header file in the main sketch:
#include "moving_average.h"
Then I need to declare a MovingAverage object in the private section of the Robot class:
private:
    MovingAverage<unsigned int, 3> distanceAverage;
Then I need to initialize it in the Robot constructor:
Robot()
    : leftMotor(LEFT_MOTOR_INIT), rightMotor(RIGHT_MOTOR_INIT),
      distanceSensor(DISTANCE_SENSOR_INIT),
      distanceAverage(MAX_DISTANCE)
{
    initialize();
}
Note that I initialize the moving average with my MAX_DISTANCE constant, to make sure I don't detect an obstacle when I start.
The initialize() function does not change. The run() function changes as follows:
void run()
{
    if (state == stateRunning) {
        int distance = distanceAverage.add(distanceSensor.getDistance());
        log("distance: %u\n", distance);
        if (distance <= TOO_CLOSE) {
            state = stateStopped;
            leftMotor.setSpeed(0);
            rightMotor.setSpeed(0);
        }
    }
}
And with this simple enhancement the readings from the distance sensor are a lot more reliable!
Turning
Stopping when finding an obstacle is not much fun. Real robots don't just stop in front of obstacles, they find ways to avoid them and keep moving.
This robot has very simple vision and motion systems, so its obstacle avoidance algorithm will also be pretty basic. What I'm going to do when the robot detects an obstacle ahead is to rotate in place for a while until no more nearby obstacles are detected and then move forward in the new direction.
In essence this algorithm should make my little robot behave like a Roomba. I can just attach a brush to it and have it swipe my floors!
The algorithm
I have used the concept of a state to make my robot have an idea what it is doing at any given time. Now that I'm also going to make the robot turn I need to define different states:
enum state_t { stateStopped, stateMoving, stateTurning };
The "stopped" state will be for when the robot is not moving at all. The "moving" state will be for when the robot is moving forward. Finally, the "turning" state will be used while the robot is turning.
The algorithm that I'm going to use in the run() method of my turn enabled firmware will be as follows:
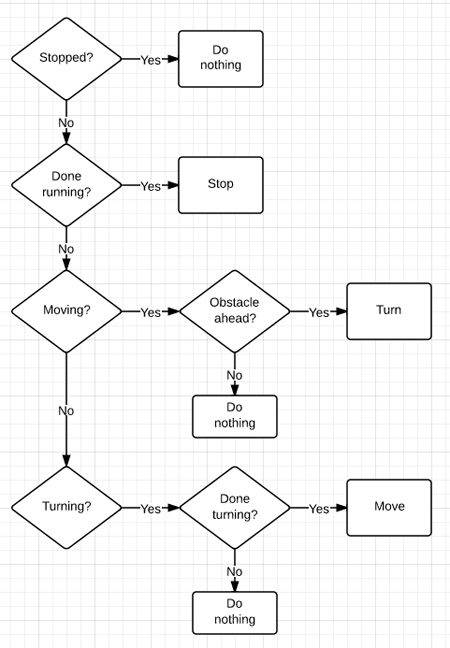
In the above diagram diamond shapes represent decisions and boxes represent processes or state changes.
The robot will begin in stateMoving state and will run for a limited amount of time, after which will change to the stateStopped state. The first two decisions in the flowchart address that part of the logic.
If the robot is in stateMoving it will check for obstacles, and if one is found it will turn, which changes the state to stateTurning. If no obstacles are found then it will not change its state.
If the robot is in stateTurning it will check if it is done turning, at which point it will change back to stateMoving. If the turn isn't complete then it will remain in the same state.
Pretty simple, right?
Recall that this is going to be inside the run() method, so as soon as this algorithm completes a pass the method will be called again, so this algorithm will run repeatedly.
Since I feel pretty strongly about writing readable code I'm going to try to map the above diagram into code as directly as possible. Here is a first attempt to write my run() method:
    void run()
    {
        if (stopped())
            return;
        else if (doneRunning())
            stop();
        else if (moving()) {
            if (obstacleAhead())
                turn();
        }
        else if (turning()) {
            if (doneTurning())
                move();
        }
    }
What do you think? This is very readable code, right? I don't think I would have any trouble understanding this code if I come back to it after a long time away from the project.
Now you may say that I'm cheating, that I just created an outline of the algorithm but in essence all I'm doing is calling functions that don't exist.
I'm not cheating. This is called top down design, I start with the big pieces and then move on to the smaller ones. I will implement all the functions referenced above one by one, and by the end of the article I will have a fully functional sketch with a run() method that looks very close to the above.
Let me start by describing what each supporting function does.
stopped()returnstrueif the robot is instateStoppedstate orfalseotherwise.doneRunning()returnstrueif the robot was up and running for a predetermined amount of time, which in my case I'll set to 30 seconds.falseis returned otherwise.stop()changes the robot state tostateStopped.moving()returnstrueif the robot is in thestateMovingstate orfalseotherwise.obstacleAhead()returnstrueif there is an obstacle in close distance orfalseotherwise.turn()initiates a turn. The state of the robot is changed tostateTurningas a result.turning()returnstrueif the robot is instateTurningstate orfalseotherwise.doneTurning()returnstrueif the turn maneuver is complete orfalseotherwise.move()changes the robot state tostateMoving.
Implementing the turn enabled robot firmware
I now have nine auxiliary functions used by my run() method that I need to implement. I will start with three really easy ones:
        bool moving() { return (state == stateMoving); }
        bool turning() { return (state == stateTurning); }
        bool stopped() { return (state == stateStopped); }
I could have checked the state variable directly in the run() method, but these make the code in run() more readable. The C++ compiler is pretty smart and will generate the same code either way.
There are two more functions from the above list that are pretty easy to implement:
        void move()
        {
            leftMotor.setSpeed(255);
            rightMotor.setSpeed(255);
            state = stateMoving;
        }

        void stop()
        {
            leftMotor.setSpeed(0);
            rightMotor.setSpeed(0);
            state = stateStopped;
        }
Five functions done, four more to go!
Let's look at doneRunning().
This function needs to return true after 30 seconds have passed or false otherwise. I have discussed how to time out actions in the previous article, so this presents no challenge.
I will start by adding a member variable to the Robot class to store a time. I could choose to store the start time of the sketch and then in this function check that the current time is that variable plus thirty seconds, or else I could store the end time, in which case I just need to compare the current time against the variable. This last option seems more efficient, so that's what I'll do.
I begin by adding the member variable:
    private:
        unsigned long endTime;
Then I define a constant at the top of the sketch with the total run time in seconds:
#define RUN_TIME 30
In the initialize() method I set endTime to the proper value and then set the robot to stateMoving state:
        void initialize()
        {
            endTime = millis() + RUN_TIME * 1000;
            move();
        }
Now I can easily implement doneRunning():
        bool doneRunning()
        {
            return (millis() >= endTime);
        }
But this implementation bothers me a bit. The millis() call does not feel right to me. I know I'm going to need to use the current time in some of the other functions I have yet to implement. For example, turning the robot will also be based on current time to some extent. One can imagine that obtaining the current time by calling the millis() function must have some cost, so it isn't very efficient to call the function multiple times, knowing that all these calls will be made very close to each other and will return the same value or close. It seems more efficient to obtain the current time once and then have all the functions that need it use it.
The immediate solution one would think is to add another member variable to the Robot class and then at the top of the run() method set it to the current time, then this variable will be accessible to any method in the class.
But is that really a good solution? Think about it. Member variables are used to keep state in the object. The current time can't be considered state, it is only valid for the execution of the run() method, the next time run() is called it will have to be obtained again.
It seems more logical to me to have the current time as a local variable inside the run() method, and then passed as an argument to doneRunning():
        void run()
        {
            unsigned long currentTime = millis();

            if (stopped())
                return;
            else if (doneRunning(currentTime))
                stop();
            // ...
        }
Then the doneRunning() method becomes:
        bool doneRunning(unsigned long currentTime)
        {
            return (currentTime >= endTime);
        }
And this feels a lot better.
Now I have three functions left. Let's do obstacleAhead() next.
To check for obstacles I need to read the distance sensor. I could read the sensor inside the obstacleAhead() method, but the same reasons that made me choose to get the current time once and pass it down to functions as an argument apply to the distance sensor. So I'm going to get a single (averaged) distance reading at the top of run() and then pass it down to any auxiliary functions that need it:
        void run()
        {
            unsigned long currentTime = millis();
            int distance = distanceAverage.add(distanceSensor.getDistance());
            // ...
        }
The obstacleAhead() method will then take the distance reading as an argument:
        bool obstacleAhead(unsigned int distance)
        {
            return (distance <= TOO_CLOSE);
        }
The two auxiliary functions left to do are the most complex, because they deal with turning the robot when it comes close to an obstacle.
Here is a basic question. Should I make the robot rotate to the left or to the right?
To avoid having a robot that always moves in a predictable way I'm going to make it choose left some times and right some other times. To create this unpredictability I'm going to use the random() function from the Arduino library. This function takes a range of numbers as input and returns one of those numbers randomly, each time a different one. For example, random(2) will sometimes return 0 and sometimes 1. I can then turn left or right based on the result of the function.
Another question. For how long does the robot need to turn?
This question is harder to answer. I can easily get the robot to rotate in place by making one wheel go forward and the other go backwards, but the robot has no way to know how fast it rotates, or when it did a complete turn, this kind of feedback can only be obtained from an onboard magnetometer or compass.
Without adding more hardware the best I can do is use more random numbers. The algorithm that I will implement comes up with a random number that determines for how long the robot will rotate. Once that time passes the robot will start checking the distance sensor, while still rotating. The rotation will end only when the distance sensor finds no obstacles in the way.
Armed with the above ideas I can write turn() as follows:
        bool turn(unsigned long currentTime)
        {
            if (random(2) == 0) {
                leftMotor.setSpeed(-255);
                rightMotor.setSpeed(255);
            }
            else {
                leftMotor.setSpeed(255);
                rightMotor.setSpeed(-255);
            }
            state = stateTurning;
            endStateTime = currentTime + random(500, 1000);
        }
The first if statement decides to turn left or right based on the result of random(2). To make the robot turn the wheels of the robot are set to run in opposite directions. And after updating the state to stateTurning I just need to make the robot stay in the turning state for a random amount of time. This is yet another timed action like the 30 second timeout I implemented above, so I need another member variable to keep track of when the turn is complete. I'm going to call that member variable endStateTime. The idea is that any robot state that needs a timed action can use this member variable to indicate the time when the action ends:
    private:
        unsigned long endStateTime;
The value I store in endStateTime is the current time plus a random value between half and a full second (recall that all the times are in millisecond units). I chose the range of the random arbitrarily, knowing that I can always fine tune these numbers if they don't work well.
And now I have one function left to do.
I said above that a turn is over when two conditions are met. First, the time for the turn must have passed. Second, the distance sensor must not see any obstacles ahead. Based on the above description it is clear that doneTurning() will need two arguments, the current time and the sensor distance reading:
        bool doneTurning(unsigned long currentTime, unsigned int distance)
        {
            if (currentTime >= endStateTime)
                return (distance > TOO_CLOSE);
            return false;
        }
To complete the task I'm going to review my run() method and make sure I'm sending the proper arguments to each auxiliary function:
        void run()
        {
            if (stopped())
                return;

            unsigned long currentTime = millis();
            int distance = distanceAverage.add(distanceSensor.getDistance());
            log("state: %d, currentTime: %ul, distance: %u\n", state, currentTime, distance);

            if (doneRunning(currentTime))
                stop();
            else if (moving()) {
                if (obstacleAhead(distance))
                    turn(currentTime);
            }
            else if (turning()) {
                if (doneTurning(currentTime, distance))
                    move();
            }
        }
Since the stopped() function does not require any arguments I moved it to above the lines that set currentTime and distance.
Also note that I threw in a logging statement that prints the current state, time and distance reading. Since I have the functionality to log already in place there is no reason not to use it!
Final words
You may feel that there is something missing, that I haven't done anything terribly complex and that with just a bunch of short and simple functions the robot will not have enough behavior built in it to move and turn.
You expected something dark and complex needed to happen somewhere because the problem is complex, but the beauty of partitioning a problem into smaller pieces is that each piece by itself isn't as hard as the whole problem.
Of course you don't have to take my word for it. The code is free and open source and is available on my github page. You can download it as a zip file below:
Download michelino v0.2.
Or if you prefer you can clone it directly from github.
And for those that aren't building a robot along with me, here is a short video of my robot running today's firmware:
In the next chapter of the series I will be adding remote control support to my robot and I will be using my cell phone as the controller.
Thank you for reading these articles, I hope you will be back for the next one!
Miguel
Become a Patron!
Hello, and thank you for visiting my blog! If you enjoyed this article, please consider supporting my work on this blog on Patreon!

-
#1 Mylo said
Hey Miguel,
great tutorial, perfect explanation for starting out with the Arduino and c++ programming language.. I'm still trying to figure out some (or a lot!) of the code but your descriptions are really useful for understanding it all.. keep up the good work :)
Mylo
-
#2 Miguel Grinberg said
@Mylo: if anything isn't clear enough please ask. While I'm also relatively new to Arduino programming, I have more years than I want to admit writing C++, so I could be inadvertently omitting stuff that is obvious to me but not to people that is new to the language. I'm always open to revise and improve my articles.
-
#3 Mylo said
Hey Miguel, thanks for the response.. well the one thing i'm struggling to understand is the use of the getSpeed statement, it doesn't seem to be called at any point, is it used by the AF library or am i just missing the point! Also i have the Arduino motor shield with no library.. is it good practice to writing all the statements to make it move into the motor class?
-
#4 Miguel Grinberg said
@Mylo: Very good question. The getSpeed() function is in the motor device driver interface that I designed. When I designed this interface I wasn't thinking specifically about the functions I would need in my robot, I was thinking about what general functions a sketch may need when working with a motor, and it seemed very reasonable to have a function to set the speed and another to return the current speed. So far I haven't had a need to use getSpeed(), but that doesn't mean it does not belong in a motor device driver, in fact it makes total sense for it to be there. So that particular function isn't used right now. But it might be used in the future. Suppose I'm debugging some problem with the motors and I want to write a log of the motor speeds. Then having this function already in there will make it a lot easier.
-
#5 Mylo said
Hey Miguel, Thanks for the reply, have been looking through the rest of your code today, rather than just copy and paste it's good to understand it as i'm creating my bot! and its great to learn properly for future projects. There's one more thing i was wondering if you could clarify for me :) in your template file on the line: ' MovingAverage(V def = 0) : sum(0), p(0)' what is the V def = 0, i understand the typename V but when it declares def = 0 is 'def' a c++ keyword or just a variable name you created? does the = 0 mean you don't need to send a value to the class?
Thanks again
Myles -
#6 Miguel Grinberg said
@Mylo: the "V def = 0" syntax is pretty easy. The "V" is the type (which is resolved by the compiler depending on the template arguments). The "def" is the variable name, I just picked that name as short for "default", since you can't use the word default as a variable name because that is a reserved keyword in C and C++. The "= 0" just says that if this argument isn't given then it will default to 0, so you can call MovingAverage(0) or just MovingAverage() and in both cases "def" will have a value of 0.
-
#7 Mylo said
That's great,.. my bot now has its brains and its running around the room! Thanks again for the great tutorial.. this may not be the last you hear from me if i get any more c++ questions!!
Mylo
-
#8 Bennett said
First off, this tutorial is awesome. Your attention to detail and just overall dedication to this project and blog are fantastic and I really appreciate you doing this.
I am new to both Arduino and C++. My problem I am having right now is in the newping_distance_sensor.h. The compiler is saying it expected a class name before '{' in line 8 when I have "class DistanceSensorDriver : public DistanceSensor" I have everything just like yours but for some reason it just is not working. I don't know what I am missing. -
#9 Bennett said
So I have the program working great. It is a little bit different because I have some different parts and some things just didn't work out how you said. But I followed your program as close as I could and it works fine. However, it only works when it is plugged into the USB to the computer. It doesn't work when it is solely on battery power. It gets stuck in 'stateturning' pretty much and just won't stop turning. I can not figure out why this is happening. I don't see how it is my code since it works with the USB. I have tried using different SainsmartSensors but nothing seems to work.
-
#10 Miguel Grinberg said
@Bennet: seeing the exact error message from gcc might help me figure out what's going on. My only guess right now is that you missed the #include "distance_sensor.h" at the top of the file.
-
#11 Miguel Grinberg said
@Bennett: you are probably having power issues. Powering the motors with a separate power supply will probably solve your problem. Alternatively a bigger single power source might help too.
-
#12 Sercan said
@Bennet: I had the same problem with you. But since Arduino board needs a power voltage higher than 6v, four AA batteries are not enough to supply enough power. And that causes the board malfunction. Better use a 9V battery for the board, and use 4xAA batteries for the motor shield.
-
#13 Vincent said
I have some problems to compile the source. I m new with Arduino and C++. This is my error "newping_distance_sensor.h:29: error: 'NewPing' does not name a type" but i have #include <NewPing.h> into the same file and it doesnt work, any help would be appreciated, thanks.
-
#14 Miguel Grinberg said
@Vincent: you probably haven't installed the NewPing library in your Arduino environment. See the Arduino documentation for how to install libraries.
-
#15 NattyFido said
Excellent article, helped me sort out where I'd been going wrong with my own code!
-
#16 Mauricio de Abreu Antunes said
Are 4x AA batteries enough for the robot?
-
#17 Miguel Grinberg said
@Mauricio: 4 AA batteries are enough for the Arduino and the sensors. They will probably not be enough to also power the motors.
-
#18 Mauricio de Abreu Antunes said
Thanks for your quick response!
Well, good to know it, but you are using 4 AA batteries no? How is it working? I just can see 4 AA batteries on your robot. -
#19 Miguel Grinberg said
@Mauricio: Yes, I was able to use just 4 AA batteries, but barely, I had to replace batteries very often. Using a 9V battery, or even better having separate power for the motors makes the robot run much more smoothly.
-
#20 Nilesh said
Hi Miguel. I am observing a strange occurrence. If I allocate pins 14 and 15, the distance sensor does not work. But when I allocate ping 16 and 17 it works fine.
I have not allocated pins 14 and 15 for anything else.
What could be the error you think?
-
#21 Miguel Grinberg said
@Nilesh: You may want to try to disconnect everything else and leave just the distance sensor. Does that work then? If not, then maybe try another Arduino board if you have one, I guess it could be a problem with the board that you are using.
-
#22 Nilesh said
Yes it does work fine. I tested that before using it in the robot car. I think it could be an issue with the motor shield. As per the tutorial the motor shield uses only 3 pins for each motor but there are 4th pins dedicated for current sensing as shown below:
Function Channel A Channel B
Direction Digital 12 Digital 13
Speed (PWM) Digital 3 Digital 11
Brake Digital 9 Digital 8
Current Sensing Analog 0 Analog 1Do you think this could be creating a collision?
-
#23 Miguel Grinberg said
@Nilesh: I forgot you were using the Arduino shield, I replied thinking on the Adafruit one. This note is in the Arduino Motor Shield page:
IMPORTANT: When the current sense pins are soldered they cannot be used as general analog pins. You will get bad readings if you try to use A0 and A1.
I guess that says it all. If you want to use A0 and A1 you have to disable the current sensing feature.
-
#24 Nilesh said
Yes that says it all. Thanks Miguel. I guess I can use the other analog pins for my ultrasonic sensor and bluetooth module.
-
#25 Laurynas said
Hi, Miguel. You did great tutorial, but for me your code doesn't work. I have installed libraries, but then compiling I get error message. It says: "Motor" does not name a type.


