The Flask Mega-Tutorial, Part IV: Database (2012)
Posted by
on under(Great news! There is a new version of this tutorial!)
This is the fourth article in the series in which I document my experience writing web applications in Python using the Flask microframework.
The goal of the tutorial series is to develop a decently featured microblogging application that demonstrating total lack of originality I have decided to call microblog.
NOTE: This article was revised in September 2014 to be in sync with current versions of Python and Flask.
Here is an index of all the articles in the series that have been published to date:
- Part I: Hello, World!
- Part II: Templates
- Part III: Web Forms
- Part IV: Database (this article)
- Part V: User Logins
- Part VI: Profile Page And Avatars
- Part VII: Unit Testing
- Part VIII: Followers, Contacts And Friends
- Part IX: Pagination
- Part X: Full Text Search
- Part XI: Email Support
- Part XII: Facelift
- Part XIII: Dates and Times
- Part XIV: I18n and L10n
- Part XV: Ajax
- Part XVI: Debugging, Testing and Profiling
- Part XVII: Deployment on Linux (even on the Raspberry Pi!)
- Part XVIII: Deployment on the Heroku Cloud
Recap
In the previous chapter of the series we created our login form, complete with submission and validation.
In this article we are going to create our database and set it up so that we can record our users in it.
To follow this chapter along you need to have the microblog app as we left it at the end of the previous chapter. Please make sure the app is installed and running.
Running Python scripts from the command line
In this chapter we are going to write a few scripts that simplify the management of our database. Before we get into that let's review how a Python script is executed on the command line.
If you are on Linux or OS X, then scripts have to be given executable permission, like this:
$ chmod a+x script.py
The script has a shebang line, which points to the interpreter that should be used. A script that has been given executable permission and has a shebang line can be executed simply like this:
./script.py <arguments>
On Windows, however, this does not work, and instead you have to provide the script as an argument to the chosen Python interpreter:
$ flask\Scripts\python script.py <arguments>
To avoid having to type the path to the Python interpreter you can add your microblog/flask/Scripts directory to the system path, making sure it appears before your regular Python interpreter. This can be temporarily achieved by activating the virtual environment with the following command:
$ flask\Scripts\activate
From now on, in this tutorial the Linux/OS X syntax will be used for brevity. If you are on Windows remember to convert the syntax appropriately.
Databases in Flask
We will use the Flask-SQLAlchemy extension to manage our application. This extension provides a wrapper for the SQLAlchemy project, which is an Object Relational Mapper or ORM.
ORMs allow database applications to work with objects instead of tables and SQL. The operations performed on the objects are translated into database commands transparently by the ORM. Knowing SQL can be very helpful when working with ORMs, but we will not be learning SQL in this tutorial, we will let Flask-SQLAlchemy speak SQL for us.
Migrations
Most database tutorials I've seen cover creation and use of a database, but do not adequately address the problem of updating a database as the application grows. Typically you end up having to delete the old database and create a new one each time you need to make updates, losing all the data. And if the data cannot be recreated easily you may be forced to write export and import scripts yourself.
Luckily, we have a much better option.
We are going to use SQLAlchemy-migrate to keep track of database updates for us. It adds a bit of work to get a database started, but that is a small price to pay for never having to worry about manual database migrations.
Enough theory, let's get started!
Configuration
For our little application we will use a sqlite database. The sqlite databases are the most convenient choice for small applications, as each database is stored in a single file and there is no need to start a database server.
We have a couple of new configuration items to add to our config file (file config.py):
import os
basedir = os.path.abspath(os.path.dirname(__file__))

SQLALCHEMY_DATABASE_URI = 'sqlite:///' + os.path.join(basedir, 'app.db')
SQLALCHEMY_MIGRATE_REPO = os.path.join(basedir, 'db_repository')
The SQLALCHEMY_DATABASE_URI is required by the Flask-SQLAlchemy extension. This is the path of our database file.
The SQLALCHEMY_MIGRATE_REPO is the folder where we will store the SQLAlchemy-migrate data files.
Finally, when we initialize our app we also need to initialize our database. Here is our updated package init file (file app/__init__.py):
from flask import Flask
from flask_sqlalchemy import SQLAlchemy

app = Flask(__name__)
app.config.from_object('config')
db = SQLAlchemy(app)

from app import views, models
Note the two changes we have made to our init script. We are now creating a db object that will be our database, and we are also importing a new module called models. We will write this module next.
The database model
The data that we will store in our database will be represented by a collection of classes that are referred to as the database models. The ORM layer will do the translations required to map objects created from these classes into rows in the proper database table.
Let's start by creating a model that will represent our users. Using the WWW SQL Designer tool, I have made the following diagram to represent our users table:
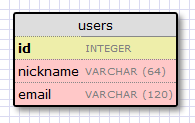
The id field is usually in all models, and is used as the primary key. Each user in the database will be assigned a unique id value, stored in this field. Luckily this is done automatically for us, we just need to provide the id field.
The nickname and email fields are defined as strings (or VARCHAR in database jargon), and their maximum lengths are specified so that the database can optimize space usage.
Now that we have decided what we want our users table to look like, the job of translating that into code is pretty easy (file app/models.py):
from app import db

class User(db.Model):
    id = db.Column(db.Integer, primary_key=True)
    nickname = db.Column(db.String(64), index=True, unique=True)
    email = db.Column(db.String(120), index=True, unique=True)

    def __repr__(self):
        return '<User %r>' % (self.nickname)
The User class that we just created contains several fields, defined as class variables. Fields are created as instances of the db.Column class, which takes the field type as an argument, plus other optional arguments that allow us, for example, to indicate which fields are unique and indexed.
The __repr__ method tells Python how to print objects of this class. We will use this for debugging.
Creating the database
With the configuration and model in place we are now ready to create our database file. The SQLAlchemy-migrate package comes with command line tools and APIs to create databases in a way that allows easy updates in the future, so that is what we will use. I find the command line tools a bit awkward to use, so instead I have written my own set of little Python scripts that invoke the migration APIs.
Here is a script that creates the database (file db_create.py):
#!flask/bin/python
from migrate.versioning import api
from config import SQLALCHEMY_DATABASE_URI
from config import SQLALCHEMY_MIGRATE_REPO
from app import db
import os.path
db.create_all()
if not os.path.exists(SQLALCHEMY_MIGRATE_REPO):
    api.create(SQLALCHEMY_MIGRATE_REPO, 'database repository')
    api.version_control(SQLALCHEMY_DATABASE_URI, SQLALCHEMY_MIGRATE_REPO)
else:
    api.version_control(SQLALCHEMY_DATABASE_URI, SQLALCHEMY_MIGRATE_REPO, api.version(SQLALCHEMY_MIGRATE_REPO))
Note how this script is completely generic. All the application specific pathnames are imported from the config file. When you start your own project you can just copy the script to the new app's directory and it will work right away.
To create the database you just need to execute this script (remember that if you are on Windows the command is slightly different):
./db_create.py
After you run the command you will have a new app.db file. This is an empty sqlite database, created from the start to support migrations. You will also have a db_repository directory with some files inside. This is the place where SQLAlchemy-migrate stores its data files. Note that we do not regenerate the repository if it already exists. This will allow us to recreate the database while leaving the existing repository if we need to.
Our first migration
Now that we have defined our model, we can incorporate it into our database. We will consider any changes to the structure of the app database a migration, so this is our first, which will take us from an empty database to a database that can store users.
To generate a migration I use another little Python helper script (file db_migrate.py):
#!flask/bin/python
import imp
from migrate.versioning import api
from app import db
from config import SQLALCHEMY_DATABASE_URI
from config import SQLALCHEMY_MIGRATE_REPO
v = api.db_version(SQLALCHEMY_DATABASE_URI, SQLALCHEMY_MIGRATE_REPO)
migration = SQLALCHEMY_MIGRATE_REPO + ('/versions/%03d_migration.py' % (v+1))
tmp_module = imp.new_module('old_model')
old_model = api.create_model(SQLALCHEMY_DATABASE_URI, SQLALCHEMY_MIGRATE_REPO)
exec(old_model, tmp_module.__dict__)
script = api.make_update_script_for_model(SQLALCHEMY_DATABASE_URI, SQLALCHEMY_MIGRATE_REPO, tmp_module.meta, db.metadata)
open(migration, "wt").write(script)
api.upgrade(SQLALCHEMY_DATABASE_URI, SQLALCHEMY_MIGRATE_REPO)
v = api.db_version(SQLALCHEMY_DATABASE_URI, SQLALCHEMY_MIGRATE_REPO)
print('New migration saved as ' + migration)
print('Current database version: ' + str(v))
The script looks complicated, but it doesn't really do much. The way SQLAlchemy-migrate creates a migration is by comparing the structure of the database (obtained in our case from file app.db) against the structure of our models (obtained from file app/models.py). The differences between the two are recorded as a migration script inside the migration repository. The migration script knows how to apply a migration or undo it, so it is always possible to upgrade or downgrade a database format.
While I have never had problems generating migrations automatically with the above script, I could see that sometimes it would be hard to determine what changes were made just by comparing the old and the new format. To make it easy for SQLAlchemy-migrate to determine the changes I never rename existing fields, I limit my changes to adding or removing models or fields, or changing types of existing fields. And I always review the generated migration script to make sure it is right.
It goes without saying that you should never attempt to migrate your database without having a backup, in case something goes wrong. Also never run a migration for the first time on a production database, always make sure the migration works correctly on a development database.
So let's go ahead and record our migration:
$ ./db_migrate.py
And the output from the script will be:
New migration saved as db_repository/versions/001_migration.py
Current database version: 1
The script shows where the migration script was stored, and also prints the current database version. The empty database version was version 0, after we migrated to include users we are at version 1.
Database upgrades and downgrades
By now you may be wondering why is it that important to go through the extra hassle of recording database migrations.
Imagine that you have your application in your development machine, and also have a copy deployed to a production server that is online and in use.
Let's say that for the next release of your app you have to introduce a change to your models, for example a new table needs to be added. Without migrations you would need to figure out how to change the format of your database, both in your development machine and then again in your server, and this could be a lot of work.
If you have database migration support, then when you are ready to release the new version of the app to your production server you just need to record a new migration, copy the migration scripts to your production server and run a simple script that applies the changes for you. The database upgrade can be done with this little Python script (file db_upgrade.py):
#!flask/bin/python
from migrate.versioning import api
from config import SQLALCHEMY_DATABASE_URI
from config import SQLALCHEMY_MIGRATE_REPO
api.upgrade(SQLALCHEMY_DATABASE_URI, SQLALCHEMY_MIGRATE_REPO)
v = api.db_version(SQLALCHEMY_DATABASE_URI, SQLALCHEMY_MIGRATE_REPO)
print('Current database version: ' + str(v))
When you run the above script, the database will be upgraded to the latest revision, by applying the migration scripts stored in the database repository.
It is not a common need to have to downgrade a database to an old format, but just in case, SQLAlchemy-migrate supports this as well (file db_downgrade.py):
#!flask/bin/python
from migrate.versioning import api
from config import SQLALCHEMY_DATABASE_URI
from config import SQLALCHEMY_MIGRATE_REPO
v = api.db_version(SQLALCHEMY_DATABASE_URI, SQLALCHEMY_MIGRATE_REPO)
api.downgrade(SQLALCHEMY_DATABASE_URI, SQLALCHEMY_MIGRATE_REPO, v - 1)
v = api.db_version(SQLALCHEMY_DATABASE_URI, SQLALCHEMY_MIGRATE_REPO)
print('Current database version: ' + str(v))
This script will downgrade the database one revision. You can run it multiple times to downgrade several revisions.
Database relationships
Relational databases are good at storing relations between data items. Consider the case of a user writing a blog post. The user will have a record in the users table, and the post will have a record in the posts table. The most efficient way to record who wrote a given post is to link the two related records.
Once a link between a user and a post is established there are two types of queries that we may need to use. The most trivial one is when you have a blog post and need to know what user wrote it. A more complex query is the reverse of this one. If you have a user, you may want to know all the posts that the user wrote. Flask-SQLAlchemy will help us with both types of queries.
Let's expand our database to store posts, so that we can see relationships in action. For this we go back to our database design tool and create a posts table:

Our posts table will have the required id, the body of the post and a timestamp. Not much new there. But the user_id field deserves an explanation.
We said we wanted to link users to the posts that they write. The way to do that is by adding a field to the post that contains the id of the user that wrote it. This id is called a foreign key. Our database design tool shows foreign keys as a link between the foreign key and the id field of the table it refers to. This kind of link is called a one-to-many relationship, one user writes many posts.
Let's modify our models to reflect these changes (app/models.py):
from app import db

class User(db.Model):
    id = db.Column(db.Integer, primary_key=True)
    nickname = db.Column(db.String(64), index=True, unique=True)
    email = db.Column(db.String(120), index=True, unique=True)
    posts = db.relationship('Post', backref='author', lazy='dynamic')

    def __repr__(self):
        return '<User %r>' % (self.nickname)

class Post(db.Model):
    id = db.Column(db.Integer, primary_key = True)
    body = db.Column(db.String(140))
    timestamp = db.Column(db.DateTime)
    user_id = db.Column(db.Integer, db.ForeignKey('user.id'))

    def __repr__(self):
        return '<Post %r>' % (self.body)
We have added the Post class, which will represent blog posts written by users. The user_id field in the Post class was initialized as a foreign key, so that Flask-SQLAlchemy knows that this field will link to a user.
Note that we have also added a new field to the User class called posts, that is constructed as a db.relationship field. This is not an actual database field, so it isn't in our database diagram. For a one-to-many relationship a db.relationship field is normally defined on the "one" side. With this relationship we get a user.posts member that gets us the list of posts from the user. The first argument to db.relationship indicates the "many" class of this relationship. The backref argument defines a field that will be added to the objects of the "many" class that points back at the "one" object. In our case this means that we can use post.author to get the User instance that created a post. Don't worry if these details don't make much sense just yet, we'll see examples of this at the end of this article.
Let's record another migration with this change. Simply run:
$ ./db_migrate.py
And the script will respond:
New migration saved as db_repository/versions/002_migration.py
Current database version: 2
It isn't really necessary to record each little change to the database model as a separate migration, a migration is normally only recorded at significant points in the history of the project. We are doing more migrations than necessary here only to show how the migration system works.
Play time
We have spent a lot of time defining our database, but we haven't seen how it works yet. Since our app does not have database code yet let's make use of our brand new database in the Python interpreter.
So go ahead and fire up Python. On Linux or OS X:
flask/bin/python
Or on Windows:
flask\Scripts\python
Once in the Python prompt enter the following:
>>> from app import db, models
>>>
This brings our database and models into memory.
Let's create a new user:
>>> u = models.User(nickname='john', email='john@email.com')
>>> db.session.add(u)
>>> db.session.commit()
>>>
Changes to a database are done in the context of a session. Multiple changes can be accumulated in a session and once all the changes have been registered you can issue a single db.session.commit(), which writes the changes atomically. If at any time while working on a session there is an error, a call to db.session.rollback() will revert the database to its state before the session was started. If neither commit nor rollback are issued then the system by default will roll back the session. Sessions guarantee that the database will never be left in an inconsistent state.
Let's add another user:
>>> u = models.User(nickname='susan', email='susan@email.com')
>>> db.session.add(u)
>>> db.session.commit()
>>>
Now we can query what our users are:
>>> users = models.User.query.all()
>>> users
[<User u'john'>, <User u'susan'>]
>>> for u in users:
...     print(u.id,u.nickname)
...
1 john
2 susan
>>>
For this we have used the query member, which is available in all model classes. Note how the id member was automatically set for us.
Here is another way to do queries. If we know the id of a user we can find the data for that user as follows:
>>> u = models.User.query.get(1)
>>> u
<User u'john'>
>>>
Now let's add a blog post:
>>> import datetime
>>> u = models.User.query.get(1)
>>> p = models.Post(body='my first post!', timestamp=datetime.datetime.utcnow(), author=u)
>>> db.session.add(p)
>>> db.session.commit()
Here we set our timestamp in UTC time zone. All timestamps stored in our database will be in UTC. We can have users from all over the world writing posts and we need to use uniform time units. In a future tutorial we will see how to show these times to users in their local timezone.
You may have noticed that we have not set the user_id field of the Post class. Instead, we are storing a User object inside the author field. The author field is a virtual field that was added by Flask-SQLAlchemy to help with relationships, we have defined the name of this field in the backref argument to db.relationship in our model. With this information the ORM layer will know how to complete the user_id for us.
To complete this session, let's look at a few more database queries that we can do:
# get all posts from a user
>>> u = models.User.query.get(1)
>>> u
<User u'john'>
>>> posts = u.posts.all()
>>> posts
[<Post u'my first post!'>]

# obtain author of each post
>>> for p in posts:
...     print(p.id,p.author.nickname,p.body)
...
1 john my first post!

# a user that has no posts
>>> u = models.User.query.get(2)
>>> u
<User u'susan'>
>>> u.posts.all()
[]

# get all users in reverse alphabetical order
>>> models.User.query.order_by('nickname desc').all()
[<User u'susan'>, <User u'john'>]
>>>
The Flask-SQLAlchemy documentation is the best place to learn about the many options that are available to query the database.
Before we close, let's erase the test users and posts we have created, so that we can start from a clean database in the next chapter:
>>> users = models.User.query.all()
>>> for u in users:
...     db.session.delete(u)
...
>>> posts = models.Post.query.all()
>>> for p in posts:
...     db.session.delete(p)
...
>>> db.session.commit()
>>>
Final words
This was a long tutorial. We have learned the basics of working with a database, but we haven't incorporated the database into our application yet. In the next chapter we will put all we have learned about databases into practice when we look at our user login system.
In the meantime, if you haven't been writing the application along, you may want to download it in its current state:
Download microblog-0.4.zip.
Note that I have not included a database in the zip file above, but the repository with the migrations is there. To create a new database just use the db_create.py script, then use db_upgrade.py to upgrade the database to the latest revision.
I hope to see you next time!
Miguel
Become a Patron!
Hello, and thank you for visiting my blog! If you enjoyed this article, please consider supporting my work on this blog on Patreon!

-
#1 Alexander Manenko said
Thank you for this article!
-
#2 Doug said
First off, I just wanted to say that I love the flask tutorials, and look forward to more in the future. They are a huge help! Unfortunately, I am having a bit of trouble with the migration script and was wondering if you might be able to offer any insight. Inside of my models, I have the following column:
date_added = db.Column(db.DateTime, default=datetime.datetime.utcnow)When I run db_migrate.py it converts that into the following line inside of my migration:
Column('date_added', DateTime, default=ColumnDefault(<function \<lambda> at 0x101dddd70>))Later, when this line of the db_migrate.py script hits that line it causes a SyntaxError:
a = api.upgrade(SQLALCHEMY_DATABASE_URI, SQLALCHEMY_MIGRATE_REPO)Any thoughts?
-
#3 Miguel Grinberg said
Hi Doug, thanks for your comments.
I couldn't find anything in writing that explains the problem, but it is clear that sqlalchemy-migrate does not know how to handle a column default that is a function instead of a regular value. The automatic generation of migration scripts is an experimental feature, so this may be one of the aspects that isn't very polished. Maybe if you fix the migration script by hand to have the default function it will work.
As a side comment, I prefer not to use these sort of implicit updates that happen outside of your control, as I believe they make the code harder to understand and maintain. I like changes to the database to be explicit and always under my control, so I always update fields myself. -
#4 Ben said
Hi Miguel,
Thanks for these, they are amazingly helpful.
I am currently having some issues querying against all posts from a date range, eg. The date 7 days. The issue comes from the fact that the datetime format doesn't recognize just the date part.
I could not find much in the sqlalchemy documentation about it.
Any help would be appreciated!
Thanks,
Ben
-
#5 Miguel Grinberg said
Hi Ben, thanks for following the tutorial. To find posts that are in a date range you can use the filter() method of the query class. For example, if you want all posts between 2012-04-20 and 2012-04-27 you would do this: Post.query.filter(Post.date >= datetime(2012,4,20), Post.date < datetime(2012,4,27)). Note that the way I constructed the query you will get all the posts from the 20th to (and including) the 26th, but nothing from the 27th. If you wanted to include the 27th then you would say Post.date < datetime(2012,4,28). I hope this makes sense. Thanks!
-
#6 Doug said
Miguel, you are awesome for responding to your comments so quickly! I wanted to say thank you for your response to mine last week. I came to the same conclusion as you about sqlalchemy-migrate not being able to handle functions as column defaults; Hopefully they address this in a future update. I was able to sidestep the issue by specifying the function as my default value in the model's constructor. Keep up the excellent work!
-
#7 smitty said
I went kinda crazy trying to use the introductory Flask examples with SQLalchemy. Chapter 18 of the Flask documentation seems key for defining a data model as a singly .py file, and then getting it to play nicely with Flask.
In my medium-weight pythonista opinion, the whole business of factory methods and function decorators cuts against the grain of the KISS principle that motivates python in general.
Possibly that is all 'nature of the beast'.
Cheers,
Chris -
#8 JonoB said
When I run ./db_create.py, i get a Permission denied error. What am I doing wrong?
-
#9 JonoB said
OK, fixed the permission issue. But now when I run ./db_create.py I get the following errors:
from: can't read /var/mail/migrate.versioning
from: can't read /var/mail/config
from: can't read /var/mail/config
line4: import: command not found
...etc
...etc -
#10 JonoB said
Finally managed to sort this out. Ignore the shebang stuff. Just type:
python db_create.pyAlso, FILE should be file
Finally, the hyperlink to the file download doesn't work.
-
#11 Miguel Grinberg said
@JonoB: #1 when you create a script in Unix/Cygwin you have to give it execute permission. You can do that by running 'chmod a+x db_create.py'. #2 it sounds like you did not install Flask using my method, explained in the first part of this tutorial, or at least did not follow it correctly. The shebang line is specifically constructed to invoke the Python interpreter in the environment that has the Flask stuff installed, sounds like you installed Flask in the global interpreter. There is no problem with that, it's just different than what I did.
-
#12 Miguel Grinberg said
And I have now fixed the download link. Sorry about that!
-
#13 Josh said
I seem to be getting an error when running db_create... Not sure whats going on. I re-ran the flask installs from part1 and everything seems to be ok:
09:15 ~/code/python/microblog $ ./db_create.py
Traceback (most recent call last):
File "./db_create.py", line 3, in <module>
from migrate.versioning import api
File "/Users/josh/code/python/microblog/flask/lib/python2.7/site-packages/migrate/versioning/api.py", line 5, in <module>
from migrate.versioning.repository import * File "/Users/josh/code/python/microblog/flask/lib/python2.7/site-packages/migrate/versioning/repository.py", line 8, in <module>
from migrate.versioning import script,exceptions,version
File "/Users/josh/code/python/microblog/flask/lib/python2.7/site-packages/migrate/versioning/script/init.py", line 1, in <module>
from py import * File "/Users/josh/code/python/microblog/flask/lib/python2.7/site-packages/migrate/versioning/script/py.py", line 2, in <module>
from logsql import LogsqlFile
File "/Users/josh/code/python/microblog/flask/lib/python2.7/site-packages/migrate/versioning/script/logsql.py", line 2, in <module>
from migrate.versioning import logengine
File "/Users/josh/code/python/microblog/flask/lib/python2.7/site-packages/migrate/versioning/logengine.py", line 260, in <module>
LogEngineStrategy()
File "/Users/josh/code/python/microblog/flask/lib/python2.7/site-packages/migrate/versioning/logengine.py", line 253, in init
super(LogEngineStrategy,self).init('logsql')
TypeError: init() takes exactly 1 argument (2 given) -
#14 Miguel Grinberg said
Hi Josh. I have sqlalchemy-migrate v0.7.2 installed here, and it does not have a versioning/logengine.py script. What version do you have? Look in directory /Users/josh/code/python/microblog/flask/lib/python2.7/site-packages for a directory that begins with "sqlalchemy_migrate" to find the version.
-
#15 Josh said
It's showing SQLAlchemy-0.7.8-py2.7.
I'll try reverting to a prior version (7.2) and see if that fixes the issue.
I appreciate your quick response to this! It's a great tutorial.
-
#16 Josh said
Oops sorry it was sqlalchemy_migrate-0.7.2-py2.7.egg-info
-
#17 Josh said
Ah, i'm stupid as hell! :P
I did a pip install migrate in addition to pip install sqlalchemy_migrate. Once I uninstalled migrate it works!
Sorry for the hassle!
-
#18 Miguel Grinberg said
@Josh: glad you figured it out. Thanks for your comments.
-
#19 Raj said
Very good write up.In this part , you have the reference to models in the init.py. which was followed by the section to create the db using db_create.py As there were no models yet created ,running db_create.py is throwing an error . I had to remove the models, and I added reference to models in the init.py and then ran the db_migrate.py to have the tables created.Coming from heavy Java background , these articles are just what I need to see what I should be using for a quick poc or a full blown app.
-
#20 Miguel Grinberg said
@Raj: Thanks for your comment. I have corrected the error. The models.py file needs to be written before the database is created.
-
#21 Robert Tsai said
Miguel, I love this tutorial. Thanks so much!
I had a couple of questions.
After setting u to be the user john, when I tried to type the command:
posts = u.posts.all()
I got an error message-
AttributeError: 'InstrumentedList' object has no attribute 'all'
Am I doing something incorrectly here? In my implementation u.posts returns a list, but I guess there is no all() method associated with this list object?Second, in #obtain author of each post
I used:
for p in posts:
print p.id, p.author.nickname, p.body(as I think in your models section your backref for post is 'author' and not 'user')
-
#22 Miguel Grinberg said
Robert, you must have defined your posts relationship without the lazy = dynamic attribute, so when you say u.posts you get the result of evaluating the query, instead of the query object still unevaluated. And thanks for the correction on the other query. I went back and forth with the names of some of the fields and I forgot to update this particular one.
-
#23 Catherine said
Hi Miguel,
so I am working through the tutorial and everything is going great. I am interested to learn more about how to create better web interfaces to provide access to bioinformatics tools for biologists and geneticists (ie non computational scientists) and your tutorial is really helpful in understanding how to go about this.
Thanks! -
#24 Catherine said
Hi (again)
Just noticed something unusual during the migrations...
upgrade skips to version 3? Here's the terminal output:
Catherines-MacBook-Pro:microblog catherine_penfold$ flask/bin/python db_migrate.py New migration saved as /Users/catherine_penfold/Sites/brownie/microblog/db_repository/versions/003_migration.py
Current database version: 3
Catherines-MacBook-Pro:microblog catherine_penfold$ flask/bin/python db_upgrade.py
Current database version: 3
Catherines-MacBook-Pro:microblog catherine_penfold$ flask/bin/python db_downgrade.py
Current database version: 2
Catherines-MacBook-Pro:microblog catherine_penfold$ flask/bin/python db_downgrade.py
Current database version: 1
Catherines-MacBook-Pro:microblog catherine_penfold$ flask/bin/python db_downgrade.py
Current database version: 0
Catherines-MacBook-Pro:microblog catherine_penfold$ flask/bin/python db_upgrade.py
Current database version: 3
Catherines-MacBook-Pro:microblog catherine_penfold$any ideas about what is going on?
Thanks -
#25 Miguel Grinberg said
@Catherine: the downgrade.py script goes back one revision at a time, but the upgrade.py script goes directly to the latest revision. The migration API supports going forward one by one, but I think that isn't a useful thing to do.