The Flask Mega-Tutorial, Part XII: Facelift (2012)
Posted by
on under(Great news! There is a new version of this tutorial!)
This is the twelfth article in the series in which I document my experience writing web applications in Python using the Flask microframework.
The goal of the tutorial series is to develop a decently featured microblogging application that demonstrating total lack of originality I have decided to call microblog.
NOTE: This article was revised in September 2014 to be in sync with current versions of Python and Flask.
Here is an index of all the articles in the series that have been published to date:
- Part I: Hello, World!
- Part II: Templates
- Part III: Web Forms
- Part IV: Database
- Part V: User Logins
- Part VI: Profile Page And Avatars
- Part VII: Unit Testing
- Part VIII: Followers, Contacts And Friends
- Part IX: Pagination
- Part X: Full Text Search
- Part XI: Email Support
- Part XII: Facelift (this article)
- Part XIII: Dates and Times
- Part XIV: I18n and L10n
- Part XV: Ajax
- Part XVI: Debugging, Testing and Profiling
- Part XVII: Deployment on Linux (even on the Raspberry Pi!)
- Part XVIII: Deployment on the Heroku Cloud
Introduction
If you have been playing with the microblog application you must have noticed that we haven't spent too much time on its looks. Up to now the templates we put together were pretty basic, with absolutely no styling. This was useful, because we did not want the distraction of having to write good looking HTML when we were coding.
But we've been hard at work coding for a while now, so today we are taking a break and will see what we can do to make our application look a bit more appealing to our users.
This article is going to be different than previous ones because writing good looking HTML/CSS is a vast topic that falls outside of the intended scope of this series. There won't be any detailed HTML or CSS, we will just discuss basic guidelines and ideas so on how to approach the task.
How do we do this?
While we can argue that coding is hard, our pains are nothing compared to those of web designers, who have to write templates that have a nice and consistent look on a list of web browsers, most with obscure bugs or quirks. And in this modern age they not only need to make their designs look good on regular browsers but also on the resource limited browsers of tablets and smartphones.
Unfortunately, learning HTML, CSS and Javascript and on top of that being aware of the idiosyncrasies of each web browser is a task of uncertain dimensions. We really do not have time (or interest) to do that. We just want our application to look decent without having to invest a lot of energy.
So how can we approach the task of styling microblog with these constraints?
Introducing Bootstrap
Our good friends at Twitter have released an open source web framework called Bootstrap that might be our winning ticket.
Bootstrap is a collection of CSS and Javascript utilities for the most common types of web pages. If you want to see the kind of pages that can be designed with this framework here are some examples.
These are some of the things Bootstrap is good at:
- Similar looks in all major web browsers
- Handling of desktop, tablet and phone screen sizes
- Customizable layouts
- Fully styled navigation bars
- Fully styled forms
- And much, much more...
Bootstrapping microblog
Before we can add Bootstrap to our application we have to install the Bootstrap CSS, Javascript and image files in a place where our web server can find them.
In Flask applications the app/static folder is where regular files go. The web server knows to go look for files in these location when a URL has a /static prefix.
For example, if we store a file named image.png in /app/static then in an HTML template we can display the image with the following tag:
<img src="/static/image.png" />
We will install the Bootstrap framework according to the following structure:
/app
    /static
        /css
            bootstrap.min.css
            bootstrap-responsive.min.css
        /img
            glyphicons-halflings.png
            glyphicons-halflings-white.png
        /js
            bootstrap.min.js
Then in the head section of our base template we load the framework according to the instructions:
<!DOCTYPE html>
<html lang="en">
  <head>
    ...
    <link href="/static/css/bootstrap.min.css" rel="stylesheet" media="screen">
    <link href="/static/css/bootstrap-responsive.min.css" rel="stylesheet">
    <script src="http://code.jquery.com/jquery-latest.js"></script>
    <script src="/static/js/bootstrap.min.js"></script>
    <meta name="viewport" content="width=device-width, initial-scale=1.0">
    ...
  </head>
  ...
</html>
The link and script tags load the CSS and Javascript files that come with Bootstrap. Note that one of the required Javascript files is jQuery, which is used by some of the Bootstrap plugins.
The meta tag enables Bootstrap's responsive mode, which scales the page appropriately for desktops, tablets and smartphones.
With these changes incorporated into our base.html template we are ready to start implementing Bootstrap, which simply involves changing the HTML in our templates.
The changes that we will make are:
- Enclose the entire page contents in a single column fixed layout with responsive features.
- Adapt all forms to use Bootstrap form styles.
- Replace our navigation bar with a Navbar.
- Convert the previous and next pagination links to Pager buttons.
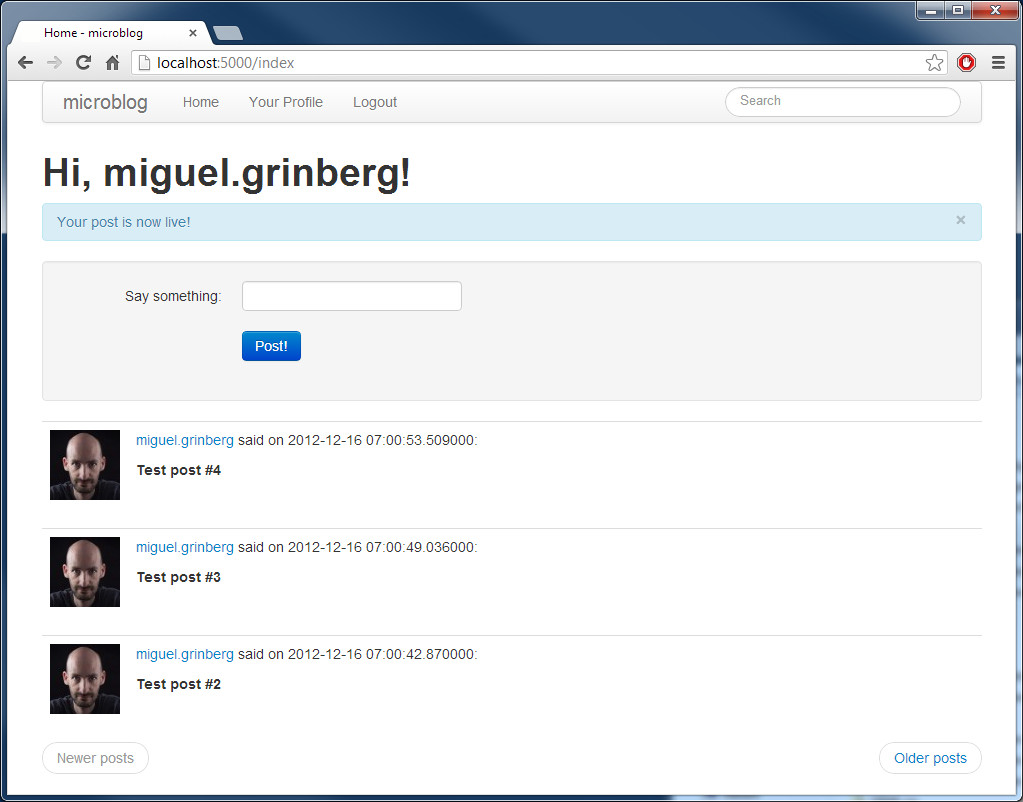
- Use the Bootstrap alert styles for flashed messages.
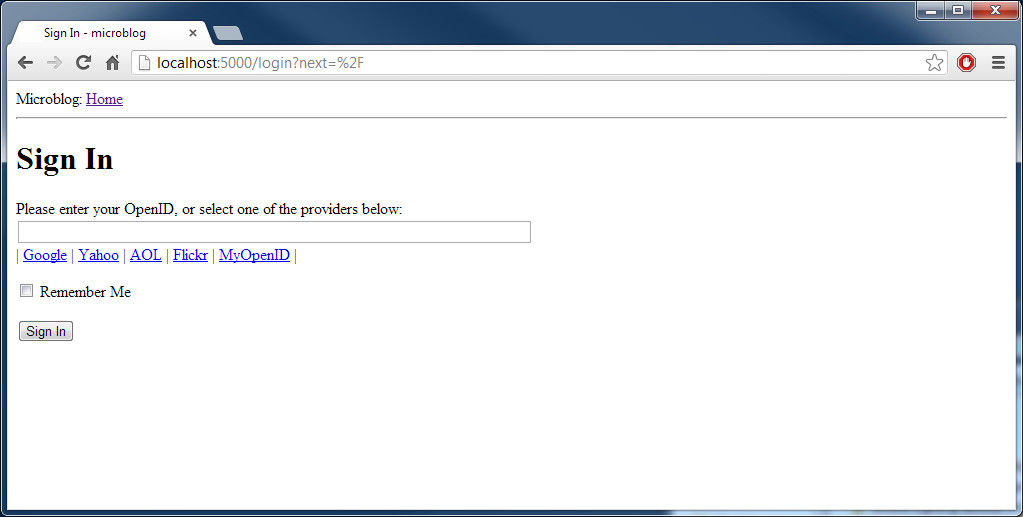
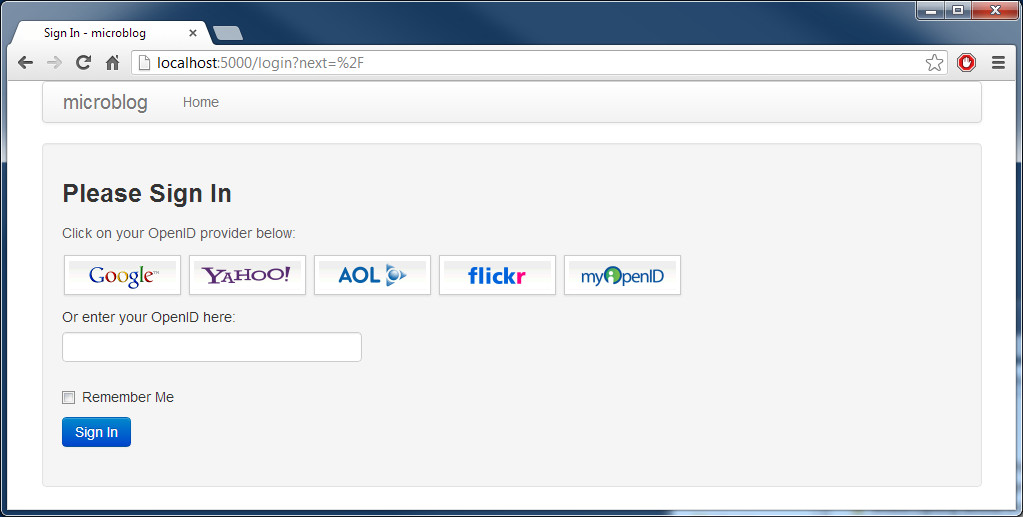
- Use styled images to represent the suggested OpenID providers in the login form.
We will not discuss the specific changes to achieve the above since these are pretty simple. For those interested, the actual changes can be viewed in diff form on this github commit. The Bootstrap reference documentation will be useful when trying to analyze the new microblog templates.
Note: At the time this tutorial was written the current version of Bootstrap was 2.3.2. Twitter has released a new major version since then, and with it several of the CSS classes have changed. Visit the Bootstrap site for more information.
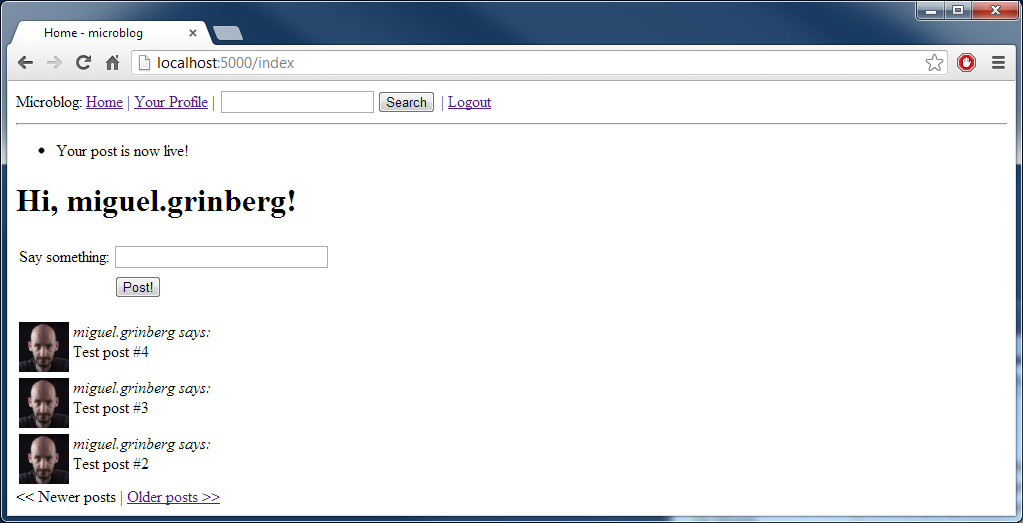
Final words
Today we've made the promise to not write a single line of code, and we stuck to it. All the improvements we've made were done with edits to the template files.
To give you an idea of the magnitude of the transformation, here are a few before and after screenshots. Click on the images to enlarge.
The updated application can be downloaded below:
Download microblog-0.12.zip.
In the next chapter we will look at improving the formatting of dates and times in our application. I look forward to see you then!
Miguel
Become a Patron!
Hello, and thank you for visiting my blog! If you enjoyed this article, please consider supporting my work on this blog on Patreon!

-
#1 sat said
i am new to web template languages can u plz tell me how can i call the python function in submit button Eg; click on submit for storing the data
-
#2 Miguel Grinberg said
@sat: If you start this tutorial series from the beginning you will learn how to handle web forms. Good luck.
-
#3 Bryan said
the downloadable base.html is missing the flash stuff from the earlier tutorial eg {% with messages = get_flashed_messages() %} -- is that somehow subsumed within the bootstrap nav or container??
-
#4 Miguel Grinberg said
@Bryan: the flashed messages did not look good that high in the page after I put in the bootstrap styling, so I abstracted those into a subtemplate (see file app/templates/flash.html on github) that is included from index.html, edit.html, etc. This just moves the flashed messages down to after the page specific headers, which looks much nicer.
-
#5 ron said
nice work. I like the links to the frameworks extensions, they really help with keeping up with new development.
-
#6 George Mabley said
Well... I'm back with another question. I replaced the bootstrap.min.css file with a theme from http://bootswatch.com/. Everything went well and the changes were as expected, but I wanted to try out a few others just to see. I replaced the file just as before, only to refresh and see that nothing changed. I tried another theme, and still no changes. I turned off the server and completely replaced all of my bootstrap files expecting to go back to default, but it is still the same first theme. Even when running your run.py directly from the microblog-0.12 folder I get the first theme I tried. I am dumbfounded as to where it is even getting the data it needs to show this theme. Could you think of how to get rid of it?
-
#7 Miguel Grinberg said
@George: try using a different web browser, one that you haven't used before for microblog on this computer. If that gives you the correct theme then the other browser has the files from the old theme in its cache. Unfortunately many browser assume static files never change. While this does not directly apply to your case, see the following stack overflow question for some ideas on how to force browsers to reload files: http://stackoverflow.com/questions/126772/how-to-force-a-web-browser-not-to-cache-images
-
#8 Lucas said
Thank you for this awesome tutorial ! Flask is really... woaw
-
#9 Paul Jewell said
Hello, I have a basically static website I am trying to convert from apache to flask to use some database applications in it. Things have gone well until I has some CSS which had links in it. For example background-image: url("SRC"); How do you point the src correctly to the file when it is in the css instead of the html?
-
#10 scott robinett said
very nice, I just came across bootstrap and needed a concise tutorial. Thank you very much.
-
#11 Joshua Grigonis said
Bootstrap seems to have moved.
-
#12 Zorba said
Hey Miguel, excellent tutorial!
Got everything working just great, but I'm having a problem with loading the external files:
127.0.0.1 - - [24/Jun/2014 20:51:34] "GET / HTTP/1.1" 200 -
127.0.0.1 - - [24/Jun/2014 20:51:34] "GET /static/bootstrap/css/bootstrap.min.css HTTP/1.1" 500 -
127.0.0.1 - - [24/Jun/2014 20:51:34] "GET /static/bootstrap/css/bootstrap-responsive.min.css HTTP/1.1" 500 -
127.0.0.1 - - [24/Jun/2014 20:51:34] "GET /static/bootstrap/js/bootstrap.min.js HTTP/1.1" 500 -Got any idea on what could cause this? Haven't touched the css or js files, and the site loads just fine, only without the styling.
-
#13 Miguel Grinberg said
@Zorba: you are getting a 500 error, that means that the application raised an exception. Run in debug mode to get a stack trace, that will give you more clues.
-
#14 Robert Wingard said
Great tutorial! I just started working with Flask and Bootstrap. I'm sure I'm missing something, but trying to use the themes from Bootswatch didn't go as planned using the flask-bootstrap plugin. Following your method, using the static folder etc., I was easily able to get the Bootswatch themes working. Thanks!
-
#15 Batat said
Why don't you use {{ url_for('static') }} in templates?
-
#16 Miguel Grinberg said
@Batat: this is an old article, you are correct, I should have used url_for to link to static files.
-
#17 Murtuza Z said
Hi Miguel ,
Thank you so much for fantastic mega tutorial.
Helps us a lot learning Flask.Greetings from India :)
-
#18 Jignesh Vasoya said
I have found that once user logged in using openID (google account), same user can jump to other user's profile page(if logged in user names nickname of other user).
<h6>######## views.py: at the beginning of view "user"</h6>
I have made following code modifications to restrict logged in user to access other users profile:if current_user.nickname != nickname:
<h6></h6>
flash('Can not access other user's profile page!')
return redirect(url_for('index')) -
#19 Miguel Grinberg said
@Jignesh: This is by design. When you go to Facebook/Twitter/etc. you can see the profile page of any user.
-
#20 Kai said
Hi Miguel,
great tutorial but in this case I would have liked to get some more Details - e.g.:
<form class="form" action="" method="post" name="login"> This is a line from the Login-Form. Does the name have to match with the name of the function in the views.py or is it just a name? I like to read code and try to understand it to adapt it to my needs if possible, but sometimes the "links" are not exactly clear... -
#21 Miguel Grinberg said
@Kai: the form name is used to access the form from Javascript. It does not need to match the name you give it in the code.
-
#22 Wang Qiang said
Hi Miguel ,
Thank you so much for your great tutorial and blog.It helps us a lot for learning python and Flask.
I found a link mistake in this chapter as below:
<link href="/static/css/bootstrap-responsive.css" rel="stylesheet">
It should be :<link href="/static/css/bootstrap-responsive.min.css" rel="stylesheet">Finally, thanks so much for your effort.
-
#23 Sat said
Hi Miguel,
I was tried to popup window with ajax form submission from button click action, main form has 3 buttons for different actions. When I tried with flask I not able to create popup but same code working with separate html file. Can please share some details flask with popups
-
#24 Miguel Grinberg said
@Sat: Flask has nothing to do with the popups, which happen entirely in the client side. Look at your javascript console to see if there are any errors, maybe the template that includes the javascript logic has a problem.
-
#25 JustHowIDidIt said
For all the people that are trying to replace bootstrap base css with something from bootswatch, I did it by loading the same file last. Basically I derived from bootswatch/base.html as a new base template, then derive all my pages from that template, like this:
{% extends "bootstrap/base.html" %}
{% block title %}An intermediate base template{% endblock %}{% block navbar %}
{{nav.top.render()}}
{% endblock %}{% block body %}
{{super()}}
<link rel="stylesheet" type="text/css" href="/static/bootswatch/cyborg/bootstrap.min.css">
{% endblock %}Then when you derive from it using content or body templates, it puts the content above the end of body and adds the additional line for the bootstrap.min.css at the end of the body just before </body>


