Using Celery With Flask
Posted by
on under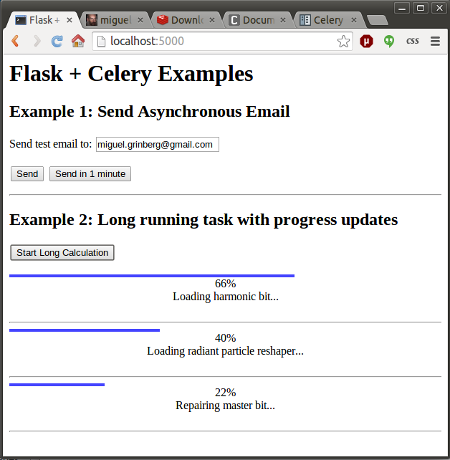
The topic of running background tasks is complex, and because of that there is a lot of confusion around it. I have tackled it in my Mega-Tutorial, later in my book, and then again in much more detail in my REST API training video. To keep things simple, in all the examples I have used so far I have executed background tasks in threads, but I always noted that for a more scalable and production ready solution a task queue such as Celery should be used instead.
My readers constantly ask me about Celery, and how a Flask application can use it, so today I am going to show you two examples that I hope will cover most application needs.
What is Celery?
Celery is an asynchronous task queue. You can use it to execute tasks outside of the context of your application. The general idea is that any resource consuming tasks that your application may need to run can be offloaded to the task queue, leaving your application free to respond to client requests.
Running background tasks through Celery is not as trivial as doing so in threads. But the benefits are many, as Celery has a distributed architecture that will enable your application to scale. A Celery installation has three core components:
- The Celery client. This is used to issue background jobs. When working with Flask, the client runs with the Flask application.
- The Celery workers. These are the processes that run the background jobs. Celery supports local and remote workers, so you can start with a single worker running on the same machine as the Flask server, and later add more workers as the needs of your application grow.
- The message broker. The client communicates with the the workers through a message queue, and Celery supports several ways to implement these queues. The most commonly used brokers are RabbitMQ and Redis.
For The Impatient
If you are the instant gratification type, and the screenshot at the top of this article intrigued you, then head over to the Github repository for the code used in this article. The README file there will give you the quick and dirty approach to running and playing with the example application.
Then come back to learn how everything works!
Working with Flask and Celery
The integration of Celery with Flask is so simple that no extension is required. A Flask application that uses Celery needs to initialize the Celery client as follows:
from flask import Flask
from celery import Celery

app = Flask(__name__)
app.config['CELERY_BROKER_URL'] = 'redis://localhost:6379/0'
app.config['CELERY_RESULT_BACKEND'] = 'redis://localhost:6379/0'

celery = Celery(app.name, broker=app.config['CELERY_BROKER_URL'])
celery.conf.update(app.config)
As you can see, Celery is initialized by creating an object of class Celery, and passing the application name and the connection URL for the message broker, which I put in app.config under key CELERY_BROKER_URL. This URL tells Celery where the broker service is running. If you run something other than Redis, or have the broker on a different machine, then you will need to change the URL accordingly.
Any additional configuration options for Celery can be passed directly from Flask's configuration through the celery.conf.update() call. The CELERY_RESULT_BACKEND option is only necessary if you need to have Celery store status and results from tasks. The first example I will show you does not require this functionality, but the second does, so it's best to have it configured from the start.
Any functions that you want to run as background tasks need to be decorated with the celery.task decorator. For example:
@celery.task
def my_background_task(arg1, arg2):
    # some long running task here
    return result
Then the Flask application can request the execution of this background task as follows:
task = my_background_task.delay(10, 20)
The delay() method is a shortcut to the more powerful apply_async() call. Here is the equivalent call using apply_async():
task = my_background_task.apply_async(args=[10, 20])
When using apply_async(), you can give Celery more detailed instructions about how the background task is to be executed. A useful option is to request that the task executes at some point in the future. For example, this invocation will schedule the task to run in about a minute:
task = my_background_task.apply_async(args=[10, 20], countdown=60)
The return value of delay() and apply_async() is an object that represents the task, and this object can be used to obtain status. I will show you how this is done later in this article, but for now let's keep it simple and not worry about results from tasks.
Consult the Celery documentation to learn about many other available options.
Simple Example: Sending Asynchronous Emails
The first example that I'm going to show is a very common need of applications: the ability to send emails without blocking the main application.
For this example I'm going to use the Flask-Mail extension, which I covered in very good detail in other articles. I'm going to assume that you are familiar with this extension, so if you need a refresher see this tutorial or my Flask book.
The example application that I'm going to use to illustrate the topic presents a simple web form with one text field. The user is asked to enter an email address in this field, and upon submission, the server sends a test email to this address. The form includes two submit buttons, one to send the email immediately, and another to send it after a wait of one minute. The top portion of the screenshot at the top of this article shows how this form looks.
Here is the HTML template that supports this example:
<html>
  <head>
    <title>Flask + Celery Examples</title>
  </head>
  <body>
    <h1>Flask + Celery Examples</h1>
    <h2>Example 1: Send Asynchronous Email</h2>
    {% for message in get_flashed_messages() %}
    <p style="color: red;">{{ message }}</p>
    {% endfor %}
    <form method="POST">
      <p>Send test email to: <input type="text" name="email" value="{{ email }}"></p>
      <input type="submit" name="submit" value="Send">
      <input type="submit" name="submit" value="Send in 1 minute">
    </form>
  </body>
</html>
Hopefully you find nothing earth shattering here. Just a regular HTML form, plus the ability to show flashed messages from Flask.
The Flask-Mail extension requires some configuration, specifically the details about the email server to use when sending emails. To make things easy I use my Gmail account as email server:
# Flask-Mail configuration
app.config['MAIL_SERVER'] = 'smtp.googlemail.com'
app.config['MAIL_PORT'] = 587
app.config['MAIL_USE_TLS'] = True
app.config['MAIL_USERNAME'] = os.environ.get('MAIL_USERNAME')
app.config['MAIL_PASSWORD'] = os.environ.get('MAIL_PASSWORD')
app.config['MAIL_DEFAULT_SENDER'] = 'flask@example.com'
Note how to avoid putting my email account's credentials at risk I set them in environment variables, which I import from the application.
There is a single route to support this example:
@app.route('/', methods=['GET', 'POST'])
def index():
    if request.method == 'GET':
        return render_template('index.html', email=session.get('email', ''))
    email = request.form['email']
    session['email'] = email

    # send the email
    email_data = {
        'subject': 'Hello from Flask',
        'to': email,
        'body': 'This is a test email sent from a background Celery task.'
    }
    if request.form['submit'] == 'Send':
        # send right away
        send_async_email.delay(email_data)
        flash('Sending email to {0}'.format(email))
    else:
        # send in one minute
        send_async_email.apply_async(args=[email_data], countdown=60)
        flash('An email will be sent to {0} in one minute'.format(email))

    return redirect(url_for('index'))
Once again, this is all pretty standard Flask. Since this is a very simple form, I decided to handle it without the help of an extension, so I use request.method and request.form to do all the management. I save the value that the user enters in the text field in the session, so that I can remember it after the page reloads.
The data associated with the email, which is the subject, recipient(s) and body, are stored in a dictionary. The interesting bit in this route is the sending of the email, which is handled by a Celery task called send_async_email, invoked either via delay() or apply_async() with this dictionary as an argument.
The last piece of this application is the asynchronous task that gets the job done:
@celery.task
def send_async_email(email_data):
    """Background task to send an email with Flask-Mail."""
    msg = Message(email_data['subject'],
                  sender=app.config['MAIL_DEFAULT_SENDER'],
                  recipients=[email_data['to']])
    msg.body = email_data['body']
    with app.app_context():
        mail.send(msg)
This task is decorated with celery.task to make it a background job. The function constructs a Message object from Flask-Mail using the data from the email_data dictionary. One notable thing in this function is that Flask-Mail requires an application context to run, so one needs to be created before the send() method can be invoked.
It is important to note that in this example the return value from the asynchronous call is not preserved, so the application will never know if the call succeeded or not. When you get to run this example, you can look at the output of the Celery worker to troubleshoot any problems with the sending of the email.
Complex Example: Showing Status Updates and Results
The above example is overly simple, the background job is started and then the application forgets about it. Most Celery tutorials for web development end right there, but the fact is that for many applications it is necessary for the application to monitor its background tasks and obtain results from it.
What I'm going to do now is extend the above application with a second example that shows a fictitious long running task. The user can start one or more of these long running jobs clicking a button, and the web page running in your browser uses ajax to poll the server for status updates on all these tasks. For each task the page will show a graphical status bar, a completion percentage, a status message, and when the task completes, a result value will be shown as well. You can see how all this looks in the screenshot at the top of this article.
Background Tasks with Status Updates
Let me start by showing you the background task that I'm using for this second example:
@celery.task(bind=True)
def long_task(self):
    """Background task that runs a long function with progress reports."""
    verb = ['Starting up', 'Booting', 'Repairing', 'Loading', 'Checking']
    adjective = ['master', 'radiant', 'silent', 'harmonic', 'fast']
    noun = ['solar array', 'particle reshaper', 'cosmic ray', 'orbiter', 'bit']
    message = ''
    total = random.randint(10, 50)
    for i in range(total):
        if not message or random.random() < 0.25:
            message = '{0} {1} {2}...'.format(random.choice(verb),
                                              random.choice(adjective),
                                              random.choice(noun))
        self.update_state(state='PROGRESS',
                          meta={'current': i, 'total': total,
                                'status': message})
        time.sleep(1)
    return {'current': 100, 'total': 100, 'status': 'Task completed!',
            'result': 42}
For this task I've added a bind=True argument in the Celery decorator. This instructs Celery to send a self argument to my function, which I can then use to record the status updates.
Since this task doesn't really do anything useful, I decided to use humorous status messages that are assembled from random verbs, adjectives and nouns. You can see the lists of non-sensical items I use to generate these messages above. Nothing wrong with having a little bit of fun, right?
The function loops for a random number of iterations between 10 and 50, so each run of the task will have a different duration. The random status message is generated on the first iteration, and then can be replaced in later iterations with a 25% chance.
The self.update_state() call is how Celery receives these task updates. There are a number of built-in states, such as STARTED, SUCCESS and so on, but Celery allows custom states as well. Here I'm using a custom state that I called PROGRESS. Attached to the state there is additional metadata, in the form of a Python dictionary that includes the current and total number of iterations and the randomly generated status message. A client can use these elements to display a nice progress bar. Each iteration sleeps for one second, to simulate some work being done.
When the loop exits, a Python dictionary is returned as the function's result. This dictionary includes the updated iteration counters, a final status message and a humorous result.
The long_task() function above runs in a Celery worker process. Below you can see the Flask application route that starts this background job:
@app.route('/longtask', methods=['POST'])
def longtask():
    task = long_task.apply_async()
    return jsonify({}), 202, {'Location': url_for('taskstatus',
                                                  task_id=task.id)}
As you can see the client needs to issue a POST request to /longtask to kick off one of these tasks. The server starts the task, and stores the return value. For the response I used status code 202, which is normally used in REST APIs to indicate that a request is in progress. I also added a Location header, with a URL that the client can use to obtain status information. This URL points to another Flask route called taskstatus, and has task.id as a dynamic component.
Accessing Task Status from the Flask Application
The taskstatus route referenced above is in charge of reporting status updates provided by background tasks. Here is the implementation of this route:
@app.route('/status/<task_id>')
def taskstatus(task_id):
    task = long_task.AsyncResult(task_id)
    if task.state == 'PENDING':
        # job did not start yet
        response = {
            'state': task.state,
            'current': 0,
            'total': 1,
            'status': 'Pending...'
        }
    elif task.state != 'FAILURE':
        response = {
            'state': task.state,
            'current': task.info.get('current', 0),
            'total': task.info.get('total', 1),
            'status': task.info.get('status', '')
        }
        if 'result' in task.info:
            response['result'] = task.info['result']
    else:
        # something went wrong in the background job
        response = {
            'state': task.state,
            'current': 1,
            'total': 1,
            'status': str(task.info),  # this is the exception raised
        }
    return jsonify(response)
This route generates a JSON response that includes the task state and all the values that I set in the update_state() call as the meta argument, which the client can use to build a progress bar. Unfortunately this function needs to check for a few edge conditions as well, so it ended up being a bit long. To access task data I recreate the task object, which is an instance of class AsyncResult, using the task id given in the URL.
The first if block is for when the task hasn't started yet (PENDING state). In this case there is no status information, so I make up some data. The elif block that follows is that one that returns the status information from the background task. Here the information that the task provided is accessible as task.info. If the data contains a result key, then that means that this is the final result and the task finished, so I add that result to the response as well. The else block at the end covers the possibility of an error, which Celery will report by setting a task state of "FAILURE", and in that case task.info will contain the exception raised. To handle errors I set the text of the exception as a status message.
Believe it or not, this is all it takes from the server. The rest needs to be implemented by the client, which in this example is a web page with Javascript scripting.
Client-Side Javascript
It isn't really the focus of this article to describe the Javascript portion of this example, but in case you are interested, here is some information.
For the graphical progress bar I'm using nanobar.js, which I included from a CDN. I also included jQuery, which simplifies the ajax calls significantly:
<script src="//cdnjs.cloudflare.com/ajax/libs/nanobar/0.2.1/nanobar.min.js"></script>
<script src="//cdnjs.cloudflare.com/ajax/libs/jquery/2.1.3/jquery.min.js"></script>
The button that starts a background job is connected to the following Javascript handler:
function start_long_task() {
// add task status elements
div = $('<div class="progress"><div></div><div>0%</div><div>...</div><div> </div></div><hr>');
$('#progress').append(div);
// create a progress bar
var nanobar = new Nanobar({
bg: '#44f',
target: div[0].childNodes[0]
});
// send ajax POST request to start background job
$.ajax({
type: 'POST',
url: '/longtask',
success: function(data, status, request) {
status_url = request.getResponseHeader('Location');
update_progress(status_url, nanobar, div[0]);
},
error: function() {
alert('Unexpected error');
}
});
}
This function starts by adding a few HTML elements that will be used to display the new background task's progress bar and status. This is done dynamically because the user can add any number of jobs, and each job needs to get its own set of HTML elements.
To help you understand this better, here is the structure of the added elements for a task, with comments to indicate what each div is used for:
<div class="progress">
<div></div> <-- Progress bar
<div>0%</div> <-- Percentage
<div>...</div> <-- Status message
<div> </div> <-- Result
</div>
<hr>
The start_long_task() function then instantiates the progress bar according to nanobar's documentation, and finally sends the ajax POST request to /longtask to initiate the Celery background job in the server.
When the POST ajax call returns, the callback function obtains the value of the Location header, which as you saw in the previous section is for the client to invoke to get status updates. It then calls another function, update_progress() with this status URL, the progress bar object and the root div element subtree created for the task. Below you can see this update_progress() function, which sends the status request and then updates the UI elements with the information returned by it:
    function update_progress(status_url, nanobar, status_div) {
        // send GET request to status URL
        $.getJSON(status_url, function(data) {
            // update UI
            percent = parseInt(data['current'] * 100 / data['total']);
            nanobar.go(percent);
            $(status_div.childNodes[1]).text(percent + '%');
            $(status_div.childNodes[2]).text(data['status']);
            if (data['state'] != 'PENDING' && data['state'] != 'PROGRESS') {
                if ('result' in data) {
                    // show result
                    $(status_div.childNodes[3]).text('Result: ' + data['result']);
                }
                else {
                    // something unexpected happened
                    $(status_div.childNodes[3]).text('Result: ' + data['state']);
                }
            }
            else {
                // rerun in 2 seconds
                setTimeout(function() {
                    update_progress(status_url, nanobar, status_div);
                }, 2000);
            }
        });
    }
This function sends the GET request to the status URL, and when a response is received it updates the different HTML elements for the task. If the background task completed and a result is available then it is added to the page. If there is no result then that means that the task ended due to an error, so the task state, which is going to be FAILURE, is shown as result.
When the server is still running the job I need to continue polling the task status and updating the UI. To achieve this I set a timer to call the function again in two seconds. This will continue until the Celery task completes.
A Celery worker runs as many concurrent jobs as there are CPUs by default, so when you play with this example make sure you start a large number of tasks to see how Celery keeps jobs in PENDING state until the worker can take it.
Running the Examples
If you made it all the way here without running the example application, then it is now time for you to try all this Celery goodness. Go ahead and clone the Github repository, create a virtual environment, and populate it:
$ git clone https://github.com/miguelgrinberg/flask-celery-example.git
$ cd flask-celery-example
$ virtualenv venv
$ source venv/bin/activate
(venv) $ pip install -r requirements.txt
Note that the requirements.txt file included with this repository contains Flask, Flask-Mail, Celery and the Redis client, along with all their dependencies.
Now you need to run the three processes required by this application, so the easiest way is to open three terminal windows. On the first terminal run Redis. You can just install Redis according to the download instructions for your operating system, but if you are on a Linux or OS X machine, I have included a small script that downloads, compiles and runs Redis as a private server:
$ ./run-redis.sh
Note that for the above script to work you need to have gcc installed. Also note that the above command is blocking, Redis will start in the foreground.
On the second terminal run a Celery worker. This is done with the celery command, which is installed in your virtual environment. Since this is the process that will be sending out emails, the MAIL_USERNAME and MAIL_PASSWORD environment variables must be set to a valid Gmail account before starting the worker:
$ export MAIL_USERNAME=<your-gmail-username>
$ export MAIL_PASSWORD=<your-gmail-password>
$ source venv/bin/activate
(venv) $ celery worker -A app.celery --loglevel=info
The -A option gives Celery the application module and the Celery instance, and --loglevel=info makes the logging more verbose, which can sometimes be useful in diagnosing problems.
Finally, on the third terminal window run the Flask application, also from the virtual environment:
$ source venv/bin/activate
(venv) $ python app.py
Now you can navigate to http://localhost:5000/ in your web browser and try the examples!
Conclusion
Unfortunately when working with Celery you have to take a few more steps than simply sending a job to a background thread, but the benefits in flexibility and scalability are hard to ignore. In this article I tried to go beyond the "let's start a background job" example and give you a more complete and realistic portrait of what using Celery might entail. I sincerely hope I haven't scared you with too much information!
As always, feel free to write down any questions or comments below.
Miguel
Become a Patron!
Hello, and thank you for visiting my blog! If you enjoyed this article, please consider supporting my work on this blog on Patreon!

-
#51 Zahid said
How can I make a periodic task in celery-flask? E.g., submit the email task periodically maybe 1st of every month and repeat for one year.
-
#52 Miguel Grinberg said
@Zahid: celery comes with a scheduler that you can use for periodic tasks: http://docs.celeryproject.org/en/latest/userguide/periodic-tasks.html. You can also use cron jobs to trigger these tasks.
-
#53 ND said
Please note that starting from version 3.2 Celery will refuse to accept pickle by default. Can you update this brilliant HOWTO with the latest changes?
-
#54 Brecht Machiels said
Thanks a lot for this tutorial. This helped me get Celery up and running quickly!
-
#55 Ishan Sharma said
Miguel@,
One question:
Can you also add how to start celery workers from within a flask application? Say, I've my application running on 10 hosts, so I don't want to manually run "Celery" command on all of them. -
#56 Miguel Grinberg said
@Ishan: whatever solution you use to start your main application you can also use for the celery workers. They are just additional services that need to be started as part of your application. I use supervisord to start services and ensure they stay up, see if that works for you.
-
#57 Alessandro said
Thank you for this awesome tutorial, the example with the status update saved my day.
-
#58 Jared said
Thanks Miguel, I was having trouble figuring out how to use Celery with the application factory pattern and this post along with the GitHub repo helped a lot. I also got some ideas on how to structure my app better and manage it more easily through Flask-Script.
-
#59 Manish Kumar said
redis.exceptions.ConnectionError
ConnectionErrorTraceback (most recent call last)
File "/Library/Frameworks/Python.framework/Versions/2.7/lib/python2.7/site-packages/flask/app.py", line 1836, in call
return self.wsgi_app(environ, start_response)
File "/Library/Frameworks/Python.framework/Versions/2.7/lib/python2.7/site-packages/flask/app.py", line 1820, in wsgi_app
response = self.make_response(self.handle_exception(e))
File "/Library/Frameworks/Python.framework/Versions/2.7/lib/python2.7/site-packages/flask_cors/extension.py", line 188, in wrapped_function
return cors_after_request(app.make_response(f(args, kwargs)))
File "/Library/Frameworks/Python.framework/Versions/2.7/lib/python2.7/site-packages/flask/app.py", line 1403, in handle_exception
reraise(exc_type, exc_value, tb)
File "/Library/Frameworks/Python.framework/Versions/2.7/lib/python2.7/site-packages/flask/app.py", line 1817, in wsgi_app
response = self.full_dispatch_request()
File "/Library/Frameworks/Python.framework/Versions/2.7/lib/python2.7/site-packages/flask/app.py", line 1477, in full_dispatch_request
rv = self.handle_user_exception(e)
File "/Library/Frameworks/Python.framework/Versions/2.7/lib/python2.7/site-packages/flask_cors/extension.py", line 188, in wrapped_function
return cors_after_request(app.make_response(f(args, kwargs)))
File "/Library/Frameworks/Python.framework/Versions/2.7/lib/python2.7/site-packages/flask/app.py", line 1381, in handle_user_exception
reraise(exc_type, exc_value, tb)
File "/Library/Frameworks/Python.framework/Versions/2.7/lib/python2.7/site-packages/flask/app.py", line 1475, in full_dispatch_request
rv = self.dispatch_request()
File "/Library/Frameworks/Python.framework/Versions/2.7/lib/python2.7/site-packages/flask/app.py", line 1461, in dispatch_request
return self.view_functionsrule.endpoint
File "/Users/manishmahendru/Desktop/trip/yurii/yurii/trip.py", line 402, in bookTrip
task1 = celery_task.send_async_email.delay(msg)
File "/Library/Frameworks/Python.framework/Versions/2.7/lib/python2.7/site-packages/celery/app/task.py", line 453, in delay
return self.apply_async(args, kwargs)
File "/Library/Frameworks/Python.framework/Versions/2.7/lib/python2.7/site-packages/celery/app/task.py", line 565, in apply_async
dict(self._get_exec_options(), options)
File "/Library/Frameworks/Python.framework/Versions/2.7/lib/python2.7/site-packages/celery/app/base.py", line 354, in send_task
reply_to=reply_to or self.oid, options
File "/Library/Frameworks/Python.framework/Versions/2.7/lib/python2.7/site-packages/celery/app/amqp.py", line 305, in publish_task
kwargs
File "/Library/Frameworks/Python.framework/Versions/2.7/lib/python2.7/site-packages/kombu/messaging.py", line 172, in publish
routing_key, mandatory, immediate, exchange, declare)
File "/Library/Frameworks/Python.framework/Versions/2.7/lib/python2.7/site-packages/kombu/connection.py", line 457, in _ensured
interval_max)
File "/Library/Frameworks/Python.framework/Versions/2.7/lib/python2.7/site-packages/kombu/connection.py", line 369, in ensure_connection
interval_start, interval_step, interval_max, callback)
File "/Library/Frameworks/Python.framework/Versions/2.7/lib/python2.7/site-packages/kombu/utils/init.py", line 246, in retry_over_time
return fun(*args, kwargs)
File "/Library/Frameworks/Python.framework/Versions/2.7/lib/python2.7/site-packages/kombu/connection.py", line 237, in connect
return self.connection
File "/Library/Frameworks/Python.framework/Versions/2.7/lib/python2.7/site-packages/kombu/connection.py", line 741, in connection
self._connection = self._establish_connection()
File "/Library/Frameworks/Python.framework/Versions/2.7/lib/python2.7/site-packages/kombu/connection.py", line 696, in _establish_connection
conn = self.transport.establish_connection()
File "/Library/Frameworks/Python.framework/Versions/2.7/lib/python2.7/site-packages/kombu/transport/virtual/init.py", line 809, in establish_connection
self._avail_channels.append(self.create_channel(self))
File "/Library/Frameworks/Python.framework/Versions/2.7/lib/python2.7/site-packages/kombu/transport/virtual/init.py", line 791, in create_channel
channel = self.Channel(connection)
File "/Library/Frameworks/Python.framework/Versions/2.7/lib/python2.7/site-packages/kombu/transport/redis.py", line 459, in init
self._disconnect_pools()
File "/Library/Frameworks/Python.framework/Versions/2.7/lib/python2.7/site-packages/kombu/transport/redis.py", line 477, in _disconnect_pools
self._async_pool.disconnect()
File "/Library/Frameworks/Python.framework/Versions/2.7/lib/python2.7/site-packages/redis/connection.py", line 921, in disconnect
connection.disconnect()
File "/Library/Frameworks/Python.framework/Versions/2.7/lib/python2.7/site-packages/kombu/transport/redis.py", line 835, in disconnect
channel._on_connection_disconnect(self)
File "/Library/Frameworks/Python.framework/Versions/2.7/lib/python2.7/site-packages/kombu/transport/redis.py", line 491, in _on_connection_disconnect
raise get_redis_ConnectionError()
ConnectionErrorI got this error when i was running my celery task in flask
-
#60 Miguel Grinberg said
@Manish: are you running a Redis service as instructed above? And if you are, are you sure you configured the connection URL correctly?
-
#61 Wally said
Do I need to install reddis and run it. Please provide details on how to setup the "message broker" if that's necessary. Do I need to run this broker seperately every time I test my project? How would I implement the broker or make it start if it's not running in a production environment?
Thanks! -
#62 Miguel Grinberg said
@Wally: Yes, you need to install and run Redis or another message broker that Celery supports. The instructions to do this are different for each platform, so I recommend that you look up a guide for the specific platform you are working on. If you have no specific preference, Ubuntu is a good choice, where you can install redis just by running "sudo apt-get install redis-server".
-
#63 Dileep said
Thank you Miguel Grinberg!! Its fantastic tutorial!!. I am looking for some kind of in memory cache layer where celery task can update the data in the cache. We can query the cache instead of direct database. Please let me know your suggestions on this.
-
#64 Miguel Grinberg said
@Dileep: memcached or redis are good choices.
-
#65 Dileep said
Thanks Miguel!. In our case there are millions of records needs to be cached for some kind analytic purpose. I planning to use the solution where t Celery will execute the query (offline) which will return millions of records and should be saved in the redis cache. Other applications can talk to Redis to fetch the data. If this solution works , how the data should be saved in redis.
-
#66 Miguel Grinberg said
@Dileep: by definition a cache is not made for storage large amounts of data. That's what databases are for.
-
#67 Sebastian Cheung said
Hi after a long break Miguel,
But not sure why upon Send email I get:
error: [Errno 10013] An attempt was made to access a socket in a way forbidden by its access permissions
Yes, redis is running in the background as redis-cli.exe prompt:
127.0.0.1:6379> ping
PONGFirst I noticed in Windows environment variables MAIL_USERNAME and MAIL_PASSWORD are null? Even though these are set in Environment Variables, both in User variables as well as System Variables?
Then I hardcoded these into app.py but still getting the above error?
-
#68 Miguel Grinberg said
@Sebastian: Sounds like on Windows this could be caused by an antivirus software. If not, search stack overflow, plenty of people asked and answered about this error.
-
#69 Tom Gentry said
I'm trying to work your example into my flask framework as I need to run a long task asynch, and I kept getting strange errors so I decided to make a working model with your example. Starting with your repository, using redis as the broker, the page stays on pending and never progresses. I can see the requests for the status updates every second, but it doesn't appear to actually be running the code. I then tried revising for my end-game database import and still getting the same. I installed all requirement using pip. Any ideas on why the base example isn't executing?
-
#70 Miguel Grinberg said
@Tom: What happens on the celery worker process? Any errors or other interesting output there?
-
#71 George James said
Thank you so much for this post. I have a question. What object is being returned by task.info? When use it in a modified script I try to return it to a blank page and get an error. If return it as str(task.info) I get the updated "update_status" dict from the "long_task". How do I convert the task.info into a dict on the server so I can modify it?
Why do you include a number at the end of task.info.get('current',1)?
Thank you. Much appreciated.
response = { 'state': task.state, 'current': task.info.get('current', 0), 'total': task.info.get('total', 1), 'status': task.info.get('status', '') } -
#72 Miguel Grinberg said
@George: task.info is whatever the Celery task returned, so it should be a dict if the task returned a dict. The "1" is the default value, this is in case the dict does not have the requested key.
-
#73 ben said
Thanks Miguel, an excellent doc. I have an issue, can please advise:
Assuming I have a long task which prints something to the console:
def printing_to_console(self):
# do some stuff which may print something to console
for i in range(1000):
print(i)
time.sleep(1)
# do some other stuff which may print something to consoleHow can I make flask to show these print output to my web page?
Like when I access http://127.0.0.1:5000/long_task, I can see the number 1, 2, ... 1000 print to screen one by one? -
#74 Miguel Grinberg said
@ben: printing to the console is problematic, because the console of the Celery worker is different than the console of your Flask server (recall that these are two different processes). To pass information to the client, you are going to need to pass it from the celery worker to the Flask server first, then via ajax the client can request it.
-
#75 Jonathan Kennedy said
This is amazing, so far I've gotten one task working completely - populating the Flask app as expected. Can you help me out by pointing me in the right direct to use the /status/<task_id> route for more than one task? I see that you've got long_task hardcoded, and can't seem to figure out the best way to make it dynamic.


