Using Celery With Flask
Posted by
on under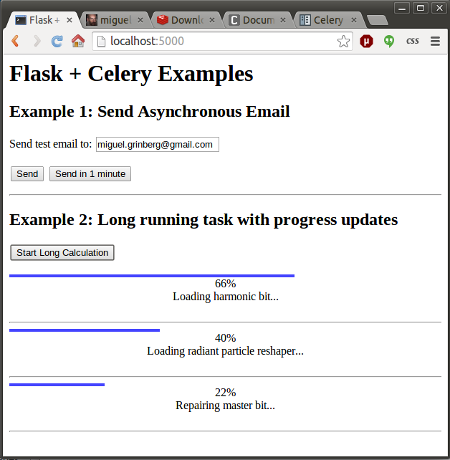
The topic of running background tasks is complex, and because of that there is a lot of confusion around it. I have tackled it in my Mega-Tutorial, later in my book, and then again in much more detail in my REST API training video. To keep things simple, in all the examples I have used so far I have executed background tasks in threads, but I always noted that for a more scalable and production ready solution a task queue such as Celery should be used instead.
My readers constantly ask me about Celery, and how a Flask application can use it, so today I am going to show you two examples that I hope will cover most application needs.
What is Celery?
Celery is an asynchronous task queue. You can use it to execute tasks outside of the context of your application. The general idea is that any resource consuming tasks that your application may need to run can be offloaded to the task queue, leaving your application free to respond to client requests.
Running background tasks through Celery is not as trivial as doing so in threads. But the benefits are many, as Celery has a distributed architecture that will enable your application to scale. A Celery installation has three core components:
- The Celery client. This is used to issue background jobs. When working with Flask, the client runs with the Flask application.
- The Celery workers. These are the processes that run the background jobs. Celery supports local and remote workers, so you can start with a single worker running on the same machine as the Flask server, and later add more workers as the needs of your application grow.
- The message broker. The client communicates with the the workers through a message queue, and Celery supports several ways to implement these queues. The most commonly used brokers are RabbitMQ and Redis.
For The Impatient
If you are the instant gratification type, and the screenshot at the top of this article intrigued you, then head over to the Github repository for the code used in this article. The README file there will give you the quick and dirty approach to running and playing with the example application.
Then come back to learn how everything works!
Working with Flask and Celery
The integration of Celery with Flask is so simple that no extension is required. A Flask application that uses Celery needs to initialize the Celery client as follows:
from flask import Flask
from celery import Celery

app = Flask(__name__)
app.config['CELERY_BROKER_URL'] = 'redis://localhost:6379/0'
app.config['CELERY_RESULT_BACKEND'] = 'redis://localhost:6379/0'

celery = Celery(app.name, broker=app.config['CELERY_BROKER_URL'])
celery.conf.update(app.config)
As you can see, Celery is initialized by creating an object of class Celery, and passing the application name and the connection URL for the message broker, which I put in app.config under key CELERY_BROKER_URL. This URL tells Celery where the broker service is running. If you run something other than Redis, or have the broker on a different machine, then you will need to change the URL accordingly.
Any additional configuration options for Celery can be passed directly from Flask's configuration through the celery.conf.update() call. The CELERY_RESULT_BACKEND option is only necessary if you need to have Celery store status and results from tasks. The first example I will show you does not require this functionality, but the second does, so it's best to have it configured from the start.
Any functions that you want to run as background tasks need to be decorated with the celery.task decorator. For example:
@celery.task
def my_background_task(arg1, arg2):
    # some long running task here
    return result
Then the Flask application can request the execution of this background task as follows:
task = my_background_task.delay(10, 20)
The delay() method is a shortcut to the more powerful apply_async() call. Here is the equivalent call using apply_async():
task = my_background_task.apply_async(args=[10, 20])
When using apply_async(), you can give Celery more detailed instructions about how the background task is to be executed. A useful option is to request that the task executes at some point in the future. For example, this invocation will schedule the task to run in about a minute:
task = my_background_task.apply_async(args=[10, 20], countdown=60)
The return value of delay() and apply_async() is an object that represents the task, and this object can be used to obtain status. I will show you how this is done later in this article, but for now let's keep it simple and not worry about results from tasks.
Consult the Celery documentation to learn about many other available options.
Simple Example: Sending Asynchronous Emails
The first example that I'm going to show is a very common need of applications: the ability to send emails without blocking the main application.
For this example I'm going to use the Flask-Mail extension, which I covered in very good detail in other articles. I'm going to assume that you are familiar with this extension, so if you need a refresher see this tutorial or my Flask book.
The example application that I'm going to use to illustrate the topic presents a simple web form with one text field. The user is asked to enter an email address in this field, and upon submission, the server sends a test email to this address. The form includes two submit buttons, one to send the email immediately, and another to send it after a wait of one minute. The top portion of the screenshot at the top of this article shows how this form looks.
Here is the HTML template that supports this example:
<html>
  <head>
    <title>Flask + Celery Examples</title>
  </head>
  <body>
    <h1>Flask + Celery Examples</h1>
    <h2>Example 1: Send Asynchronous Email</h2>
    {% for message in get_flashed_messages() %}
    <p style="color: red;">{{ message }}</p>
    {% endfor %}
    <form method="POST">
      <p>Send test email to: <input type="text" name="email" value="{{ email }}"></p>
      <input type="submit" name="submit" value="Send">
      <input type="submit" name="submit" value="Send in 1 minute">
    </form>
  </body>
</html>
Hopefully you find nothing earth shattering here. Just a regular HTML form, plus the ability to show flashed messages from Flask.
The Flask-Mail extension requires some configuration, specifically the details about the email server to use when sending emails. To make things easy I use my Gmail account as email server:
# Flask-Mail configuration
app.config['MAIL_SERVER'] = 'smtp.googlemail.com'
app.config['MAIL_PORT'] = 587
app.config['MAIL_USE_TLS'] = True
app.config['MAIL_USERNAME'] = os.environ.get('MAIL_USERNAME')
app.config['MAIL_PASSWORD'] = os.environ.get('MAIL_PASSWORD')
app.config['MAIL_DEFAULT_SENDER'] = 'flask@example.com'
Note how to avoid putting my email account's credentials at risk I set them in environment variables, which I import from the application.
There is a single route to support this example:
@app.route('/', methods=['GET', 'POST'])
def index():
    if request.method == 'GET':
        return render_template('index.html', email=session.get('email', ''))
    email = request.form['email']
    session['email'] = email

    # send the email
    email_data = {
        'subject': 'Hello from Flask',
        'to': email,
        'body': 'This is a test email sent from a background Celery task.'
    }
    if request.form['submit'] == 'Send':
        # send right away
        send_async_email.delay(email_data)
        flash('Sending email to {0}'.format(email))
    else:
        # send in one minute
        send_async_email.apply_async(args=[email_data], countdown=60)
        flash('An email will be sent to {0} in one minute'.format(email))

    return redirect(url_for('index'))
Once again, this is all pretty standard Flask. Since this is a very simple form, I decided to handle it without the help of an extension, so I use request.method and request.form to do all the management. I save the value that the user enters in the text field in the session, so that I can remember it after the page reloads.
The data associated with the email, which is the subject, recipient(s) and body, are stored in a dictionary. The interesting bit in this route is the sending of the email, which is handled by a Celery task called send_async_email, invoked either via delay() or apply_async() with this dictionary as an argument.
The last piece of this application is the asynchronous task that gets the job done:
@celery.task
def send_async_email(email_data):
    """Background task to send an email with Flask-Mail."""
    msg = Message(email_data['subject'],
                  sender=app.config['MAIL_DEFAULT_SENDER'],
                  recipients=[email_data['to']])
    msg.body = email_data['body']
    with app.app_context():
        mail.send(msg)
This task is decorated with celery.task to make it a background job. The function constructs a Message object from Flask-Mail using the data from the email_data dictionary. One notable thing in this function is that Flask-Mail requires an application context to run, so one needs to be created before the send() method can be invoked.
It is important to note that in this example the return value from the asynchronous call is not preserved, so the application will never know if the call succeeded or not. When you get to run this example, you can look at the output of the Celery worker to troubleshoot any problems with the sending of the email.
Complex Example: Showing Status Updates and Results
The above example is overly simple, the background job is started and then the application forgets about it. Most Celery tutorials for web development end right there, but the fact is that for many applications it is necessary for the application to monitor its background tasks and obtain results from it.
What I'm going to do now is extend the above application with a second example that shows a fictitious long running task. The user can start one or more of these long running jobs clicking a button, and the web page running in your browser uses ajax to poll the server for status updates on all these tasks. For each task the page will show a graphical status bar, a completion percentage, a status message, and when the task completes, a result value will be shown as well. You can see how all this looks in the screenshot at the top of this article.
Background Tasks with Status Updates
Let me start by showing you the background task that I'm using for this second example:
@celery.task(bind=True)
def long_task(self):
    """Background task that runs a long function with progress reports."""
    verb = ['Starting up', 'Booting', 'Repairing', 'Loading', 'Checking']
    adjective = ['master', 'radiant', 'silent', 'harmonic', 'fast']
    noun = ['solar array', 'particle reshaper', 'cosmic ray', 'orbiter', 'bit']
    message = ''
    total = random.randint(10, 50)
    for i in range(total):
        if not message or random.random() < 0.25:
            message = '{0} {1} {2}...'.format(random.choice(verb),
                                              random.choice(adjective),
                                              random.choice(noun))
        self.update_state(state='PROGRESS',
                          meta={'current': i, 'total': total,
                                'status': message})
        time.sleep(1)
    return {'current': 100, 'total': 100, 'status': 'Task completed!',
            'result': 42}
For this task I've added a bind=True argument in the Celery decorator. This instructs Celery to send a self argument to my function, which I can then use to record the status updates.
Since this task doesn't really do anything useful, I decided to use humorous status messages that are assembled from random verbs, adjectives and nouns. You can see the lists of non-sensical items I use to generate these messages above. Nothing wrong with having a little bit of fun, right?
The function loops for a random number of iterations between 10 and 50, so each run of the task will have a different duration. The random status message is generated on the first iteration, and then can be replaced in later iterations with a 25% chance.
The self.update_state() call is how Celery receives these task updates. There are a number of built-in states, such as STARTED, SUCCESS and so on, but Celery allows custom states as well. Here I'm using a custom state that I called PROGRESS. Attached to the state there is additional metadata, in the form of a Python dictionary that includes the current and total number of iterations and the randomly generated status message. A client can use these elements to display a nice progress bar. Each iteration sleeps for one second, to simulate some work being done.
When the loop exits, a Python dictionary is returned as the function's result. This dictionary includes the updated iteration counters, a final status message and a humorous result.
The long_task() function above runs in a Celery worker process. Below you can see the Flask application route that starts this background job:
@app.route('/longtask', methods=['POST'])
def longtask():
    task = long_task.apply_async()
    return jsonify({}), 202, {'Location': url_for('taskstatus',
                                                  task_id=task.id)}
As you can see the client needs to issue a POST request to /longtask to kick off one of these tasks. The server starts the task, and stores the return value. For the response I used status code 202, which is normally used in REST APIs to indicate that a request is in progress. I also added a Location header, with a URL that the client can use to obtain status information. This URL points to another Flask route called taskstatus, and has task.id as a dynamic component.
Accessing Task Status from the Flask Application
The taskstatus route referenced above is in charge of reporting status updates provided by background tasks. Here is the implementation of this route:
@app.route('/status/<task_id>')
def taskstatus(task_id):
    task = long_task.AsyncResult(task_id)
    if task.state == 'PENDING':
        # job did not start yet
        response = {
            'state': task.state,
            'current': 0,
            'total': 1,
            'status': 'Pending...'
        }
    elif task.state != 'FAILURE':
        response = {
            'state': task.state,
            'current': task.info.get('current', 0),
            'total': task.info.get('total', 1),
            'status': task.info.get('status', '')
        }
        if 'result' in task.info:
            response['result'] = task.info['result']
    else:
        # something went wrong in the background job
        response = {
            'state': task.state,
            'current': 1,
            'total': 1,
            'status': str(task.info),  # this is the exception raised
        }
    return jsonify(response)
This route generates a JSON response that includes the task state and all the values that I set in the update_state() call as the meta argument, which the client can use to build a progress bar. Unfortunately this function needs to check for a few edge conditions as well, so it ended up being a bit long. To access task data I recreate the task object, which is an instance of class AsyncResult, using the task id given in the URL.
The first if block is for when the task hasn't started yet (PENDING state). In this case there is no status information, so I make up some data. The elif block that follows is that one that returns the status information from the background task. Here the information that the task provided is accessible as task.info. If the data contains a result key, then that means that this is the final result and the task finished, so I add that result to the response as well. The else block at the end covers the possibility of an error, which Celery will report by setting a task state of "FAILURE", and in that case task.info will contain the exception raised. To handle errors I set the text of the exception as a status message.
Believe it or not, this is all it takes from the server. The rest needs to be implemented by the client, which in this example is a web page with Javascript scripting.
Client-Side Javascript
It isn't really the focus of this article to describe the Javascript portion of this example, but in case you are interested, here is some information.
For the graphical progress bar I'm using nanobar.js, which I included from a CDN. I also included jQuery, which simplifies the ajax calls significantly:
<script src="//cdnjs.cloudflare.com/ajax/libs/nanobar/0.2.1/nanobar.min.js"></script>
<script src="//cdnjs.cloudflare.com/ajax/libs/jquery/2.1.3/jquery.min.js"></script>
The button that starts a background job is connected to the following Javascript handler:
function start_long_task() {
// add task status elements
div = $('<div class="progress"><div></div><div>0%</div><div>...</div><div> </div></div><hr>');
$('#progress').append(div);
// create a progress bar
var nanobar = new Nanobar({
bg: '#44f',
target: div[0].childNodes[0]
});
// send ajax POST request to start background job
$.ajax({
type: 'POST',
url: '/longtask',
success: function(data, status, request) {
status_url = request.getResponseHeader('Location');
update_progress(status_url, nanobar, div[0]);
},
error: function() {
alert('Unexpected error');
}
});
}
This function starts by adding a few HTML elements that will be used to display the new background task's progress bar and status. This is done dynamically because the user can add any number of jobs, and each job needs to get its own set of HTML elements.
To help you understand this better, here is the structure of the added elements for a task, with comments to indicate what each div is used for:
<div class="progress">
<div></div> <-- Progress bar
<div>0%</div> <-- Percentage
<div>...</div> <-- Status message
<div> </div> <-- Result
</div>
<hr>
The start_long_task() function then instantiates the progress bar according to nanobar's documentation, and finally sends the ajax POST request to /longtask to initiate the Celery background job in the server.
When the POST ajax call returns, the callback function obtains the value of the Location header, which as you saw in the previous section is for the client to invoke to get status updates. It then calls another function, update_progress() with this status URL, the progress bar object and the root div element subtree created for the task. Below you can see this update_progress() function, which sends the status request and then updates the UI elements with the information returned by it:
    function update_progress(status_url, nanobar, status_div) {
        // send GET request to status URL
        $.getJSON(status_url, function(data) {
            // update UI
            percent = parseInt(data['current'] * 100 / data['total']);
            nanobar.go(percent);
            $(status_div.childNodes[1]).text(percent + '%');
            $(status_div.childNodes[2]).text(data['status']);
            if (data['state'] != 'PENDING' && data['state'] != 'PROGRESS') {
                if ('result' in data) {
                    // show result
                    $(status_div.childNodes[3]).text('Result: ' + data['result']);
                }
                else {
                    // something unexpected happened
                    $(status_div.childNodes[3]).text('Result: ' + data['state']);
                }
            }
            else {
                // rerun in 2 seconds
                setTimeout(function() {
                    update_progress(status_url, nanobar, status_div);
                }, 2000);
            }
        });
    }
This function sends the GET request to the status URL, and when a response is received it updates the different HTML elements for the task. If the background task completed and a result is available then it is added to the page. If there is no result then that means that the task ended due to an error, so the task state, which is going to be FAILURE, is shown as result.
When the server is still running the job I need to continue polling the task status and updating the UI. To achieve this I set a timer to call the function again in two seconds. This will continue until the Celery task completes.
A Celery worker runs as many concurrent jobs as there are CPUs by default, so when you play with this example make sure you start a large number of tasks to see how Celery keeps jobs in PENDING state until the worker can take it.
Running the Examples
If you made it all the way here without running the example application, then it is now time for you to try all this Celery goodness. Go ahead and clone the Github repository, create a virtual environment, and populate it:
$ git clone https://github.com/miguelgrinberg/flask-celery-example.git
$ cd flask-celery-example
$ virtualenv venv
$ source venv/bin/activate
(venv) $ pip install -r requirements.txt
Note that the requirements.txt file included with this repository contains Flask, Flask-Mail, Celery and the Redis client, along with all their dependencies.
Now you need to run the three processes required by this application, so the easiest way is to open three terminal windows. On the first terminal run Redis. You can just install Redis according to the download instructions for your operating system, but if you are on a Linux or OS X machine, I have included a small script that downloads, compiles and runs Redis as a private server:
$ ./run-redis.sh
Note that for the above script to work you need to have gcc installed. Also note that the above command is blocking, Redis will start in the foreground.
On the second terminal run a Celery worker. This is done with the celery command, which is installed in your virtual environment. Since this is the process that will be sending out emails, the MAIL_USERNAME and MAIL_PASSWORD environment variables must be set to a valid Gmail account before starting the worker:
$ export MAIL_USERNAME=<your-gmail-username>
$ export MAIL_PASSWORD=<your-gmail-password>
$ source venv/bin/activate
(venv) $ celery worker -A app.celery --loglevel=info
The -A option gives Celery the application module and the Celery instance, and --loglevel=info makes the logging more verbose, which can sometimes be useful in diagnosing problems.
Finally, on the third terminal window run the Flask application, also from the virtual environment:
$ source venv/bin/activate
(venv) $ python app.py
Now you can navigate to http://localhost:5000/ in your web browser and try the examples!
Conclusion
Unfortunately when working with Celery you have to take a few more steps than simply sending a job to a background thread, but the benefits in flexibility and scalability are hard to ignore. In this article I tried to go beyond the "let's start a background job" example and give you a more complete and realistic portrait of what using Celery might entail. I sincerely hope I haven't scared you with too much information!
As always, feel free to write down any questions or comments below.
Miguel
Become a Patron!
Hello, and thank you for visiting my blog! If you enjoyed this article, please consider supporting my work on this blog on Patreon!

-
#226 Avner Moshkovitz said
Hi Miguel,
In my webapp I use celery (4.3.0) + redis (within docker) for background tasks.
Initially, I set up Celery following your tutorial (here)
https://blog.miguelgrinberg.com/post/using-celery-with-flask
and it was working fine using ssl.I then changed the structure to not have the app as a global variable, by following your tutorial (here)
https://blog.miguelgrinberg.com/post/the-flask-mega-tutorial-part-xv-a-better-application-structure/page/7#and adjusted celery based on your code (here)
https://github.com/miguelgrinberg/flasky-with-celery/blob/master/app/init.py
the code for app/init.py is shown below
I cannot call "celery.init_app(app)" similar to e.g. db.init_app(app)when I restart the containers the log files are quite, I don't see any problem.
When I create a task from the web container ("task = create_zip_file_task4.apply_async(kwargs={'group_id': group_id, 'arg2': arg2})")
I get an error from the celery container (see below - I run celery with log level set to debug)
and the web container shows: task.state FAILURE. The code does not get into the function create_zip_file_task4)I do have app.api.sites.create_zip_file_task4 defined in app/api/sites.py and i'm calling it from a function within app/api/sites.py
Could thie problem be related to usign the "better application structure"? (with app not being a global variable)
(this) link talks about similar problem, but I couldn't find a clue in it for me...
https://github.com/celery/celery/issues/4794How can I register the task within celery using a strycture where app is not a global variable?
Thanks
<hr /> <h1>create_zip_file_task4 is defined in app/api/sites.py</h1>cat app/api/sites.py
...
@bp.route('/api/v1_2/create_zip_file3', methods=['POST'])
def create_zip_file3(group_id = 1):if current_user.role != 'admin': abort(403) arg2 = 'foo2' task = create_zip_file_task4.apply_async(kwargs={'group_id': group_id, 'arg2': arg2}) print( 'task', task ) return jsonify({}), 202, {'Location': url_for('api.create_zip_file_taskstatus', task_id=task.id, _external=True, _scheme='https')}...
@celery.task(bind=True)
def create_zip_file_task4(self, group_id, arg2):
print( 'BEG create_zip_file_task4' )
print( 'group_id', group_id )
<hr /> <h1>error from the celery container</h1>user_role = 'admin' group = get_group(group_id) print( 'group.group_name', group.group_name ) zip_filename = '%s.zip' % group.group_name task = create_zip_file2_with_progress_update(self, zip_filename, group_id, user_role) return taskdocker logs -f webserver_celery_1
...
[2020-08-05 02:32:03,285: ERROR/MainProcess] Received unregistered task of type 'app.api.sites.create_zip_file_task4'.
The message has been ignored and discarded.
Did you remember to import the module containing this task?
Or maybe you're using relative imports?Please see
<hr /> <h1>in celery I run with log level set to debug</h1> <h1>.yml settings for celery container</h1>
http://docs.celeryq.org/en/latest/internals/protocol.html
for more information.cat webServer/docker-compose.yml
...
celery:
command: watchmedo auto-restart --directory=./ --pattern=*.py --recursive -- celery worker -A app.celery --loglevel=debug
... -
#227 Avner Moshkovitz said
Hi again,
I was able to overcome the "unregistered task" error by adding include=["app.api.sites"] when constructing the celery instance
The code now does get into the function create_zip_file_task4.However, now I'm getting another error:
RuntimeError: No application found. Either work inside a view function or push an application context. See http://flask-sqlalchemy.pocoo.org/contexts/.
(see the error tracestack below)I tried wrapping the problematic line with "with current_app.app_context():", i.e.
with current_app.app_context():
group = Group.query.filter_by(id=group_id).first_or_404()
which then leads to another error:
RuntimeError: Working outside of application context.Next I tried to pass current_app into create_zip_file_task4 via arg2
but this seems to fail miserabely. I get an error in the web container and no messages at all (nothing happens) in the celery logsHow can I overcome the
<hr /> <h1>create_zip_file_task4 is defined in app/api/sites.py</h1> <h1>passing current_app into create_zip_file_task4 via arg2 does not work - I get an error in the web container and no messages in the celery logs</h1>cat app/api/sites.py
...
@bp.route('/api/v1_2/create_zip_file3', methods=['POST'])
def create_zip_file3(group_id = 1):
<h1>function create_zip_file_task4 creates an error, when it is calling sqlalchemy with</h1> <h1>group = Group.query.filter_by(id=group_id).first_or_404()</h1> <h1>either when wrapped with "with current_app.app_context():" or not wrapped</h1>if current_user.role != 'admin': abort(403) arg2 = 'foo2' task = create_zip_file_task4.apply_async(kwargs={'group_id': group_id, 'arg2': arg2}) print( 'task', task ) return jsonify({}), 202, {'Location': url_for('api.create_zip_file_taskstatus', task_id=task.id, _external=True, _scheme='https')}@celery.task(bind=True)
def create_zip_file_task4(self, group_id, arg2):
print( 'BEG create_zip_file_task4' )
print( 'group_id', group_id )user_role = 'admin' with current_app.app_context(): group = Group.query.filter_by(id=group_id).first_or_404()...
<hr /> <h1>adding include=["app.api.sites"] when constructing the celery instance, solves the "unregistered task" error</h1>print( 'group.group_name', group.group_name )celery = Celery(name,
<h1>the error tracestack</h1>
backend=Config.CELERY_RESULT_BACKEND,
broker=Config.CELERY_BROKER_URL,
include=["app.api.sites"],
broker_use_ssl = {
'ssl_keyfile': key_file,
'ssl_certfile': cert_file,
'ssl_ca_certs': ca_file,
'ssl_cert_reqs': ssl.CERT_REQUIRED
},
redis_backend_use_ssl = {
'ssl_keyfile': key_file,
'ssl_certfile': cert_file,
'ssl_ca_certs': ca_file,
'ssl_cert_reqs': ssl.CERT_REQUIRED
})[2020-08-05 04:59:11,075: INFO/MainProcess] Received task: app.api.sites.create_zip_file_task4[19954ab2-4b81-495a-b2d2-0d1aa9325828]
[2020-08-05 04:59:11,075: DEBUG/MainProcess] TaskPool: Apply <function _fast_trace_task at 0x7f3eada4ee60> (args:('app.api.sites.create_zip_file_task4', '19954ab2-4b81-495a-b2d2-0d1aa9325828', {'lang': 'py', 'task': 'app.api.sites.create_zip_file_task4', 'id': '19954ab2-4b81-495a-b2d2-0d1aa9325828', 'shadow': None, 'eta': None, 'expires': None, 'group': None, 'retries': 0, 'timelimit': [None, None], 'root_id': '19954ab2-4b81-495a-b2d2-0d1aa9325828', 'parent_id': None, 'argsrepr': '()', 'kwargsrepr': "{'group_id': '3', 'arg2': 'foo2'}", 'origin': 'gen3307@e1bfced56f9b', 'reply_to': '73c74d53-78eb-3d26-9084-9bc701df0b07', 'correlation_id': '19954ab2-4b81-495a-b2d2-0d1aa9325828', 'delivery_info': {'exchange': '', 'routing_key': 'celery', 'priority': 0, 'redelivered': None}}, b'[[], {"group_id": "3", "arg2": "foo2"}, {"callbacks": null, "errbacks": null, "chain": null, "chord": null}]', 'application/json', 'utf-8') kwargs:{})
[2020-08-05 04:59:11,076: DEBUG/MainProcess] Task accepted: app.api.sites.create_zip_file_task4[19954ab2-4b81-495a-b2d2-0d1aa9325828] pid:3034
[2020-08-05 04:59:11,076: WARNING/ForkPoolWorker-8] BEG create_zip_file_task4
[2020-08-05 04:59:11,076: WARNING/ForkPoolWorker-8] group_id
[2020-08-05 04:59:11,076: WARNING/ForkPoolWorker-8] 3
[2020-08-05 04:59:11,076: WARNING/ForkPoolWorker-8] bar111111111111111111111111
[2020-08-05 04:59:11,076: WARNING/ForkPoolWorker-8] arg2
[2020-08-05 04:59:11,076: WARNING/ForkPoolWorker-8] foo2
[2020-08-05 04:59:11,110: ERROR/ForkPoolWorker-8] Task app.api.sites.create_zip_file_task4[19954ab2-4b81-495a-b2d2-0d1aa9325828] raised unexpected: RuntimeError('No application found. Either work inside a view function or push an application context. See http://flask-sqlalchemy.pocoo.org/contexts/.')
Traceback (most recent call last):
File "/usr/local/lib/python3.7/site-packages/sqlalchemy/util/_collections.py", line 1010, in call
return self.registry[key]
KeyError: 139907231680320During handling of the above exception, another exception occurred:
Traceback (most recent call last):
File "/usr/local/lib/python3.7/site-packages/celery/app/trace.py", line 385, in trace_task
R = retval = fun(args, kwargs)
File "/usr/local/lib/python3.7/site-packages/celery/app/trace.py", line 648, in protected_call
return self.run(args, kwargs)
File "/usr/src/app/web/app/api/sites.py", line 473, in create_zip_file_task4
group = Group.query.filter_by(id=group_id).first_or_404()
File "/usr/local/lib/python3.7/site-packages/flask_sqlalchemy/init.py", line 519, in get
return type.query_class(mapper, session=self.sa.session())
File "/usr/local/lib/python3.7/site-packages/sqlalchemy/orm/scoping.py", line 78, in call
return self.registry()
File "/usr/local/lib/python3.7/site-packages/sqlalchemy/util/collections.py", line 1012, in call
return self.registry.setdefault(key, self.createfunc())
File "/usr/local/lib/python3.7/site-packages/sqlalchemy/orm/session.py", line 3234, in call
return self.class(local_kw)
File "/usr/local/lib/python3.7/site-packages/flask_sqlalchemy/init.py", line 136, in init
self.app = app = db.get_app()
File "/usr/local/lib/python3.7/site-packages/flask_sqlalchemy/init.py", line 982, in get_app
'No application found. Either work inside a view function or push'
RuntimeError: No application found. Either work inside a view function or push an application context. See http://flask-sqlalchemy.pocoo.org/contexts/. -
#228 Miguel Grinberg said
@Avner: you can't use
current_appto refer to your application instance, that only works when there is an app context already pushed. What you need to do icreate a brand new app instance in your Celery worker that you can use to get an app context from it. Then push a context from this app, and your task will work fine. -
#229 Sri Bhargava Yadavalli said
Hi Miguel, I tried running this on my windows machine. After submitting the task the task is not running and the status of the task is PENDING. Redis for windows and celery worker are running perfectly fine can you please help me?
-
#230 Miguel Grinberg said
@Sri: Try running Celery with logging to see if it receives the task and for some reason isn't executing it. Not sure what else to suggest, this is something that you need to debug to figure out, something is definitely not running perfectly fine as you think it is.
-
#231 Avner Moshkovitz said
@Miguel,
I initially used the pushed current_app from the the web/app/init.py, but it did not work.
Following your comment (#228) to "create a brand new app instance in your Celery worker"
I added a new file web/celery_worker.py, similar to the script in
https://blog.miguelgrinberg.com/post/celery-and-the-flask-application-factory-pattern/page/0#
which creates a global brand new app instance, and pushed the context from this app.
After doing this, celery worker now works as expected.
Thank you! -
#232 Geolama said
I would like to adapt this example to upload a zip file (in place of the email task) and then use that zip file as the sole input for a very long process (as much as 30 minutes perhaps more). The long process takes each of the zipped files and parses out data to be written to a database; there would be a minimum of 50 files in each zip file. What mechanism would work best to make the uploaded file available for my long process to parse?
-
#233 Miguel Grinberg said
@Geolama: for the file upload I would use a POST request, not a Socket.IO event. The request will save the file to disk, so then it is a local file that you can use as you see fit.
-
#234 Jesus Roncal said
Thank you for the great contribution that you have made Miguel. It was a great help to me. By way of thanks and for my training as a developer, I adapted the examples with socketIO. I hope that helps. Regards.
Here is the repository: https://gitlab.com/jesusroncal94/docker_flask_celery_socketio_redis
-
#235 Sagar said
Hi Miguel. Thank you for this great tutorial and other related ones too. I was trying to run this locally by pointing to a Heroku Redis addon which supports max 20 clients. But what I'm observing is that when I start polling for the task status, after around n (where n seems to be a bit random but around 10) requests, my flask app throws "redis.exceptions.ConnectionError: max number of clients reached" this error. It seems that every time I poll for the task status, celery somehow ends up creating a new connection and thus ends up exhausting clients. Have you come across this before and is there a way to ensure my app uses only a single connection? I tried passing "redis_max_connections=20", "BROKER_POOL_LIMIT=0" thru config to no avail. Thanks in advance.
-
#236 Miguel Grinberg said
@Sagar: this seems to be a very confusing aspect of the Celery configuration. This issue shows how to do it: https://github.com/celery/celery/issues/1350.
-
#237 Sagar said
@Miguel Thank you for the prompt response. The explanation in that issue made sense but yet when I'm trying to pass the said config, the same error keeps popping. Here is the relevant part of stack trace that I'm seeing:
File "/masked_path/env/lib/python3.7/site-packages/celery/backends/redis.py", line 346, in get
return self.client.get(key)
File "/masked_path/env/lib/python3.7/site-packages/redis/client.py", line 1606, in get
return self.execute_command('GET', name)
File "/masked_path/env/lib/python3.7/site-packages/redis/client.py", line 898, in execute_command
conn = self.connection or pool.get_connection(command_name, **options)
File "/masked_path/env/lib/python3.7/site-packages/redis/connection.py", line 1192, in get_connection
connection.connect()
File "/masked_path/env/lib/python3.7/site-packages/redis/connection.py", line 567, in connect
self.on_connect()
File "/masked_path/env/lib/python3.7/site-packages/redis/connection.py", line 643, in on_connect
auth_response = self.read_response()
File "/masked_path/env/lib/python3.7/site-packages/redis/connection.py", line 739, in read_response
response = self._parser.read_response()
File "/masked_path/env/lib/python3.7/site-packages/redis/connection.py", line 340, in read_response
raise error
redis.exceptions.ConnectionError: max number of clients reachedI see a recent related SO post too here: https://stackoverflow.com/questions/63731689/python-celery-creates-a-lot-of-connections-on-redis. May be I'll switch to rq too if this doesn't budge soon.
-
#238 Miguel Grinberg said
@Sagar: I really have no experience with the internals of Celery, so if that does not work for you I suggest you raise an issue with Celery and seek help from that community.
-
#239 Naman Jain said
Hi Miguel,
Firstly, thanks for the numerous tutorials and answers you contribute to the community. Browsing through S/O and GitHub I found multiple ways of initializing celery with flask
1.) celery.init_app,
2.) usingContextTaskclass with runs all tasks insideapp.app_context)My main issue is with running flask, sqlalchemy and celery together. While I have got a basic setup running, I find that it sometimes it randomly throws
SSL error: decryption failed or bad record mac.I looked around and found solutions suggest these multiple ways to initialize celery along other ways that such as using task_prerun signal in celery and dispose the database engine as follows
@task_prerun.connect
def on_task_init(*args, **kwargs):
    engine.dispose()
It would be great if you could let me know of the differences between these approaches and any best/work-for-all-purposes approach you are aware of.
-
#240 Miguel Grinberg said
@Naman: you are not providing enough information. You say you get an SSL error, but where does it happen? How is SSL related to your use of Flask, Celery and SQLAlchemy?
-
#241 Naman Jain said
Hi Miguel,
Thanks for such the quick response! The SSL error comes in the database when we try to do
db.session.add(*args)The error seems quite popular
1.) https://stackoverflow.com/questions/36190763/celery-flask-sqlalchemy-databaseerror-databaseerror-ssl-error-decryption-f
2.) https://stackoverflow.com/questions/22752521/uwsgi-flask-sqlalchemy-and-postgres-ssl-error-decryption-failed-or-bad-reco
3.) https://stackoverflow.com/questions/45215596/flask-and-celery-on-heroku-sqlalchemy-exc-databaseerror-psycopg2-databaseerro
and few more similar posts with sometimes different solutionsCurrently I added -- session.close(), session.remove(), engine.dispose() and different signals inside my celery task after success or exception when inserting into database and it seems to be working so far. But I was wondering if there are better solution or some standard practice of handing database errors.
-
#242 Miguel Grinberg said
@Naman: this only applies if you use an encrypted connection to your database. You did not mention that before.
You are not showing any code so I cannot really tell you much. When you say
session.close()and/orsession.remove()why is there an open session, assuming you are doing this at the start of the task? That seems to me is where you should look for a problem. Maybe you are accessing the database outside of your task function and that creates an early session that becomes stale by the time the task starts. -
#243 Michael Li said
Hi Miguel, thanks for the great tutorial. What's the recommended way to run celery worker/beat in ubuntu in production environment? Can it be integrated into the flask application? I can think of using Supervisor or Docker. But I'd like to confirm it's the recommended way, thanks,
Best Regards,
Michael
-
#244 Michael Li said
Hi Miguel, I'm using Postfix on ubuntu to test the email example and it works. But Postfix doesn't work on Windows. Do you have any alternative to recommend?
Best Regards,
Michael
-
#245 Miguel Grinberg said
@Michael: I'm not sure Celery recommends anything specific with regards to deployment. If you are using Docker for everything else then I would also use it for Celery. If you do not user Docker, then supervisor or systemd should be okay.
You can probably install Postfix under WSL on Windows.
-
#246 Michael said
Hi Miguel, thanks for the reply. It clarifies something for me. I'm trying to use your tutorial as a base to test file upload from the Web. When I send the task to celery, I get the error "object not serializable". I think I understand why - request.files are not json serializable and celery is expecting a json format. I believe it's a common task to use celery for big file uploads. Is there anything I can do to make it work? Thanks again,
Best Regards,
Michael
-
#247 Miguel Grinberg said
@Michael: Yes, save the file to disk, then only pass the path to Celery.
-
#248 shobhit said
How to deploy it on heroku?
-
#249 Miguel Grinberg said
@shobhit: I don't have any specific articles for deploying a Celery based application, but I've written about deployment of Flask apps to Heroku many times. That should get you closer to the goal, the rest you can find on the Heroku docs: https://devcenter.heroku.com/articles/celery-heroku.
-
#250 Rouizi said
Your tutorials are the best ones on the internet about programming, and I am saying that after following many tutorials.
Thank you very much!


