The Flask Mega-Tutorial, Part VI: Profile Page And Avatars (2012)
Posted by
on under(Great news! There is a new version of this tutorial!)
This is the sixth article in the series in which I document my experience writing web applications in Python using the Flask microframework.
The goal of the tutorial series is to develop a decently featured microblogging application that demonstrating total lack of originality I have decided to call microblog.
NOTE: This article was revised in September 2014 to be in sync with current versions of Python and Flask.
Here is an index of all the articles in the series that have been published to date:
- Part I: Hello, World!
- Part II: Templates
- Part III: Web Forms
- Part IV: Database
- Part V: User Logins
- Part VI: Profile Page And Avatars (this article)
- Part VII: Unit Testing
- Part VIII: Followers, Contacts And Friends
- Part IX: Pagination
- Part X: Full Text Search
- Part XI: Email Support
- Part XII: Facelift
- Part XIII: Dates and Times
- Part XIV: I18n and L10n
- Part XV: Ajax
- Part XVI: Debugging, Testing and Profiling
- Part XVII: Deployment on Linux (even on the Raspberry Pi!)
- Part XVIII: Deployment on the Heroku Cloud
Recap
In the previous chapter of this tutorial we created our user login system, so we can now have users log in and out of the website using their OpenIDs.
Today, we are going to work on the user profiles. First, we'll create the user profile page, which shows the user's information and more recent blog posts, and as part of that we will learn how to show user avatars. Then we are going to create a web form for users to edit their profiles.
User Profile Page
Creating a user profile page does not really require any new major concepts to be introduced. We just need to create a new view function and its accompanying HTML template.
Here is the view function (file app/views.py):
@app.route('/user/<nickname>')
@login_required
def user(nickname):
    user = User.query.filter_by(nickname=nickname).first()
    if user == None:
        flash('User %s not found.' % nickname)
        return redirect(url_for('index'))
    posts = [
        {'author': user, 'body': 'Test post #1'},
        {'author': user, 'body': 'Test post #2'}
    ]
    return render_template('user.html',
                           user=user,
                           posts=posts)
The @app.route decorator that we used to declare this view function looks a little bit different than the previous ones. In this case we have an argument in it, which is indicated as <nickname>. This translates into an argument of the same name added to the view function. When the client requests, say, URL /user/miguel the view function will be invoked with nickname set to 'miguel'.
The implementation of the view function should have no surprises. First we try to load the user from the database, using the nickname that we received as argument. If that doesn't work then we just redirect to the main page with an error message, as we have seen in the previous chapter.
Once we have our user, we just send it in the render_template call, along with some fake posts. Note that in the user profile page we will be displaying only posts by this user, so our fake posts have the author field correctly set.
Our initial view template will be extremely simple (file app/templates/user.html):
<!-- extend base layout -->
{% extends "base.html" %}

{% block content %}
  <h1>User: {{ user.nickname }}!</h1>
  <hr>
  {% for post in posts %}
  <p>
    {{ post.author.nickname }} says: <b>{{ post.body }}</b>
  </p>
  {% endfor %}
{% endblock %}
The profile page is now complete, but a link to it does not exist anywhere in the web site. To make it a bit more easy for a user to check his or her own profile, we are going to add a link to it in the navigation bar at the top (file `app/templates/base.html'):
    <div>Microblog:
        <a href="{{ url_for('index') }}">Home</a>
        {% if g.user.is_authenticated %}
        | <a href="{{ url_for('user', nickname=g.user.nickname) }}">Your Profile</a>
        | <a href="{{ url_for('logout') }}">Logout</a>
        {% endif %}
    </div>
Note how in the url_for function we have added the required nickname argument.
Give the application a try now. Clicking on the Your Profile link at the top should take you to your user page. Since we don't have any links that will direct you to an arbitrary user profile page you will need to type the URL by hand if you want to see someone else. For example, you would type http://localhost:5000/user/miguel to see the profile of user miguel.
Avatars
I'm sure you agree that our profile pages are pretty boring. To make them a bit more interesting, let's add user avatars.
Instead of having to deal with a possibly large collection of uploaded images in our server, we will rely on the Gravatar service to provide our user avatars.
Since returning an avatar is a user related task, we will be putting it in the User class (file app/models.py):
from hashlib import md5
# ...
class User(db.Model):
    # ...
    def avatar(self, size):
        return 'http://www.gravatar.com/avatar/%s?d=mm&s=%d' % (md5(self.email.encode('utf-8')).hexdigest(), size)
The avatar method of User returns the URL of the user's avatar image, scaled to the requested size in pixels.
Turns out with the Gravatar service this is really easy to do. You just need to create an md5 hash of the user email and then incorporate it into the specially crafted URL that you see above. After the md5 of the email you can provide a number of options to customize the avatar. The d=mm determines what placeholder image is returned when a user does not have an Gravatar account. The mm option returns the "mystery man" image, a gray silhouette of a person. The s=N option requests the avatar scaled to the given size in pixels.
The Gravatar's website has documentation for the avatar URL.
Now that our User class knows how to return avatar images, we can incorporate them into our profile page layout (file app/templates/user.html):
<!-- extend base layout -->
{% extends "base.html" %}

{% block content %}
  <table>
      <tr valign="top">
          <td><img src="{{ user.avatar(128) }}"></td>
          <td><h1>User: {{ user.nickname }}</h1></td>
      </tr>
  </table>
  <hr>
  {% for post in posts %}
  <p>
    {{ post.author.nickname }} says: <b>{{ post.body }}</b>
  </p>
  {% endfor %}
{% endblock %}
The nice thing about making the User class responsible for returning avatars is that if some day we decide Gravatar avatars are not what we want, we just rewrite the avatar method to return different URLs (even ones that points to our own web server, if we decide we want to host our own avatars), and all our templates will start showing the new avatars automatically.
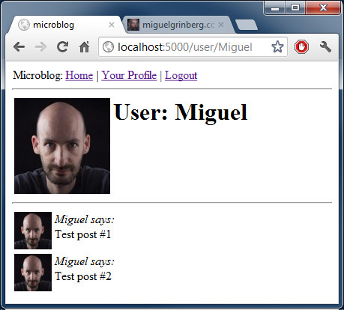
We have added the user avatar to the top of the profile page, but at the bottom of the page we have posts, and those could have a little avatar as well. For the user profile page we will of course be showing the same avatar for all the posts, but then when we move this functionality to the main page we will have each post decorated with the author's avatar, and that will look really nice.
To show avatars for the posts we just need to make a small change in our template (file app/templates/user.html):
<!-- extend base layout -->
{% extends "base.html" %}

{% block content %}
  <table>
      <tr valign="top">
          <td><img src="{{ user.avatar(128) }}"></td>
          <td><h1>User: {{ user.nickname }}</h1></td>
      </tr>
  </table>
  <hr>
  {% for post in posts %}
  <table>
      <tr valign="top">
          <td><img src="{{ post.author.avatar(50) }}"></td><td><i>{{ post.author.nickname }} says:</i><br>{{ post.body }}</td>
      </tr>
  </table>
  {% endfor %}
{% endblock %}
Here is how our profile page looks at this point:
Reusing at the sub-template level
We designed the user profile page so that it displays the posts written by the user. Our index page also displays posts, this time of any user. So now we have two templates that will need to display posts made by users. We could just copy/paste the portion of the template that deals with the rendering of a post, but that is really not ideal, because when we decide to change the layout of a post we'll have to remember to go update all the templates that have posts in them.
Instead, we are going to make a sub-template that just renders a post, then we'll include it in all the templates that need it.
To start, we create a post sub-template, which is really nothing more than a regular template. We do so by simply extracting the HTML for a post from our user template (file /app/templates/post.html):
<table>
    <tr valign="top">
        <td><img src="{{ post.author.avatar(50) }}"></td><td><i>{{ post.author.nickname }} says:</i><br>{{ post.body }}</td>
    </tr>
</table>
And then we invoke this sub-template from our user template using Jinja2's include command (file app/templates/user.html):
<!-- extend base layout -->
{% extends "base.html" %}

{% block content %}
  <table>
      <tr valign="top">
          <td><img src="{{ user.avatar(128) }}"></td>
          <td><h1>User: {{ user.nickname }}</h1></td>
      </tr>
  </table>
  <hr>
  {% for post in posts %}
      {% include 'post.html' %}
  {% endfor %}
{% endblock %}
Once we have a fully functioning index page we will invoke this same sub-template from over there, but we aren't quite ready to do that, we'll leave that for a future chapter of this tutorial.
More interesting profiles
While we now have a nice profile page, we don't really have much information to show on it. Users like to tell a bit about them on these pages, so we'll let them write something about themselves that we can show here. We will also keep track of what was the last time each user accessed the site, so that we can also show that on their profile page.
To add these things we have to start by modifying our database. More specifically, we need to add two new fields to our User class (file app/models.py):
class User(db.Model):
    id = db.Column(db.Integer, primary_key=True)
    nickname = db.Column(db.String(64), index=True, unique=True)
    email = db.Column(db.String(120), index=True, unique=True)
    posts = db.relationship('Post', backref='author', lazy='dynamic')
    about_me = db.Column(db.String(140))
    last_seen = db.Column(db.DateTime)
Every time we modify the database we have to generate a new migration. Remember that in the database chapter we went through the pain of setting up a database migration system. We can see the fruits of that effort now. To add these two new fields to our database we just do this:
$ ./db_migrate.py
To which our script will respond:
New migration saved as db_repository/versions/003_migration.py
Current database version: 3
And our two new fields are now in our database. Remember that if you are on Windows the way to invoke this script is different.
If we did not have migration support you would have needed to edit your database manually, or worse, delete it and recreate it from scratch.
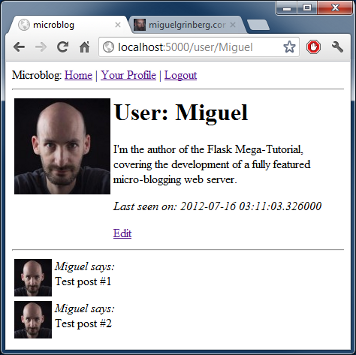
Next, let's modify our profile page template to show these fields (file app/templates/user.html):
<!-- extend base layout -->
{% extends "base.html" %}

{% block content %}
  <table>
    <tr valign="top">
      <td><img src="{{user.avatar(128)}}"></td>
      <td>
        <h1>User: {{user.nickname}}</h1>
          {% if user.about_me %}<p>{{ user.about_me }}</p>{% endif %}
          {% if user.last_seen %}<p><i>Last seen on: {{ user.last_seen }}</i></p>{% endif %}
      </td>
    </tr>
  </table>
  <hr>
  {% for post in posts %}
    {% include 'post.html' %}
  {% endfor %}
{% endblock %}
Note we make use of Jinja2's conditionals to show these fields, because we only want to show them if they are set (at this point these two new fields are empty for all users, so nothing will show).
The last_seen field is pretty easy to support. Remember that in a previous chapter we created a before_request handler, to register the logged in user with the flask.g global, as g.user. That is the perfect time to update our database with the last access time for a user (file app/views.py):
from datetime import datetime
# ...
@app.before_request
def before_request():
    g.user = current_user
    if g.user.is_authenticated:
        g.user.last_seen = datetime.utcnow()
        db.session.add(g.user)
        db.session.commit()
If you log in to your profile page again the last seen time will now display, and each time you refresh the page the time will update as well, because each time the browser makes a request the before_request handler will update the time in the database.
Note that we are writing the time in the standard UTC timezone. We discussed this in a previous chapter, we will write all timestamps in UTC so that they are consistent. That has the undesired side effect that the time displayed in the user profile page is also in UTC. We will fix this in a future chapter that will be dedicated to date and time handling.
To display the user's about me information we have to give them a place to enter it, and the proper place for this is in the edit profile page.
Editing the profile information
Adding a profile form is surprisingly easy. We start by creating the web form (file app/forms.py):
from flask_wtf import Form
from wtforms import StringField, BooleanField, TextAreaField
from wtforms.validators import DataRequired, Length

class EditForm(Form):
    nickname = StringField('nickname', validators=[DataRequired()])
    about_me = TextAreaField('about_me', validators=[Length(min=0, max=140)])
Then the view template (file app/templates/edit.html):
<!-- extend base layout -->
{% extends "base.html" %}

{% block content %}
  <h1>Edit Your Profile</h1>
  <form action="" method="post" name="edit">
      {{form.hidden_tag()}}
      <table>
          <tr>
              <td>Your nickname:</td>
              <td>{{ form.nickname(size=24) }}</td>
          </tr>
          <tr>
              <td>About yourself:</td>
              <td>{{ form.about_me(cols=32, rows=4) }}</td>
          </tr>
          <tr>
              <td></td>
              <td><input type="submit" value="Save Changes"></td>
          </tr>
      </table>
  </form>
{% endblock %}
And finally we write the view function (file app/views.py):
from .forms import LoginForm, EditForm

@app.route('/edit', methods=['GET', 'POST'])
@login_required
def edit():
    form = EditForm()
    if form.validate_on_submit():
        g.user.nickname = form.nickname.data
        g.user.about_me = form.about_me.data
        db.session.add(g.user)
        db.session.commit()
        flash('Your changes have been saved.')
        return redirect(url_for('edit'))
    else:
        form.nickname.data = g.user.nickname
        form.about_me.data = g.user.about_me
    return render_template('edit.html', form=form)
To make this page easy to reach, we also add a link to it from the user profile page (file app/templates/user.html):
<!-- extend base layout -->
{% extends "base.html" %}

{% block content %}
  <table>
      <tr valign="top">
          <td><img src="{{ user.avatar(128) }}"></td>
          <td>
              <h1>User: {{user.nickname}}</h1>
              {% if user.about_me %}<p>{{ user.about_me }}</p>{% endif %}
              {% if user.last_seen %}<p><i>Last seen on: {{ user.last_seen }}</i></p>{% endif %}
              {% if user.id == g.user.id %}<p><a href="{{ url_for('edit') }}">Edit</a></p>{% endif %}
          </td>
      </tr>
  </table>
  <hr>
  {% for post in posts %}
      {% include 'post.html' %}
  {% endfor %}
{% endblock %}
Pay attention to the clever conditional we are using to make sure that the Edit link appears when you are viewing your own profile, but not when you are viewing someone else's.
Below is a new screenshot of the user profile page, with all the additions, and with some "about me" words written:
Final words... and your homework!
So it seems we are pretty much done with user profiles, right? We sort of are, but we have a nasty bug that we need to fix.
Can you find it?
Here is a clue. We have introduced this bug in the previous chapter of the tutorial, when we were looking at the login system. And today we have written a new piece of code that has the same bug.
Think about it, and if you know what the problem is feel free to show off in the comments below. I will explain the bug, and how to fix it properly in the next chapter.
As always, here is the download link for the complete application with today's additions:
Download microblog-0.6.zip.
Remember that I'm not including a database in the archive. If you have a database from the previous chapter, just put it in the correct location and then run db_upgrade.py to upgrade it. If you don't have a previous database then call db_create.py to make a brand new one.
Thank you for following my tutorial. I hope to see you again in the next installment.
Miguel
Become a Patron!
Hello, and thank you for visiting my blog! If you enjoyed this article, please consider supporting my work on this blog on Patreon!

-
#26 Miguel Grinberg said
Samuel: Did you compare your version with the one I have on github?
-
#27 Samuel said
Hi again.
I've downloaded your zip file for this part. I've installed everything. It works correctly.
However I've tried to recreate venv on my folder, it seems worked out okay, but still i had same issue.
I've also tried to recreate db with db_create.py, but i got the error message:
File "./db_create.py", line 14, in <module>
api.version_control(SQLALCHEMY_DATABASE_URI, SQLALCHEMY_MIGRATE_REPO, api.version(SQLALCHEMY_MIGRATE_REPO))
File "<string>", line 2, in version_control
File "/home/izdi/blog/flask/lib/python2.7/site-packages/migrate/versioning/util/init.py", line 159, in with_engine
return f(a, *kw)
File "/home/izdi/blog/flask/lib/python2.7/site-packages/migrate/versioning/api.py", line 250, in version_control
ControlledSchema.create(engine, repository, version)
File "/home/izdi/blog/flask/lib/python2.7/site-packages/migrate/versioning/schema.py", line 139, in create
table = cls._create_table_version(engine, repository, version)
File "/home/izdi/blog/flask/lib/python2.7/site-packages/migrate/versioning/schema.py", line 187, in _create_table_version
raise exceptions.DatabaseAlreadyControlledError
migrate.exceptions.DatabaseAlreadyControlledErrorI assume i have to remove the existing one first, how would i do this?
-
#28 Miguel Grinberg said
@Samuel: you can delete the database on your own and then db_create.py will create a new one. If you are using SQLite, then just delete the app.db file.
-
#29 Cory said
When editing our profiles I see that the nickname is prefilled with the current nickname, but the about me is blank. Why is one filled and the other not? I tried to fill the about me using the default kwarg when creating the textareafield, but neither self or g.user is available at that time. Is there a simple fix for this? As always thank you for these tutorials!!
-
#30 Miguel Grinberg said
@Cory: in the edit() function the about me field is set with the following statement: form.about_me.data = g.user.about_me. Do you have that in your version?
-
#31 Cory said
@Miguel: That was it! Thank you again!
-
#32 Victor said
This is amazing. I don't think I would have made it past "Hello World" in my understanding of Flask without it! Thank you so much!
-
#33 Elon said
Hmm, I decided to host my avatar within my project at /static/avatar.jpg. I had to take out the "md5(self.email).hexdigest()" part in the def avatar method, and my only issue now is the avatar is displaying at full size, i.e. they're ignoring the 128px and 50px parameters specified in user.html. The method does take a size argument. Am I missing something obvious?
I have a feeling the issue is in the avatar method, which currently returns: '/static/avatar.jpg/' + '?d=mm&s=' + str(size)
-
#34 Miguel Grinberg said
@Elon: Yes, the query string arguments to resize the avatar are part of the Gravatar API, they handle them in their server. You can't use them for a regular image. If you host your avatar you should probably store the picture in the correct size(s) so that no resizing is needed.
-
#35 Elon said
Ahh that is what I figured. Maybe I could specify width and height somewhere in the html.
I still would like to have different sizes that reference the same image the way you do... I am just not interested in giving this Gravatar service my contact info. I will keep playing around, thanks for the reply.
-
#36 Miguel Grinberg said
@Elon: you can put width and height in the CSS for your image element, but note that if your image is pretty big your clients will have to download it to resize it, you will be making your page slower. A best approach is that you generate a few sizes as separate images and load the appropriate one each time.
-
#37 Jeffrey Leung said
Out of curiousity, in your demonstration, you specified, user = User.query.filter_by(nickname = nickname).first()
But when we pass in the variable of "user" again to render template, that we can also use user = user?
How come we don't need to specify something like this.user = user rather than user = user?
Or is this something python will figure out automatically?
Thank you
-
#38 Miguel Grinberg said
@Jeffrey: you will see the "user=user" syntax in many Python apps. The left side "user" is just an argument name. The right side user is the value that the argument receives. This is saying that in the template there should be a variable named "user" (the left side one) and its value should be a user object (the right side one).
-
#39 Agnaldo said
Errata: in the app/templates/user.html should be g.user.nickname instead of user.nickname
-
#40 Miguel Grinberg said
@Agnaldo: Not sure which one you mean. The user.html page shows data about a user, any user. The user to show is passed as an argument called "user" into the template, so I believe what I have is correct. The "g.user" user is the logged-in user, not the user you want to view the profile of. Or am I missing something?
-
#41 Max said
Thank you dear Miguel for your mega tutorial.
I just wanted to ask how to manage each username to be the name of subdomain. For example in this tutorial the application takes the username and binds it to url like localhost:5000/user/Miguel but how to make the username a subdomain like Miguel.localhost:5000/ -
#42 Miguel Grinberg said
@Max: Implementing dynamic subdomains is a bit complex, because the problem extends outside of the web application. You'll need to setup DNS for all the subdomains, or maybe set up a wildcard DNS entry. Then your web server will have to be configured to handle these. My recommendation is that you rewrite URLs in your front-end web server, so that you don't have to deal with the subdomains in the app. For example, a request to http://miguel.example.com/index.html will be rewritten by nginx to http://example.com/miguel/index.html. Then you can handle the non-subdomain routes in your app.
-
#43 Yecid said
Thanks Miguel for the mega tutorial, i like to learn from it.
But I have an issue, I cannot login with any user from my databse, I tried creating new ones,using db_migrate and db_upgrade but nothing works. So I decided to copy your code, and stil not working. I can see Just de "user.html" template without login (ignoring @login_required at views.py) at localhost:5000/user/Miguel. I don't know if it's my computer. Please, I don't wanna get stuck. Thanks so much
-
#44 Miguel Grinberg said
@Yecid: do you get an error when you login? Please paste the stack trace somewhere I can see it.
-
#45 Stephen said
Hey Miguel, great tutorial, absolutely amazing for getting introduced to flask. I have a small question, in your code you tend to make changes to database entries as follows:
g.user.nickname = form.nickname.data
g.user.about_me = form.about_me.data
db.session.add(g.user)
db.session.commit()but as far as I can tell, you get the same results by omitting the db.session.add() line altogether, and to me, makes more sense when reading the code. Is there a reason you call db.session.add() in this way?
-
#46 Miguel Grinberg said
@Stephen: you cannot omit db.session.add(), the commit() call will only write to the database the objects that were added.
-
#47 Stephen said
Here's a small screenshot of what happens when I make changes to an object in my database and commit without add:
http://postimg.org/image/trqabpty5/Am I misinterpreting what has happened here? I should have explicitly said that this (seems) to work, but of course only with objects that are being updated, not inserted. Which is why I thought it should work with the code I posted previously, since there should already be an entry for g.user in the database (because login is required to view the edit page)
Thanks in advance for clearing up any misunderstandings I may be having, I've only been working with Flask for a few days but this tutorial is showing me that it's awesome!
-
#48 Miguel Grinberg said
@Stephen: yours is an interesting observation. I have found a good explanation to this behavior in the SQLAlchemy docs: http://docs.sqlalchemy.org/en/rel_0_9/orm/session.html#adding-new-or-existing-items. I wasn't aware of this, but the User.query.get() call that you use to retrieve an object implicitly adds the object to the session. For consistency and clarity I still think it is best to call add() before the commit. For new objects there is no implicitly add(), those must be added manually (unless you come up with some sort of auto-add callback using SQLAlchemy events).
-
#49 Kevin said
A slight error I noticed when going through this
We are importing StringFielld from wtforms yet in the nickname field we are using nickname = TextField
I'm guessing that should be nickname = StringField, right?
-
#50 Miguel Grinberg said
@Kevin: yes, TextField was deprecated in favor of StringField, missed that one occurrence. Thanks!


