Running Your Flask Application Over HTTPS
Posted by
on underWhile you work on your Flask application, you normally run the development web server, which provides a basic, yet functional WSGI complaint HTTP server. But eventually you will want to deploy your application for production use, and at that time, one of the many things you will need to decide is if you should require clients to use encrypted connections for added security.
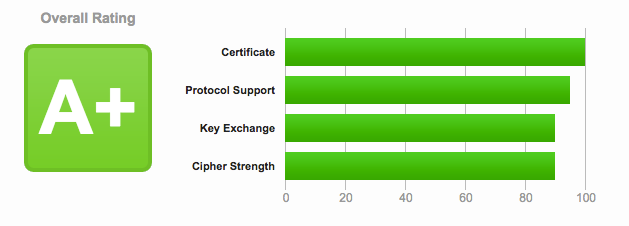
People ask me all the time about this, in particular how to expose a Flask server on HTTPS. In this article I'm going to present several options for adding encryption to a Flask application, going from an extremely simple one that you can implement in just five seconds, to a robust solution that should give you an A+ rating like my site gets from this exhaustive SSL analysis service.
How Does HTTPS Work?
The encryption and security functionality for HTTP is implemented through the Transport Layer Security (TLS) protocol. Basically put, TLS defines a standard way to make any network communication channel secure. Since I'm not a security expert, I don't think I can do a great job if I try to give you a detailed description of the TLS protocol, so I will just give you some of the details that are of interest for our purpose of setting up a secure and encrypted Flask server.
The general idea is that when the client establishes a connection with the server and requests an encrypted connection, the server responds with its SSL Certificate. The certificate acts as identification for the server, as it includes the server name and domain. To ensure that the information provided by the server is correct, the certificate is cryptographically signed by a certificate authority, or CA. If the client knows and trusts the CA, it can confirm that the certificate signature indeed comes from this entity, and with this the client can be certain that the server it connected to is legitimate.
After the client verifies the certificate, it creates an encryption key to use for the communication with the server. To make sure that this key is sent securely to the server, it encrypts it using a public key that is included with the server certificate. The server is in possession of the private key that goes with that public key in the certificate, so it is the only party that is able to decrypt the package. From the point when the server receives the encryption key all traffic is encrypted with this key that only the client and server know.
From this summary you can probably guess that to implement TLS encryption we need two items: a server certificate, which includes a public key and is signed by a CA, and a private key that goes with the public key included in the certificate.
The Simplest Way To Do It
Flask, and more specifically Werkzeug, support the use of on-the-fly certificates, which are useful to quickly serve an application over HTTPS without having to mess with certificates. All you need to do, is add ssl_context='adhoc' to your app.run() call. As an example, below you can see the "Hello, World" Flask application from the official documentation, with TLS encryption added:
from flask import Flask
app = Flask(__name__)

@app.route("/")
def hello():
    return "Hello World!"

if __name__ == "__main__":
    app.run(ssl_context='adhoc')
This option is also available through the Flask CLI if you are using a Flask 1.x release:
$ flask run --cert=adhoc
To use ad hoc certificates with Flask, you need to install an additional dependency in your virtual environment:
$ pip install pyopenssl
When you run the script (or start with flask run if you prefer), you will notice that Flask indicates that it is running an https:// server:
$ python hello.py
 * Running on https://127.0.0.1:5000/ (Press CTRL+C to quit)
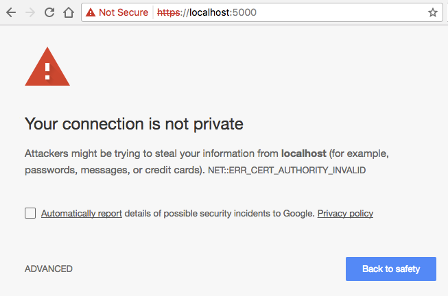
Simple, right? The problem is that browsers do not like this type of certificate, so they show a big and scary warning that you need to dismiss before you can access the application. Once you allow the browser to connect, you will have an encrypted connection, just like what you get from a server with a valid certificate, which make these ad hoc certificates convenient for quick & dirty tests, but not for any real use.
Self-Signed Certificates
A so called self-signed certificate is one where the signature is generated using the private key that is associated with that same certificate. I mentioned above that the client needs to "know and trust" the CA that signed a certificate, because that trust relationship is what allows the client to validate a server certificate. Web browsers and other HTTP clients come pre-configured with a list of known and trusted CAs, but obviously if you use a self-signed certificate the CA is not going to be known and validation will fail. That is exactly what happened with the ad hoc certificate we used in the previous section. If the web browser is unable to validate a server certificate, it will let you proceed and visit the site in question, but it will make sure you understand that you are doing it at your own risk.
But what is the risk, really? With the Flask server from the previous section you obviously trust yourself, so there is no risk to you. The problem is when users are presented with this warning when connecting to a site they do not directly know or control. In those cases, it is impossible for the user to know if the server is authentic or not, because anyone can generate certificates for any domain, as you will see below.
While self-signed certificates can be useful sometimes, the ad hoc certificates from Flask are not that great, because each time the server runs, a different certificate is generated on the fly through pyOpenSSL. When you are working with a self-signed certificate, it is better to have the same certificate used every time you launch your server, because that allows you to configure your browser to trust it, and that eliminates the security warnings.
You can generate self-signed certificates easily from the command line. All you need is to have openssl installed:
openssl req -x509 -newkey rsa:4096 -nodes -out cert.pem -keyout key.pem -days 365
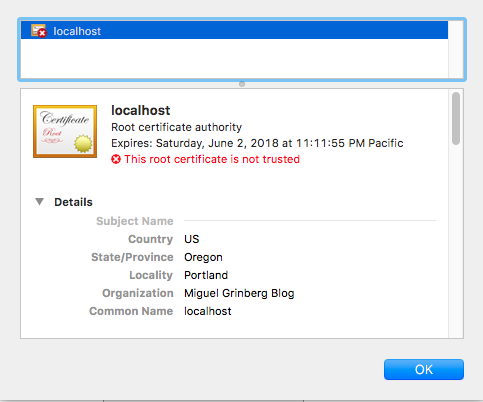
This command writes a new certificate in cert.pem with its corresponding private key in key.pem, with a validity period of 365 days. When you run this command, you will be asked a few questions. Below you can see in red how I answered them to generate a certificate for localhost:
Generating a 4096 bit RSA private key
......................++
.............++
writing new private key to 'key.pem'
-----
You are about to be asked to enter information that will be incorporated
into your certificate request.
What you are about to enter is what is called a Distinguished Name or a DN.
There are quite a few fields but you can leave some blank
For some fields there will be a default value,
If you enter '.', the field will be left blank.
-----
Country Name (2 letter code) [AU]:US
State or Province Name (full name) [Some-State]:Oregon
Locality Name (eg, city) []:Portland
Organization Name (eg, company) [Internet Widgits Pty Ltd]:Miguel Grinberg Blog
Organizational Unit Name (eg, section) []:
Common Name (e.g. server FQDN or YOUR name) []:localhost
Email Address []:
We can now use this new self-signed certificate in our Flask application by setting the ssl_context argument in app.run() to a tuple with the filenames of the certificate and private key files:
from flask import Flask
app = Flask(__name__)

@app.route("/")
def hello():
    return "Hello World!"

if __name__ == "__main__":
    app.run(ssl_context=('cert.pem', 'key.pem'))
Alternatively, you can add the --cert and --key options to the flask run command if you are using Flask 1.x or newer:
$ flask run --cert=cert.pem --key=key.pem
The browser will continue to complain about this certificate, but if you inspect it, you will see the information that you entered when you created it:
Using Production Web Servers
Of course we all know that the Flask development server is only good for development and testing. So how do we install an SSL certificate on a production server?
If you are using gunicorn, you can do this with command line arguments:
$ gunicorn --certfile cert.pem --keyfile key.pem -b 0.0.0.0:8000 hello:app
If you use nginx as a reverse proxy, then you can configure the certificate with nginx, and then nginx can "terminate" the encrypted connection, meaning that it will accept encrypted connections from the outside, but then use regular unencrypted connections to talk to your Flask backend. This is a very useful set up, as it frees your application from having to deal with certificates and encryption. The configuration items for nginx are as follows:
server {
    listen 443 ssl http2;
    server_name example.com;
    ssl_certificate /path/to/cert.pem;
    ssl_certificate_key /path/to/key.pem;
    # ...
}
Another important item you need to consider is how are clients that connect through regular HTTP going to be handled. The best solution, in my opinion, is to respond to unencrypted requests with a redirect to the same URL but on HTTPS. For a Flask application, you can achieve that using the Flask-SSLify extension. With nginx, you can include another server block in your configuration:
server {
    listen 80;
    server_name example.com;
    location / {
        return 301 https://$host$request_uri;
    }
}
If you are using a different web server, check their documentation and you will likely find similar ways to create the configurations shown above.
Using "Real" Certificates
We have now explored all the options we have for self-signed certificates, but in all those cases, the limitation remains that web browsers are not going to trust those certificates unless you tell them to, so the best option for server certificates for a production site is to obtain them from one of these CAs that are well known and automatically trusted by all the web browsers.
When you request a certificate from a CA, this entity is going to verify that you are in control of your server and domain, but how this verification is done depends on the CA. If the server passes this verification then the CA will issue a certificate for it with its own signature and give it to you to install. The certificate is going to be good for a period of time that is usually not longer than a year. Most CAs charge money for these certificates, but there are a couple that offer them for free. The most popular free CA is called Let's Encrypt.
Getting a certificate from Let's Encrypt is fairly easy, since the whole process is automated. Assuming you are using an Ubuntu based server, you have to begin by installing their open source certbot tool on your server:
$ sudo apt-get install software-properties-common
$ sudo add-apt-repository ppa:certbot/certbot
$ sudo apt-get update
$ sudo apt-get install certbot
And now you are ready to request the certificate using this utility. There are a few ways that certbot uses to verify your site. The "webroot" method is, in general, the easiest to implement. With this method, certbot adds some files in a directory that your web server exposes as static files, and then tries to access these files over HTTP, using the domain you are trying to generate a certificate for. If this test is successful, certbot knows that the server in which it is running it is associated with the correct domain, and with that it is satisfied and issues the certificate. The command to request a certificate with this method is as follows:
$ sudo certbot certonly --webroot -w /var/www/example -d example.com
In this example, we are trying to generate a certificate for a example.com domain, which uses the directory in /var/www/example as a static file root. Unfortunately a Flask based website does not have a static file root directory, all static files from the application are accessed with the /static prefix, at least when you use the default configuration, so more planning is necessary.
What certbot does to the static root directory is add a .well-known subdirectory, and then store some files in it. Then it uses a HTTP client to retrieve those files as http://example.com/.well-known/.... If it can retrieve the files, then that is confirmation that your server is in full control of the domain name. For Flask and other applications that don't have a static file root directory, it is necessary to define one.
If you are using nginx as reverse proxy, you can take advantage of the powerful mappings that you can create in the configuration to give certbot a private directory where it can write its verification files. In the following example, I extended the HTTP server block shown in the previous section to send all Let's Encrypt related requests (which always begin with /.well-known/...) to a specific directory of your choice:
server {
    listen 80;
    server_name example.com;
    location ~ /.well-known {
        root /path/to/letsencrypt/verification/directory;
    }
    location / {
        return 301 https://$host$request_uri;
    }
}
Then you can give this director to certbot:
$ sudo certbot certonly --webroot -w /path/to/letsencrypt/verification/directory -d example.com
If certbot is able to verify the domain, it will write the certificate file as /etc/letsencrypt/live/example.com/fullchain.pem and the private key as /etc/letsencrypt/live/example.com/privkey.pem, and these are going to be valid for a period of 90 days.
To use this newly acquired certificate, you can enter the two filenames mentioned above in place of the self-signed files we used before, and this should work with any of the configurations described above. And of course you will also need to make your application available through the domain name that you registered, as that is the only way the browser will accept the certificate as valid.
Certbot is also used when you need to renew the certificates. To do that, you simply issue the following command:
$ sudo certbot renew
If there are any certificates in your system that are close to expire, the above command renews them, leaving new certificates in the same locations. You will likely need to restart your web server if you want the renewed certificates to be picked up.
Achieving an SSL A+ Grade
If you use a certificate from Let's Encrypt or another known CA for your production site and you are running a recent and maintained operating system on this server, you are likely very close to have a top-rated server in terms of SSL security. You can head over to the Qualys SSL Labs site and get a report to see where you stand.
Chances are you will still have some minor things to do. The report will indicate what areas you need to improve, but in general, I expect you'll be told that the options the server exposes for the encrypted communication are too wide, or too weak, leaving you open to known vulnerabilities.
One of the areas in which it is easy to make an improvement is in how the coefficients that are used during the encryption key exchange are generated, which usually have defaults that are fairly weak. In particular, the Diffie-Hellman coefficients take a considerable amount of time to be generated, so servers by default use smaller numbers to save time. But we can pre-generate strong coefficients and store them in a file, which then nginx can use. Using the openssl tool, you can run the following command:
openssl dhparam -out /path/to/dhparam.pem 2048
You can change the 2048 above for a 4096 if you want even stronger coefficients. This command is going to take some time to run, specially if your server does not have a lot of CPU power, but when it's done, you will have a dhparam.pem file with strong coefficients that you can plug into the ssl server block in nginx:
ssl_dhparam /path/to/dhparam.pem;
Next, you will probably need to configure which ciphers the server allows for the encrypted communication. This is the list that I have on my server:
ssl_ciphers 'ECDHE-RSA-AES128-GCM-SHA256:ECDHE-ECDSA-AES128-GCM-SHA256:ECDHE-RSA-AES256-GCM-SHA384:ECDHE-ECDSA-AES256-GCM-SHA384:DHE-RSA-AES128-GCM-SHA256:DHE-DSS-AES128-GCM-SHA256:kEDH+AESGCM:ECDHE-RSA-AES128-SHA256:ECDHE-ECDSA-AES128-SHA256:ECDHE-RSA-AES128-SHA:ECDHE-ECDSA-AES128-SHA:ECDHE-RSA-AES256-SHA384:ECDHE-ECDSA-AES256-SHA384:ECDHE-RSA-AES256-SHA:ECDHE-ECDSA-AES256-SHA:DHE-RSA-AES128-SHA256:DHE-RSA-AES128-SHA:DHE-DSS-AES128-SHA256:DHE-RSA-AES256-SHA256:DHE-DSS-AES256-SHA:DHE-RSA-AES256-SHA:AES128-GCM-SHA256:AES256-GCM-SHA384:AES128-SHA256:AES256-SHA256:AES128-SHA:AES256-SHA:AES:CAMELLIA:!DES-CBC3-SHA:!aNULL:!eNULL:!EXPORT:!DES:!RC4:!MD5:!PSK:!aECDH:!EDH-DSS-DES-CBC3-SHA:!EDH-RSA-DES-CBC3-SHA:!KRB5-DES-CBC3-SHA';
In this list, disabled ciphers are prefixed with a !. The SSL report will tell you if there are any ciphers that are not recommended. You will have to check from time to time to find out if new vulnerabilities have been discovered that require modifications to this list.
Below you can find my current nginx SSL configuration, which includes the above settings, plus a few more that I added to address warnings from the SSL report:
server {
    listen 443 ssl http2;
    server_name example.com;
    ssl_certificate /path/to/cert.pem;
    ssl_certificate_key /path/to/key.pem;
    ssl_dhparam /path/to/dhparam.pem;
    ssl_ciphers 'ECDHE-RSA-AES128-GCM-SHA256:ECDHE-ECDSA-AES128-GCM-SHA256:ECDHE-RSA-AES256-GCM-SHA384:ECDHE-ECDSA-AES256-GCM-SHA384:DHE-RSA-AES128-GCM-SHA256:DHE-DSS-AES128-GCM-SHA256:kEDH+AESGCM:ECDHE-RSA-AES128-SHA256:ECDHE-ECDSA-AES128-SHA256:ECDHE-RSA-AES128-SHA:ECDHE-ECDSA-AES128-SHA:ECDHE-RSA-AES256-SHA384:ECDHE-ECDSA-AES256-SHA384:ECDHE-RSA-AES256-SHA:ECDHE-ECDSA-AES256-SHA:DHE-RSA-AES128-SHA256:DHE-RSA-AES128-SHA:DHE-DSS-AES128-SHA256:DHE-RSA-AES256-SHA256:DHE-DSS-AES256-SHA:DHE-RSA-AES256-SHA:AES128-GCM-SHA256:AES256-GCM-SHA384:AES128-SHA256:AES256-SHA256:AES128-SHA:AES256-SHA:AES:CAMELLIA:!DES-CBC3-SHA:!aNULL:!eNULL:!EXPORT:!DES:!RC4:!MD5:!PSK:!aECDH:!EDH-DSS-DES-CBC3-SHA:!EDH-RSA-DES-CBC3-SHA:!KRB5-DES-CBC3-SHA';
    ssl_protocols TLSv1.2;
    ssl_session_timeout 1d;
    ssl_session_cache shared:SSL:50m;
    ssl_stapling on;
    ssl_stapling_verify on;
    add_header Strict-Transport-Security max-age=15768000;
    # ...
}
You can see the results that I obtained for my site at the top of this article. If you are after 100% marks in all categories, you will have to add additional restrictions to your configuration, but this is going to limit the number of clients that can connect to your site. In general, older browsers and HTTP clients use ciphers that are not considered to be the strongest, but if you disable those, then these clients will not be able to connect. So you will basically need to compromise, and also routinely review the security reports and make updates as things change over time.
Unfortunately for the level of sophistication on these last SSL improvements you will need to use a professional grade web server, so if you don't want to go with nginx, you will need to find one that supports these settings, and the list is pretty small. I know Apache does, but besides that, I don't know any other.
Conclusion
So there you go, this is how you can implement top-of-the-line SSL security for your Flask application. Is there anything that I left out? Do you do things differently? Let me know below in the comments!
Become a Patron!
Hello, and thank you for visiting my blog! If you enjoyed this article, please consider supporting my work on this blog on Patreon!

-
#1 Ezequiel said
Great post Miguel!
Recently, I have been struggling with the requests module, trying to consume an API from a server with a self signed certificate so this is very helpful.
Thanks
-
#2 netchose said
All i've learned about flask is by reading your book and your website.
excellent article like usual
thanks a lot -
#3 Joe Labi said
Thank you for the great tutorial
-
#4 Benjamin said
Nice article as always!
If you use docker to deploy your app, there is another alternative really worth looking into: https://traefik.io
It's a reverse proxy that supports Let's Encrypt (it automatically requests a certificate). Really nice.I wrote a blog post about it: http://beenje.github.io/blog/posts/running-your-application-over-https-with-traefik/
-
#5 Miguel Grinberg said
@Benjamin: Thanks. I have Traefik on my list of things to try out, as I keep hearing good things about it.
-
#6 Florian said
Hey Miguel,
how would you implement 'adhoc' ssl as an Flask CLI command?
@app.cli.command('runssl', short_help='Runs a development server with HTTPS.')
-
#7 Miguel Grinberg said
@Florian: what I would do is grab the source code for the "run" command from the Flask repository, copy it to this new "runssl" and then modify it to include the adhoc ssl context.
-
#8 mz said
As always, your post helps me a lot!
-
#9 Rob Mathers said
Great article. Since it's the first hit for "flask https", may I suggest you add some info about using ProxyFix (http://flask.pocoo.org/docs/0.12/deploying/wsgi-standalone/#proxy-setups) or similar, so that url_for properly uses the https scheme for all non-relative links, and redirects.
-
#10 cmb said
@Rob Mathers: after hours struggling with some weird errors when switching from http to https, I saw your comment here. You made my day, thank you!
-
#11 zhihong Pei said
Thank you for your post. If I develop a web application in the enterprise intranet, the web application was accessed by the IP address and do not have it's own domain name, did it can get the Let's Encrypt Certificates? thank you
-
#12 Miguel Grinberg said
@zhihong: Not sure if Let's Encrypt will give you a certificate for an IP address. I'm also not sure if LE will give you a certificate for an intranet site. You'll have to find out from them if they support these options.
-
#13 Doron said
@miguel, I followed your instructions to @Florian, regarding the runssl. In doing so I discovered that flask v0.12.3 (unreleased) will include a "--cert" option for the default Flask CLI run command. See here: https://github.com/pallets/flask/pull/2606
Until, them I'm just going to follow your instructions to @Florian
-
#14 Vipin Reyaroth said
Hi Miguel
I've been following your Flask tutorial recently, which is very good. But this piece about security gives much clarity, which doesn't leave any doubts in my mind.
Excellent article mate.Cheers
Vipin -
#15 igor said
Hello Miguel,
I ve set up the ssl cert following your guide (used letsencrypt and nginx), and it all seemed fine, ssllabs showed A grade. However recently I tried to access the site trough different machine and I kept geting "not secure connection" warnig (both chrome and firefox, recent versions). On my machine its still runing fine, ssllabs are still showing A grade. Do you have any adivice how to start de-buging this, I can provide more data if needed.Thanks
-
#16 Miguel Grinberg said
@igor: you need to look at the page and certificate information from the browser that gives you the error to see what the problem is.
-
#17 faceless stranger said
Hi,
I see you've coded up your own blog with Python. And a commenting system no less! A feat in and of itself, I'm finding. Thanks for all the write-ups.
-
#18 Olav Vahtras said
Thank you for a great tutorial!
Comment: installing certbot and generation+installation of certificates appears to be even simpler now in Ubuntu 18.04 LTS:
$ sudo apt install python-certbot-nginx
$ sudo certbot --nginx -
#19 Miguel Grinberg said
@Olav: Ubuntu packages tend in general to be older releases. For something as important as this I prefer to install the latest available version directly.
-
#20 Doaa Altarawy said
Thanks for the useful post, as always.
Do you have a specific suggestion for enabling HSTS in flask apps?
I was looking into flask-sslify but it's pretty old, flask-talisman is much more than needed? -
#21 Miguel Grinberg said
@Doaa: you can set the HSTS headers that you want manually, for example in an after_request handler. Or else, you can use one of the extensions that you mentioned, if they do what you need.
-
#22 Vladyslav said
Great job, Miguel!
-
#23 Aleksandr Mikheev said
Thank you for this article! It helped me a lot.
By the way, now it is even simplier - you just need this command:
sudo certbot --nginx -
#24 Alexis ROLLAND said
Hello Miguel and thank you for this great resource.
I'm running a Flask API on Google Cloud Compute Engine and I'm trying to serve it with SSL. I followed the steps you described to register the certificate via Let's Encrypt. So I connected to my instance via SSH and executed the commands to install certbot / generate the certificate:
sudo certbot certonly --webroot -w /home/contact_mobydq/mobydq/ -d mobydq.net
Sadly I receive the following error:
Failed authorization procedure. mobydq.net (http-01): urn:ietf:params:acme:error:unauthorized :: The client lacks sufficient authorization :: Invalid response from http://mobydq.net/.well-known/acme-challe
nge/dLDapInas_pNEvM7XAgDJ6SPsHsv6utu9kiSdZ_uXcg: "<!DOCTYPE html>\n<html lang=\"en\">\n <head>\n <meta charset=\"utf-8\">\n <meta name=\"viewport\" content=\"width=device-width, init"
IMPORTANT NOTES:
- The following errors were reported by the server:
Domain: mobydq.net
Type: unauthorized
Detail: Invalid response from
http://mobydq.net/.well-known/acme-challenge/dLDapInas_pNEvM7XAgDJ6SPsHsv6utu9kiSdZ_uXcg:
"<!DOCTYPE html>\n<html lang=\"en\">\n <head>\n <meta charset=\"utf-8\">\n <meta name=\"viewport\"
content=\"width=device-width, init"
To fix these errors, please make sure that your domain name was
entered correctly and the DNS A/AAAA record(s) for that domain
contain(s) the right IP address.
- Your account credentials have been saved in your Certbot
configuration directory at /etc/letsencrypt. You should make a
secure backup of this folder now. This configuration directory will
also contain certificates and private keys obtained by Certbot so
making regular backups of this folder is ideal.My domain name http://mobydq.net was purchased on Gandi but as mentioned above my app runs on Google Cloud. I'm guessing this is why this method does not work because Let's Encrypt is not able to verify my Google Cloud server. Would you happen to have a hint about how I should proceed to generate the certificate files?
Many thanks in advance!
Keep up the excellent work.Alexis
-
#25 Miguel Grinberg said
@Alexis: you need to find a guide that is specific to Google Cloud, my instructions are for servers where you have full access.


