How To Create a React + Flask Project
Posted by
on underOne of the questions I get asked more often lately is how to create a project that combines a React frontend with a Flask backend. Instead of giving vague answers I decided to write a tutorial about it, including a video in which I go through the steps to create a simple but fully functional React+Flask project.
Requirements
You need to install three packages on your machine:
- Node.js: The JavaScript runtime that you will use to run your frontend project.
- Yarn: A package and project manager for Node.js applications.
- Python: A recent Python 3 interpreter to run the Flask backend on.
Please install these three packages using the instructions for your operating system before continuing with the tutorial.
Creating a Starter React Project
There are several ways to create a combined project with React and Flask. I prefer to start from the frontend because the project structure is much more complex than the backend. For this example I used the create-react-app generator to create a simple React project to start from:
$ npx create-react-app react-flask-app
$ cd react-flask-app
The npx command comes with Node.js. It is a simple project runner that downloads the requested command if it isn't already available and in the system's PATH. The first argument is the command to execute. The second argument is the name of the project to create. When this command completes, you will have a react-flask-app directory with a complete and fully functional simple react project.
Since you will work on this project from now on, you can cd into react-flask-app so that it is your current directory. If you list the directory you should see the top-level structure, which should be more or less like this:
$ ls -l
total 912
-rw-r--r--     1 mgrinberg  staff    2884 Feb 10 14:54 README.md
drwxr-xr-x  1027 mgrinberg  staff   32864 Feb 10 15:03 node_modules
-rw-r--r--     1 mgrinberg  staff     890 Feb 10 15:04 package.json
drwxr-xr-x     8 mgrinberg  staff     256 Feb 10 14:54 public
drwxr-xr-x    10 mgrinberg  staff     320 Feb 10 23:50 src
-rw-r--r--     1 mgrinberg  staff  454962 Feb 10 14:54 yarn.lock
Creating a Flask API Backend
The next step is to create the Flask project. Since I want to have both the frontend and backend combined into a single project, my preference here is to add one more top-level subdirectory where the Flask project will live:
$ mkdir api
$ cd api
I always create a virtual environment called venv in my project directory, so let's do that now:
$ python3 -m venv venv
$ source venv/bin/activate
(venv) $ _
Note that the above is for Unix-based operating systems. If you are using Windows, then you will do this instead:
$ python -m venv venv
$ venv\Scripts\activate
(venv) $ _
For this simple example I need only two Python packages, the obvious Flask and also python-dotenv:
(venv) $ pip install flask python-dotenv
The Flask project can have any structure that you like, as long as its root is this new api subdirectory. In particular, you can use large and complex structures such as those in my Flask Mega-Tutorial or O'Reilly Flask book, as well as much simpler single file applications. In the spirit of keeping things simple, for this example I'm going to create a small, single file and single endpoint application. Here is my Flask API project, written as a single file called api.py:
import time
from flask import Flask

app = Flask(__name__)

@app.route('/time')
def get_current_time():
    return {'time': time.time()}
This little API responds to the /time URL with a JSON payload such as this:
{"time": 1581527730.5866282}
If you are surprised that you are not seeing a call to the jsonify() function from Flask, you may not be aware that in recent releases of Flask your view function can return a dictionary, which gets automatically JSONified by Flask.
As you probably know, Flask imports the application from the place indicated by the FLASK_APP environment variable. To avoid having to manually set this variable every time, I'm going to write a .flaskenv file, which Flask automatically imports into the environment on startup if it finds the python-dotenv package installed. Here is my .flaskenv file:
FLASK_APP=api.py
FLASK_ENV=development
Since I'm going to be setting up development environment, I also added the FLASK_ENV variable, with a setting of development, which enables Flask's debug mode.
At this point this basic Flask project is complete. To make sure that it is working well you can start it:
(venv) $ flask run
 * Serving Flask app "api.py" (lazy loading)
 * Environment: development
 * Debug mode: on
 * Running on http://127.0.0.1:5000/ (Press CTRL+C to quit)
 * Restarting with stat
 * Debugger is active!
 * Debugger PIN: 673-234-166
To stop the Flask server press Ctrl-C.
Now that the Flask part of this project is complete, let's leave the api subdirectory and go back to the root of the combined project.
(venv) $ cd ..
React Configuration Changes
The React project created by the create-react-app utility left a package.json file with the project's configuration. There are a couple of changes to make in this file to improve the integration between the React and the Flask sides.
The first change is to set up "proxy" redirection from React to Flask. You will see in a moment that the React project will run a web server on port 3000, while Flask runs its own server on port 5000. In most deployments, however, the frontend files and the API endpoints are all served from the same domain and port, which makes everything work seamlessly by avoiding cross-origin issues. The React project can be configured to redirect any requests it receives on its port 3000 that it does not understand into another server. This is configured simply by adding a proxy key at the bottom package.json:
{

  ... leave all other configuration options alone ...

  "proxy": "http://localhost:5000"
}
When you do this, do not forget to add a comma at the end of the previous line, as without that comma the file would not be a valid JSON file.
The other change I like to make is related to management commands. The React application uses yarn as a command manager. For example, the frontend server is started with the yarn start command. There is also a yarn test and a few more commands.
While this is entirely optional, the commands to manage the Flask app can be integrated with yarn as well. Somewhere in the middle of package.json you will find a scripts key. You can add any custom commands inside it:
  "scripts": {
    "start": "react-scripts start",
    "start-api": "cd api && venv/bin/flask run --no-debugger",
    "build": "react-scripts build",
    "test": "react-scripts test",
    "eject": "react-scripts eject"
  },
Here I've added one new entry called start-api, which I'm going to use to run the Flask server. The value of this key is the command that needs to be executed, which in this case involves changing into the api subdirectory and then running the flask run command.
Note that I have used the virtual environment path for the flask command so that I don't need to have the virtual environment activated. The nice thing about running the command in this way is that in the context of the Flask process all imports will work in the same way as with an activated virtual environment.
The --no-debugger option that I added in the command also deserves a mention. Since this Flask backend is strictly an API server, we will never be serving complete pages, so having the browser-based debugger enabled serves no purpose, as it's just going to mess up the JSON responses that the API returns. You will see stack traces of your errors in the terminal.
Adding the Flask Project to Git
The React starter project includes a git repository, which is actually a nice feature. To make it more friendly to Python there are a couple of things that need to be added to the .gitignore file:
venv
__pycache__
This will prevent the virtual environment and the cache bytecode directories that Python 3 creates from ever getting added to source control. You can add any other things that you need here for your project as well.
Once your .gitignore is configured you can add all the new and modified files to git and commit the Flask backend:
$ git add .gitignore package.json api
$ git commit -m "flask backend"
Running the Combined Project
Okay, now the most exciting part. Let's run the application!
To do this you will need to use two terminal windows. One for the frontend server, and another for the backend. On the first terminal, start the frontend:
$ yarn start
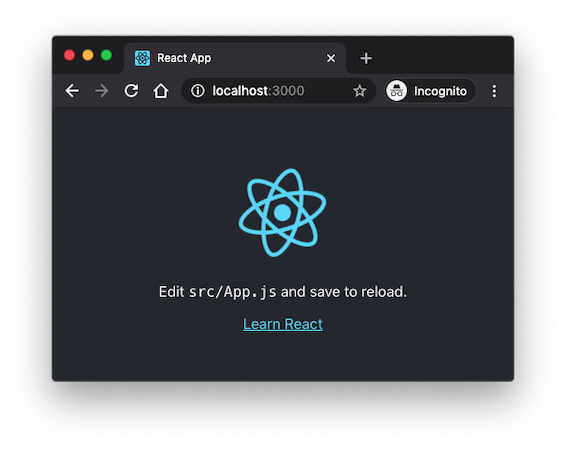
This will take a few seconds and then a browser window will open with the example application from React loaded from http://localhost:3000:
When you have the frontend running, switch to your second terminal and start the Flask backend at http://localhost:5000:
$ yarn start-api
Now both the frontend and backend are running. The frontend will redirect any requests it does not recognize to the backend. Both are watching their source code files and will restart when changes are made. I find this setup very convenient, because now I can just concentrate on writing code and the two servers refresh automatically as the code changes.
Invoking a Flask Endpoint from React
To complete this project, I'm going to expand the React application with a call to the /time endpoint that I defined in the Flask side. The main source file for the React application is src/App.js. This is this file after I put my changes:
import React, { useState, useEffect } from 'react';
import logo from './logo.svg';
import './App.css';

function App() {
  const [currentTime, setCurrentTime] = useState(0);

  useEffect(() => {
    fetch('/time').then(res => res.json()).then(data => {
      setCurrentTime(data.time);
    });
  }, []);

  return (
    <div className="App">
      <header className="App-header">

        ... no changes in this part ...

        <p>The current time is {currentTime}.</p>
      </header>
    </div>
  );
}

export default App;
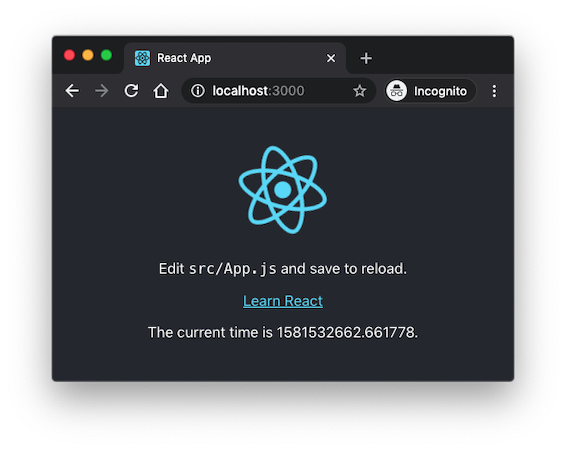
As soon as you save the src/App.js file with the above changes, the application should update and show the current Unix time:
There are a few small changes here. In the first line I added two new imports, useState and useEffect. I'm going to use the former to add the current time as state within the React application. The latter is used to create a callback that will be invoked when the application renders to the page, which is the time the Flask endpoint needs to be invoked.
In case you are used to writing React applications using classes and components, you should note that you can still do that, but the currently recommended practice is to use a function based approach. JavaScript projects tend to change often, sometimes in drastic ways. You should keep in mind that this isn't the only way to write a React application.
To add state to the application you use the useState() function:
const [currentTime, setCurrentTime] = useState(0);
The function returns two values, a getter and a setter for the new state. The getter is a simple variable, while the setter is a function. Using a setter function is necessary because by invoking the setter React is able to trigger updates in the parts of the application that depend on this state. The 0 that I'm passing as an argument to useState() is the initial value for this state variable.
Now that the state variable exists, it can be added to the template portion of the application:
<p>The current time is {currentTime}.</p>
This can be added anywhere in the template, and in fact, if you prefer you can erase the content used by the default React application and replace it with this.
The final part of this example application is to issue a request from the frontend to the backend:
  useEffect(() => {
    fetch('/time').then(res => res.json()).then(data => {
      setCurrentTime(data.time);
    });
  }, []);
This needs to happen at a specific time when the React application is about to be displayed on the page. The useEffect() function is used to set up a callback function to be invoked when the application needs to prepare itself to render.
The first argument is the callback function. In this function I used fetch() to send the request over to the Flask API. Because of the proxy configuration I don't have to use the port 5000 URL, I can just use /time, which will make the request go to http://localhost:3000/time, before it gets redirected to port 5000. If you decide to not use the proxy feature and send the requests directly to port 5000, you will also need to configure CORS in the Flask server to allow this, since now you will be issuing the request across different origins.
The fetch() function returns a promise, so I set up a completion callback with the then() method. This callback receives the response as res, and then calls the res.json() method to convert the payload to a JavaScript object. This is yet another promise, so I have to chain a second then() with one more callback function. This final callback receives the JSON data from the request, which is an object with a single time attribute. Here I can use the setCurrentTime() setter function to update the currentTime state, which is referenced in the template, so as soon as the state changes the new value will be rendered.
The second argument to useEffect() is optional and can be set to the list of state variables on which this callback depends. In this case I wanted to display the time when the page appears initially and then stay fixed to that, so I'm sending an empty list to eliminate all dependencies. This means that this callback will be invoked on initial rendering and never again. If this argument isn't set, the default is to make this callback dependent on all state variables. This means that when the setCurrentTime() setter is called there will be another call into this function, which will cause the state to change again and keep causing recursive invocations in an endless loop.
Update: I have now written a second part to this tutorial where I show how to deploy this project to a production server.
Conclusion
So that's it, now you know how to create a project that combines React with Flask. As I hinted earlier, this isn't the only way to combine these two frameworks, so I encourage you to experiment with them and find what works best for you.
Do you use a different method? I'd love to know how you think it compares to mine, so let me know below in the comments!
Become a Patron!
Hello, and thank you for visiting my blog! If you enjoyed this article, please consider supporting my work on this blog on Patreon!

-
#151 Benjamin said
hi Miguel,
I'll paste here how I got it to work with code server (not sure all of these settings are needed, but maybe they are helpful for somebody else in the future):
1) Added an ".env.development" next to the package.json, with the following content:
REACT_APP_PUBLIC_URL_API=/absproxy/5000
PUBLIC_URL=/absproxy/3000
DANGEROUSLY_DISABLE_HOST_CHECK=true2) Changed in package json the "start" line:
From: "start": "eact-scripts start",
To: "start": "export SET NODE_OPTIONS=--openssl-legacy-provider && react-scripts start",3) Changed the App.js by
- changing fetch('/api/time') to fetch(process.env.REACT_APP_PUBLIC_URL_API + '/api/time')
- changing <BrowserRouter> to <BrowserRouter basename={process.env.PUBLIC_URL}>3) Added an empty .env in the "api" folder (since otherwise it tried using my docker .env file to which the container has no access)
4) Added in .flaskenv the following parameter: REACT_APP_PUBLIC_URL_API=/absproxy/5000
5) Changed in api.py, and added the following on the top:
import os
FLASK_ENV = os.environ['FLASK_ENV']
REACT_APP_PUBLIC_URL_API = os.environ['REACT_APP_PUBLIC_URL_API']6) Changed in api.py the route /api/time to:
@app.route((REACT_APP_PUBLIC_URL_API if FLASK_ENV == 'development' else '') + '/api/time')7) Changing the requirements.txt and updating MarkupSafe from 2.0.1 to 2.1.3