Easy WebSockets with Flask and Gevent
Posted by
on underThis weekend I decided to take a short vacation from my book writing effort and spend time on a project I wanted to work on for a long time. The result of this effort is a brand new Flask extension that I think is pretty cool.
I'm happy to introduce Flask-SocketIO, a very easy to use extension that enables WebSocket communications in Flask applications.
What is WebSocket?
WebSocket is a new communication protocol introduced with HTML5, mainly to be implemented by web clients and servers, though it can also be implemented outside of the web.
Unlike HTTP connections, a WebSocket connection is a permanent, bi-directional communication channel between a client and the server, where either one can initiate an exchange. Once established, the connection remains available until one of the parties disconnects from it.
WebSocket connections are useful for games or web sites that need to display live information with very low latency. Before this protocol existed there were other much less efficient approaches to achieve the same result such as Comet.
The following web browsers support the WebSocket protocol:
- Chrome 14
- Safari 6
- Firefox 6
- Internet Explorer 10
What is SocketIO?
SocketIO is a cross-browser Javascript library that abstracts the client application from the actual transport protocol. For modern browsers the WebSocket protocol is used, but for older browsers that don't have WebSocket SocketIO emulates the connection using one of the older solutions, the best one available for each given client.
The important fact is that in all cases the application uses the same interface, the different transport mechanisms are abstracted behind a common API, so using SocketIO you can be pretty much sure that any browser out there will be able to connect to your application, and that for every browser the most efficient method available will be used.
What about Flask-Sockets?
A while ago Kenneth Reitz published Flask-Sockets, another extension for Flask that makes the use of WebSocket accessible to Flask applications.
The main difference between Flask-Sockets and Flask-SocketIO is that the former wraps the native WebSocket protocol (through the use of the gevent-websocket project), so it can only be used by the most modern browsers that have native support. Flask-SocketIO transparently downgrades itself for older browsers.
Another difference is that Flask-SocketIO implements the message passing protocol exposed by the SocketIO Javascript library. Flask-Sockets just implements the communication channel, what is sent on it is entirely up to the application.
Flask-SocketIO also creates an environment for event handlers that is close to that of regular view functions, including the creation of application and request contexts. There are some important exceptions to this explained in the documentation, however.
A Flask-SocketIO Server
Installation of Flask-SocketIO is very simple:
$ pip install flask-socketio
Below is an example Flask application that implements Flask-SocketIO:
from flask import Flask, render_template
from flask_socketio import SocketIO, emit

app = Flask(__name__)
app.config['SECRET_KEY'] = 'secret!'
socketio = SocketIO(app)

@app.route('/')
def index():
    return render_template('index.html')

@socketio.on('my event')
def test_message(message):
    emit('my response', {'data': message['data']})

@socketio.on('my broadcast event')
def test_message(message):
    emit('my response', {'data': message['data']}, broadcast=True)

@socketio.on('connect')
def test_connect():
    emit('my response', {'data': 'Connected'})

@socketio.on('disconnect')
def test_disconnect():
    print('Client disconnected')

if __name__ == '__main__':
    socketio.run(app)
The extension is initialized in the usual way, but to simplify the start up of the server a custom run() method is used instead of flask run or app.run(). This method starts the eventlet or gevent servers if they are installed. Using gunicorn with the eventlet or gevent workers should also work. The run() method takes optional host and port arguments, but by default it will listen on localhost:5000 like Flask's development web server.
The only traditional route in this application is /, which serves index.html, a web document that contains the client implementation of this example.
To receive WebSocket messages from the client the application defines event handlers using the socketio.on decorator.
The first argument to the decorator is the event name. Event names 'connect', 'disconnect', 'message' and 'json' are special events generated by SocketIO. Any other event names are considered custom events.
The 'connect' and 'disconnect' events are self-explanatory. The 'message' event delivers a payload of type string, and the 'json' and custom events deliver a JSON payload, in the form of a Python dictionary.
To send events a Flask server can use the send() and emit() functions provided by Flask-SocketIO. The send() function sends a standard message of string or JSON type to the client. The emit() function sends a message under a custom application-defined event name.
Messages are sent to the connected client by default, but when including the broadcast=True optional argument all clients connected to the namespace receive the message.
A SocketIO Client
Ready to try your hand at some Javascript? The index.html page used by the example server contains a little client application that uses jQuery and SocketIO. The relevant code is shown below:
$(document).ready(function(){
    var socket = io();
    socket.on('my response', function(msg) {
        $('#log').append('<p>Received: ' + msg.data + '</p>');
    });
    $('form#emit').submit(function(event) {
        socket.emit('my event', {data: $('#emit_data').val()});
        return false;
    });
    $('form#broadcast').submit(function(event) {
        socket.emit('my broadcast event', {data: $('#broadcast_data').val()});
        return false;
    });
});
The socket variable is initialized with a SocketIO connection to the server. If the Socket.IO server is hosted at a different URL than the HTTP server, then you can pass a connection URL as an argument to io().
The socket.on() syntax is used in the client side to define an event handler. In this example a custom event with name 'my response' is handled by adding the data attribute of the message payload to the contents of a page element with id log. This element is defined in the HTML portion of the page.
The next two blocks override the behavior of two form submit buttons so that instead of submitting a form over HTTP they trigger the execution of a callback function.
For the form with id emit the submit handler emits a message to the server with name 'my event' that includes a JSON payload with a data attribute set to the value of the text field in that form.
The second form, with id broadcast does the same thing, but sends the data under a different event name called 'my broadcast event'.
If you now go back to the server code you can review the handlers for these two custom events. For 'my event' the server just echoes the payload back to the client in a message sent under event name 'my response', which is handled by showing the payload in the page. The event named 'my broadcast event' does something similar, but instead of echoing back to the client alone it broadcasts the message to all connected clients, also under the 'my response' event.
You can view the complete HTML document in the GitHub repository.
Running the Example
To run this example you first need to download the code from GitHub. For this you have two options:
- Clone the repository with git
- Download the project as a zip file.
The example application is in the example directory, so cd to it to begin.
To keep your global Python interpreter clean it is a good idea to make a virtual environment:
$ virtualenv venv
$ . venv/bin/activate
Then you need to install the dependencies:
(venv) $ pip install -r requirements.txt
Finally you can run the application:
(venv) $ python app.py
Now open your web browser and navigate to http://localhost:5000 and you will get a page with two forms as shown in the following screenshot:
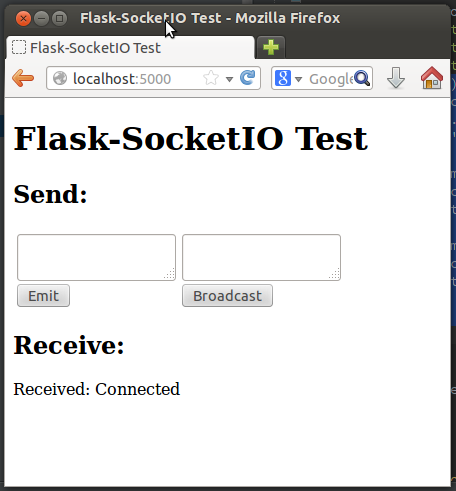
Any text you submit from any of the two text fields will be sent to the server over the SocketIO connection, and the server will echo it back to the client, which will append the message to the "Receive" part of the page, where you can already see the message sent by the 'connect' event handler from the server.
Things get much more interesting if you connect a second browser to the application. In my case I'm testing this with Firefox and Chrome, but any two browsers that you run on your machine will do. If you prefer to access the server from multiple machines you can do that too, but you first need to change the start up command to socketio.run(app, host='0.0.0.0') so that the server listens on the public network interface.
With two or more clients when you submit a text from the form on the left only the client that submitted the message gets the echoed response. If you submit from the form on the right the server broadcasts the message to all connected clients, so all get the reply.
If a client disconnects (for example if you close the browser window) the server will detect it a few seconds later and send a disconnect event to the application. The console will print a message to that effect.
Final Words
For a more complete description of this extension please read the documentation. If you want to make improvements to it feel free to fork it and then submit a pull request.
I hope you make cool applications with this extension. I can tell you that I had a lot of fun implementing this extension.
If you make something with it feel free to post links in the comments below.
Miguel
Become a Patron!
Hello, and thank you for visiting my blog! If you enjoyed this article, please consider supporting my work on this blog on Patreon!

-
#51 Miguel Grinberg said
@Tom: You have to start gunicorn with the gevent worker, and this is done by adding "-k gevent" to the cmd line.
-
#52 Miguel Grinberg said
@Tom: actually, no, scratch that. You need the specialized socketio worker, the command is:
gunicorn --worker-class socketio.sgunicorn.GeventSocketIOWorker module:app
where module:app point to your application. -
#53 Tom T. said
Thanks for the fast answer, this works!
Another question: is this extension capable of working together with flask-sqlalchemy? I mean, does it automatically closes db sessions after a event was called?
-
#54 Miguel Grinberg said
@Tom: No, the extension does not invoke your before/after_request handlers, the dynamics of websocket are different and you will not always want socket handlers to behave like regular request handlers. You would normally use a websocket channel for low latency communication, so it is best to leave the db session management to the application, the extension does not know enough to do this properly.
-
#55 Tom T. said
Alright, i think i have to dig a bit deeper to figure this out.
Anyway, thanks for your answers! -
#56 Jani said
I don't know if this is silly question but here goes.
Do I need to care about synchronizing something if two connections are trying to access same variable on the server. Or if I want to do some multiplayer game which stores data for example in MongoDB, do I need to be aware of something that's not immediately obvious? -
#57 Marcin W said
Hi I have a small problem with gunicorn --worker-class socketio.sgunicorn.GeventSocketIOWorker module:app and flask, when i try to emit message from server as originator to all connected clients i am getting error message 'SocketIO' object has no attribute 'server'. On other hand when i am using flask build in server for dev purpose then app work correct and all clients get the message. Can you pleas tell me what could be the reason for such behavior ?
-
#58 Miguel Grinberg said
@Jani: The important thing is that all the libraries that you use for database or other functions are compatible with gevent.
-
#59 Miguel Grinberg said
@Marcin: I have fixed your problem in release 0.3.2 of the extension. Please upgrade and let me know if you can make it work.
-
#60 Marcin w said
Hi
The upgrade fix the problem. Thanks. -
#61 Akshay said
I am sorry if this sounds stupid but I am having a tough time to understand the concept of namespace here. What exactly does a namespace represent.
Thanks
-
#62 Akshay Kumar said
Hi , I downloaded your project it works fine, but when I do the same on my existing application even the connect handler isn't working. It shows that 'No handlers could be found for logger "socketio.virtsocket'. Can you please tell where I might be going wrong.
Thanks
-
#63 Miguel Grinberg said
@Akshay: namespaces are a SocketIO thing. They allow you to have several independent channels of communication multiplexed in a single physically connection. If you just one one line of communication then you don't need to use namespaces.
-
#64 Miguel Grinberg said
@Akshay: Have you included the JavaScript code in your HTML?
-
#65 Akshay said
Yes I have included JavaScript. I figured out that if I restructure your example and instead of using app as a module I create a package named app and structure it accordingly(http://flask.pocoo.org/docs/patterns/packages/) creating init.py and runserver.py then also it is not working. So may be something is going wrong with my imports or initialization
-
#66 Miguel Grinberg said
@Akshay: post the project to github or bitbucket so that I can see it, happy to take a look.
-
#67 b leiman said
hi - nice tutorial (along with your others)
I'd like to use the Flask-SocketIO in slightly different way. After taking a look at the source code I was still not able to figure how to do this. Maybe you have an idea.
I'm try to use websocket s to send announcements from the server to the client.For instance the client annouces who he is upon starting a wensocket (or immediatly after). The server save the pair of name and socket. The server sends from time to time "uncast" messages to a specific client.
What I can't figure out is how to save/access a specific websocket in order to use later.
Any ideas?
Thanks
-
#68 Miguel Grinberg said
@b: you can save the request.namespace object in the connect event and then send messages by calling emit() on it. Another alternative is to put each user in a different room by calling join_room() in the connect event, then broadcast your messages to the room of the user you want. The room names could be encoded with a name that is easy to generate with user information that you have, such as the username, email, etc.
-
#69 Akshay Kumar said
I figured it out my imports were going wrong, I was using a different socketio object in my views.py and binding a different socketio object to my app. Anyways thanks a lot .
-
#70 Steven Elliott said
Well, you've certainly topped yourself here. This saved me! The Python community is very luck to have you!
-
#71 samir said
I try to run the socketio example I get an KeyError: 'socketio' on line 61 ("socketio = environ['socketio']").
i use python 2.7
-
#72 Miguel Grinberg said
@samir: you need to use the gevent-socketio server. If you are using Gunicorn then use the worker from this project. See previous comments for the command line.
-
#73 samir said
thank you for the reply.
i try this command : gunicorn -k gevent --bind 127.0.0.1:5000 my_server:appi had this error :
File "/usr/local/lib/python2.7/dist-packages/socketio/init.py", line 67, in socketio_manage socket = environ['socketio'] KeyError: 'socketio'
How i can use the gevent-socketio please ?(i use linux(ubuntu ) and python 2.7)
-
#74 Miguel Grinberg said
@samir: you are using the wrong command. Use this:
gunicorn --worker-class socketio.sgunicorn.GeventSocketIOWorker module:app -
#75 Lars Heer said
Hi... I'm stuck in a blueprint question too...
I've created the main part, which contains:
app.register_blueprint(MyUrlService,url_prefix='/MyUrl')
socketio = SocketIO(app)I can emit messages to all clients from here without problems.
Now I'd like to emit (broadcast) from the named blueprint and did it like the following:
socketio = SocketIO(current_app)
socketio.emit('status', 'data',namespace='/MyUrl')This does not appear at the client side. Am I completely wrong...or is this the way it should work?


