A cheap Bluetooth serial port for your Raspberry Pi
Posted by
on under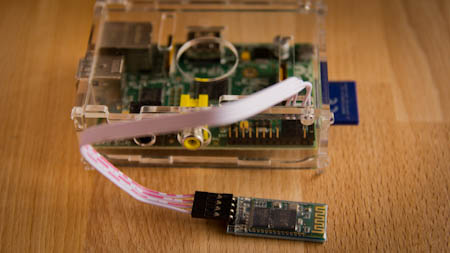
While working on my Arduino based robot vehicle project the idea came to me that the Bluetooth module that I'm using as a remote control receiver for my robot would make a great addition to my Raspberry Pi.
In this article I describe how to enable the Raspberry Pi's serial port to talk to other devices over Bluetooth using this module.
Required hardware
The nice aspect of this project is that it requires very little hardware, most of the action happens in the software side. But of course we do need some hardware, which I list below:
-
A Raspberry Pi.
If you have been living under a rock or in another planet for the last year or two and never heard of the Raspberry Pi then you should know that this is a credit card sized Linux computer created in the UK that sells for just $35 USD. I've got mine through Element 14.
-
A Bluetooth slave module
This is a small and inexpensive Bluetooth to serial adapter that is mainly targeted to Arduino users. I've got mine from the Virtuabotix store at Amazon.com for $14.95. The Chinese electronics stores on Ebay sell it for less, but of course you have to wait longer to get it.
-
Four female-to-female breadboard wires
If you buy the Bluetooth module from the Virtuabotix store at Amazon (link above) then you get the wires included with it. If you are buying from another place you may want to ask if wires are included or sold separately.
-
A computer or device with a Bluetooth terminal software
To establish a communication with the Raspberry Pi over Bluetooth you need another device that can speak Bluetooth. If your computer has a Bluetooth adapter then you just need to find a terminal software that you can use to send and receive data, like HyperTerminal on Windows, or
screenon OS X and Linux. A computer is not the only choice, though. For example, I will use my Android cell phone with the free BlueTerm app installed.
Wiring
The wiring is very simple and is better explained with a diagram:
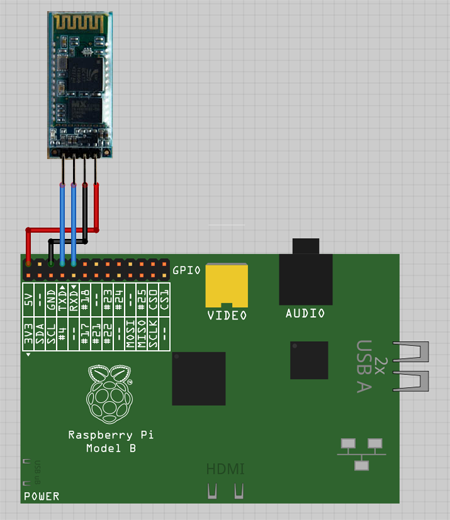
If you prefer to see it in table format, here are the four connections that you need to make:
| RPi GPIO pin | BT module pin |
|---|---|
| 5V (Pin #2) | VCC |
| GND (Pin #6) | GND |
| TXD (Pin #8) | RXD |
| RXD (Pin #10) | TXD |
Note that the TXD and RXD connections between the RPi and the Bluetooth module are crossed, this is what makes one end receive what the other end sends.
Raspberry Pi configuration
I'm going to assume you are running a recent release of Raspbian on your Raspberry Pi. If you are running another OS then you will need to find out how the changes below are done in your system.
By default the Raspberry Pi is configured to write boot time messages to the serial port, and also to start a login console on it. Unfortunately, the default baud rate that the RPi uses for its serial port is 115200 bps, while the Bluetooth module comes preconfigured from factory to 9600 bps.
It is easier to configure the RPi to use 9600 bps so we will try that first. There are two config files that need to be updated.
File /boot/cmdline.txt contains the kernel options that are used to boot the system. In my Raspbian based system this file contains the following options:
dwc_otg.lpm_enable=0 console=ttyAMA0,115200 kgdboc=ttyAMA0,115200 console=tty1 root=/dev/mmcblk0p2 rootfstype=ext4 elevator=deadline rootwait
The interesting options are console and kgdboc, because these configure the serial port device /dev/ttyAMA0 to 115200 bps. You need to change these two configurations to 9600 bps. After you make these changes the file should read:
dwc_otg.lpm_enable=0 console=ttyAMA0,9600 kgdboc=ttyAMA0,9600 console=tty1 root=/dev/mmcblk0p2 rootfstype=ext4 elevator=deadline rootwait
The second configuration file is /etc/inittab. Inside this file you have to locate the following line:
T0:23:respawn:/sbin/getty -L ttyAMA0 115200 vt100
This tells the system to start a terminal on the serial port, and again it uses 115200 bps to configure the port. You have to change this line to use 9600 bps:
T0:23:respawn:/sbin/getty -L ttyAMA0 9600 vt100
Remeber that these are configuration files so they are not writable to the default pi user, to edit these files you have to use sudo. As far as text editors, Raspbian provides two, vi and pico. If you don't know either then you will probably be more confortable using pico. For example, to edit cmdline.txt with pico you would run the following command:
$ sudo pico /boot/cmdline.txt
The system will ask for your password and after that you will be able to make changes to this file. I recommend that you save original copies of these config files in case you make a mistake.
With those changes made the RPi is configured to talk to the Bluetooth module. If you now power up your Raspberry Pi you will notice that the LED in the Bluetooth module blinks rapidly. This is the sign that the Bluetooth module is ready and waiting to be paired with another device.
Connecting from a Bluetooth terminal
Now leave the RPi running with the Bluetooth module in its blinking state and go to the Bluetooth enabled computer or smartphone that you will connect to it. Your device should now find the Bluetooth module with the name linvor when you set it to discover devices.
If you are using an Android device with BlueTerm then start the app and from the app menu select "Connect device". Android does the baud selection automatically so you don't have to configure it. From a terminal software running in a computer it is likely that you will need to configure the speed, number of data bits per character, parity, and number of stop bits per character. The values you need to use are:
- Speed: 9600 bps
- Data bits: 8 bits
- Parity: None
- Stop bits: 1 bit
The Bluetooth module comes preconfigured with a PIN number. To complete the connection your computer or smartphone will ask you to enter this PIN. The factory default PIN is 1234.
The LED in the Bluetooth module will now stop blinking and remain lit, indicating that it has made a connection.
And here comes the fun part. You need to reboot the Raspberry Pi so that the new serial port settings take effect. To reboot the RPi run the following command in a local or network shell:
$ sudo reboot
Now watch the Bluetooth terminal on your PC or smartphone while the Pi reboots. Boot messages should be appearing on your terminal, and as soon as the RPi is up you should get a login prompt there as well.
You can now login from your Bluetooth terminal and use the command line prompt as you normally would over a local or network shell.
Below is a short video that shows my Raspberry Pi connected to my Android smartphone:
Direct serial port access
While you can't deny there is a coolness factor in being able to run a Raspberry Pi from a smartphone, let's be honest, that isn't extremely useful. But having a wireless serial connection into the RPi can be useful for regular applications, for example for debugging or for remote control.
To be able to use the serial port from a user application running in the Raspberry Pi we first need to tell the system to not use it as a console. To do this we need to go back to the two configuration files we touched before. I once again recommend that you back up your config files before changing them, in case things don't work out well and you need to revert the changes.
In file /boot/cmdline.txt we are going to remove the two serial references by taking away the first console and kgdboc sections:
dwc_otg.lpm_enable=0 console=tty1 root=/dev/mmcblk0p2 rootfstype=ext4 elevator=deadline rootwait
And in file /etc/inittab we will comment out the serial console task:
#T0:23:respawn:/sbin/getty -L ttyAMA0 115200 vt100
After making these changes reboot the system so that they take effect. With these changes the RPi will not use the serial port at all, so the port will be free to any application that wants to use it as /dev/ttyAMA0.
If you want to play with sending and receiving data through the serial port then you can install minicom into your RPi using the following command:
$ sudo apt-get install minicom
And then you can open a terminal on the serial port with this command:
$ minicom -b 9600 -o -D /dev/ttyAMA0
Anything you type inside the minicom terminal will be sent to the serial port, and anything the other side sends will be displayed.
Configuring the Bluetooth module
The Bluetooth module comes preconfigured from the factory with a set of defaults, which are:
- Baud rate: 9600
- Bluetooth ID: linvor
- PIN: 1234
But these values can be changed by sending special commands through the communication channel. Now that the Raspberry Pi is connected to the module we can try this.
These special commands that configure the Bluetooth module can be sent from a connected remote device, or they can be sent from the local system, in this case the Raspberry Pi. Since the Raspberry Pi is the star of the article I'm going to also use it to do the configuration.
Here is a quick summary of the most useful configuration commands:
| Command | Description |
|---|---|
| AT | Test the communication with the Bluetooth module. |
| AT+VERSION | Report the module's version number |
| AT+NAMEname | Change the Bluetooth ID to name (maximum 20 characters). |
| AT+PINnnnn | Change the PIN to nnnn, which must be a four digit number. |
| AT+BAUDn | Change the baud rate. Use one of the following values for n: 2: 2400bps 3: 4800bps 4: 9600bps 5: 19200bps 6: 38400bps 7: 57600bps 8: 115200bps |
One tricky aspect of sending these commands is that the Bluetooth module has a very short timeout, so all the characters in a command must be entered really quickly. The safest way to get the entire command in time is to type it in a text editor window and then use copy/paste to send it really fast.
If your Raspberry Pi session is local, then there is no clipboard support unless you work inside the X environment, so you will need to run startx and then open a Terminal window. If you are using a remote shell over the network then you can use the clipboard in your host operating system.
To send the commands we can use minicom. So let's fire it up one more time:
$ minicom -b 9600 -o -D /dev/ttyAMA0
Note that it isn't necessary to have a connection to do this, so you can do this while the Bluetooth module is in its blinking state.
You now need to use any method to get the string AT into the clipboard, and then hit paste inside the minicom window to send the command to the module.
When you send AT the module should respond with this in the minicom window:
OK
If you get this response then you know that everything is all right. If you don't get a response then for some reason the Raspberry Pi is unable to communicate with the Bluetooth module.
When I send AT+VERSION to the module I get the following response:
OKlinvorV1.5
To change the baud rate to the fastest rate of 115200 we need to issue the command AT+BAUD8, and the module will respond with:
OK115200
Because the baud rate was changed now the communication will break, and we will need to exit and restart minicom with the updated speed:
$ minicom -b 115200 -o -D /dev/ttyAMA0
To change the name of the module to MyBT we must issue the command AT+NAMEMyBT, and the module will respond with:
OKsetname
And to change the PIN to 4321 the command is AT+PIN4321 and the response from the Bluetooth module will be:
OKsetPIN
Note that when the name and/or the PIN change the module requires a power cycle for the changes to take effect.
Also don't forget that if you change the baud rate and later want to reestablish the serial console you will need to change the two config files to reflect the new baud rate you have selected in the Bluetooth module.
Conclusion
I hope this article gives you some ideas to bring new life to the serial port in your Raspberry Pi. If you have any questions feel free to ask below in the comments!
Miguel
Become a Patron!
Hello, and thank you for visiting my blog! If you enjoyed this article, please consider supporting my work on this blog on Patreon!

-
#26 Daniel said
One question: Rebooting in your example is just necessary in order to change settings of the RPi, right? So pairing should be possible always and then immediately start to work over console...? In my scenario, I'd prefer just that. Headless RPi in the middle of nowhere, physically not really accessible and then having a fallback console when WiFi fails.
-
#27 Miguel Grinberg said
@Daniel: Yes, as you can see in the video I have rebooted the Pi after doing the pairing.
-
#28 Daniel said
Hi Miguel,
thanks for replying. Got a bluetooth module today, works exactly as expected, easy on, easy off. I may set it up to work at more than 9600, but that's ok for now ;)
-
#29 Chethana said
I've built an arduino based robot, wanted to make it wireless for communicating it serially with my pc. What are the inclusions that I'm supposed to make in the program after wiring the arduino with the bluetooth serial adapter?
-
#30 Bill said
Indeed a great guide. One small remark, besides slave-only modules one can buy modules configurable as master as well. They cost about the same and give you more possibilities...
-
#31 Ghimire Ashok said
I am trying to change the slide or the content loaded in browser of RPi through the bluetooth terminal, I have a active bt connection btn two devices but how do i configure the different signal received by the RPi can perform different action??
-
#32 staha said
To look at boot through phone, was crazy :) Now there is no need for LCD to tcheck RPI`s IP if needed. Just boot, login and 'ifconfig' :D Not the mention other possibilities :) Thank you, good man, for your hard keyboard-typing work :)
I am writing small app just now for PIC12F675>>ADC>>softUART>RPI but UART behaved badly so was looking for something, and just found your`s interesting post :) As I had JY-MCU, decided to follow and test it :D Nice.
-
#33 Samir Sogay said
Awesome guide about the bluetooth module. I am facing an issue and hopefully you will be able to help. I am able to console to RPi using the bluetooth module but I find it slow. So i followed your other steps to change the baud rate but unfortunately I am not getting any response. First I disabled the serial console and then installed minicom and when I try to send AT to bluetooth module, there is no response. Also, I have a USB to TTL but on this as well there is no response to AT commands. Is there a way you have to enable AT mode? My Bluetooth module is hc05.
-
#34 Miguel Grinberg said
@Samir: I have not used the HC05 myself, so I cannot really comment on how to enable the AT command set. The description page claims it does support AT commands though. Have you seen this guide? http://www.instructables.com/id/Modify-The-HC-05-Bluetooth-Module-Defaults-Using-A/
-
#35 Giorgos K said
Hi miguel ,i couldn't display hc-06 with lsusb or hcitool as a 005 device ,but as a console port as you described above , everything went fine.any ideas of configuring the hc-06 as serial bluetooth port ?Thankss!!
-
#36 Jean-marc Mercy said
Hi.
Very interesting link which came as "Eureka" ! I have successfully linked my pc through rfcomm to the Pi and it solved my one to one connectivity need. Thanks.
A couple of remarks, though (for later users).
The cable is not crossed as you indicate, I have the same one and it has to go straight ... the module seems to be the same though.
Another point to note is that the boot messages will only come when a reboot is done, not a cold boot, as the rfcomm link on the pc is not yet established (is seems to be reset when the Pi shutdowns).Great idea though.
-
#37 Manuel Almeida said
I have made the "Raspberry Pi configuration". I tried to connect my Android phone with BlueTerm but it doesn't find the Pi. I connected my PC through Bluetooth with the Pi, using HyperTerminal. (My phone find the PC by Bluetooth). If I make the changes described in "Direct serial port access" I can´t access the Pi with the HyperTerminal by Bluetooth. Deleting the changes made of "Direct serial port access", I used minicom to transfer a file with the HyperTerminal but it is allways having error during the transfer. Please help.
-
#38 Kardacian said
Could I use this BT module on a serial port of a server or a network router. Today I use a 9 pin adapter and a long patch cable to servers and routers in a rack. Having BT to eliminate the cable would be very handy. Just not sure about all the pinouts.
-
#39 krishna gaihre said
What i need is to connect raspberry pi with projector (using hdmi cable)
and allow slides on any android phones to be displayed via projector wirelessly
as well as changing of slides on android device to be shown in projector in real time.
Please reply me !! -
#40 Muhamad Veri said
hay, i have do like your tutorial, and my android want connect with bluetooth in raspy, but when im reboot nothing happend in my bluetooth terminal, can you help me? thx
-
#41 MinSeokBae said
Hey! Miguel
I'm glad to see you in here, Thank a lot for good idea for communicating with B/T..But I have a error message for
<bcm2708-i2s bcm2708-i2s.o : Failed to create debugfs directory>
Please tell me why?
So long!!! -
#42 strawb said
Hi, this is a bit old post, but I have a question and I was hoping you could help: are there any bluetooth modules similar to the one used in your post that use bluetooth 3.0 technology - if yes where could it be bought - and could it actually work (what is the maximum baud rate for raspberry pi UART)? Thanks in advance.
-
#43 maihoaomv said
i finally got to trying it on the rpi. works great. the bt module i bought defaulted to 115200 (lucky me) so it came up and worked on the first try without any configuration. works very well with the android using blue term and linux using c-kermit (minicom will probably work to). only hard part was getting linux mint 17 to reconnect after complete power down of the rpi. just turning off/on bt didn't work. had to pull the dongle.
my biggest concern is security. anyone within range (or professional equipment) could easlier log into the console and use it as a gateway into my lan. it was a fun project but it's not practical for a server connected to a lan with other computers on the same lan.
-
#44 Miguel Grinberg said
@maihoaomv: fully agree that this is not a secure solution at all. You would need to implement encryption on top of the serial channel to make it secure.
-
#45 Hardik said
awesome tutorial, that's what exactly I need.
-
#46 Mike said
Hi there, I did everything step by step! But once I get at the Ctrl+A I don't see the gray box at the bottom, which should appear so can give me more instructions on how I can see the response or how I can enter the command more properly such as AT
-
#47 Miguel Grinberg said
@Mike: not sure I understand. What are you trying to do with Ctrl-A? Any chance you configured a different meta key?
-
#48 Alexander said
Hi everybody,
thanks for this guide, works quite well. I can connect with Blueterm and it works.
Has anyone found a way to send ctrl+c via Blueterm if a program doesn't terminate? I tried it with @, but it didn't work.
Regards,
Alex -
#49 Nils Eriksson said
Hello :) im just wondering if i can use a regular bluetooth usb dongle ?
What is the diffrence :) tnx ! -
#50 Miguel Grinberg said
@Nills: maybe it works, as long as there are drivers for the Pi.